Images
Encord provides comprehensive support for image annotation. With the image editor, you can:
- Label using any annotation type such as bounding boxes, rotatable boxes, polygons, polylines, keypoints, and primitives
- Create frame-level & object classifications
- Object detection and instance segmentation
- Reduce manual annotations with automation (e.g., importing model predictions) features
Task Management
Before we get into the details of the label editor and making annotations, a quick note about scheduling annotation work. Annotation is done in the annotation phase of the task management system. In order to ensure annotation work is saved properly, it's crucial that each labeling task is properly assigned to an annotator, annotators always access the task through the Queue tab in the Task Management System, and only the assigned annotator works on any given task at any given time.
Annotation types
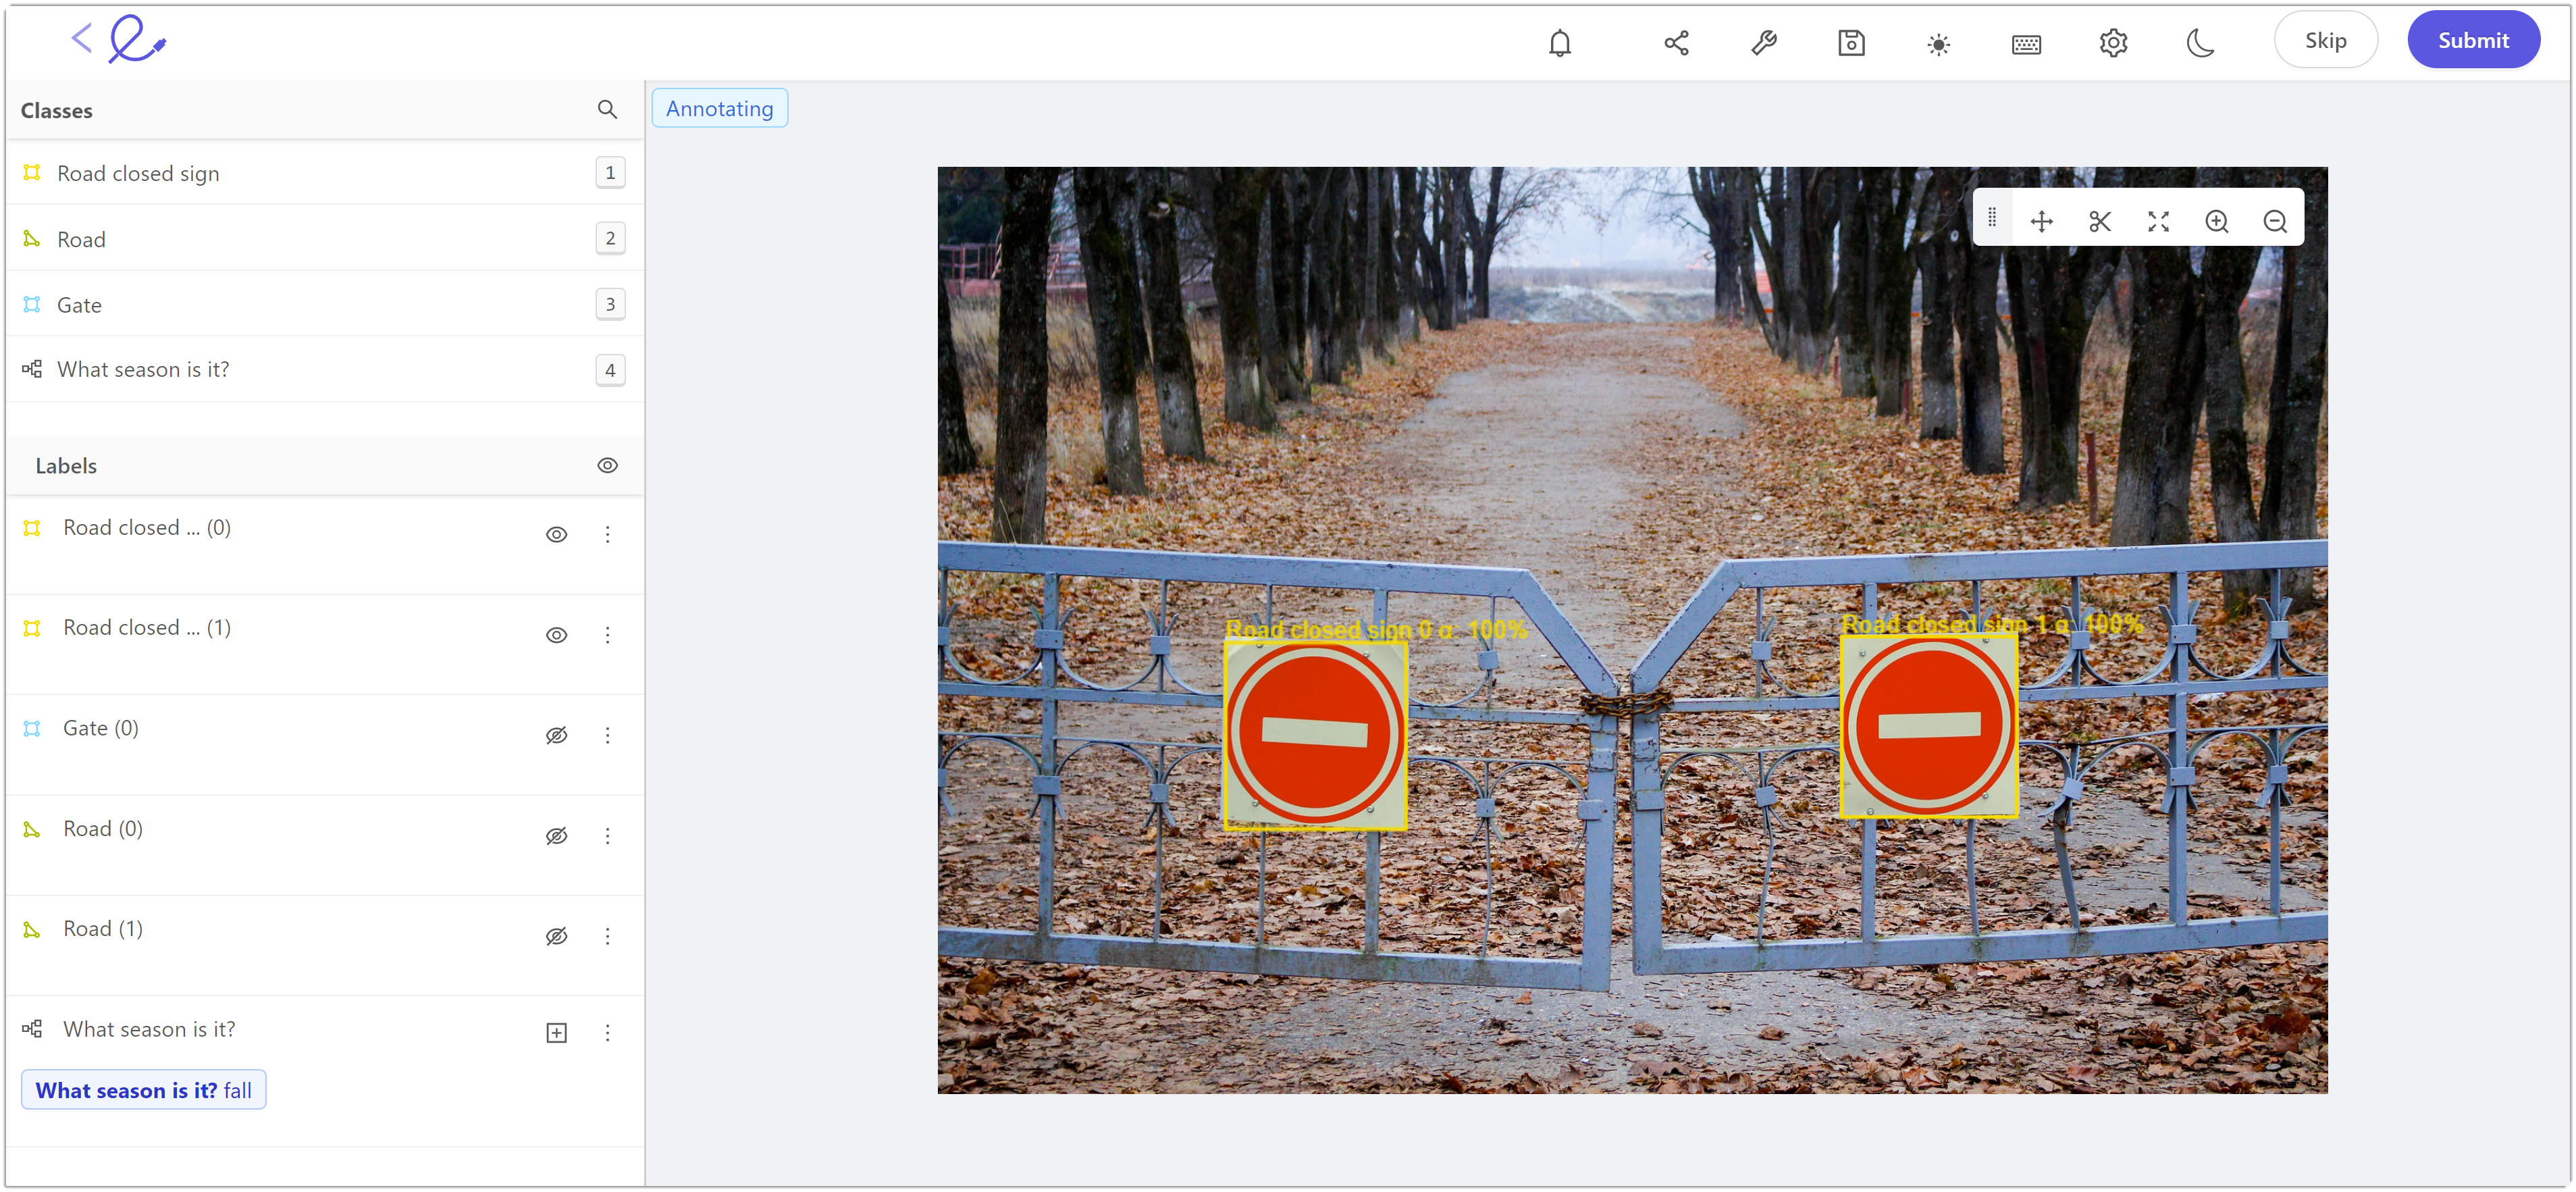
Objects are annotated using bounding boxes, polygons, polylines, keypoints or primitives. Frames are annotated using classifications. Instantiating objects or classifications in the image editor generates a UUID that uniquely identifies that label in the frame.
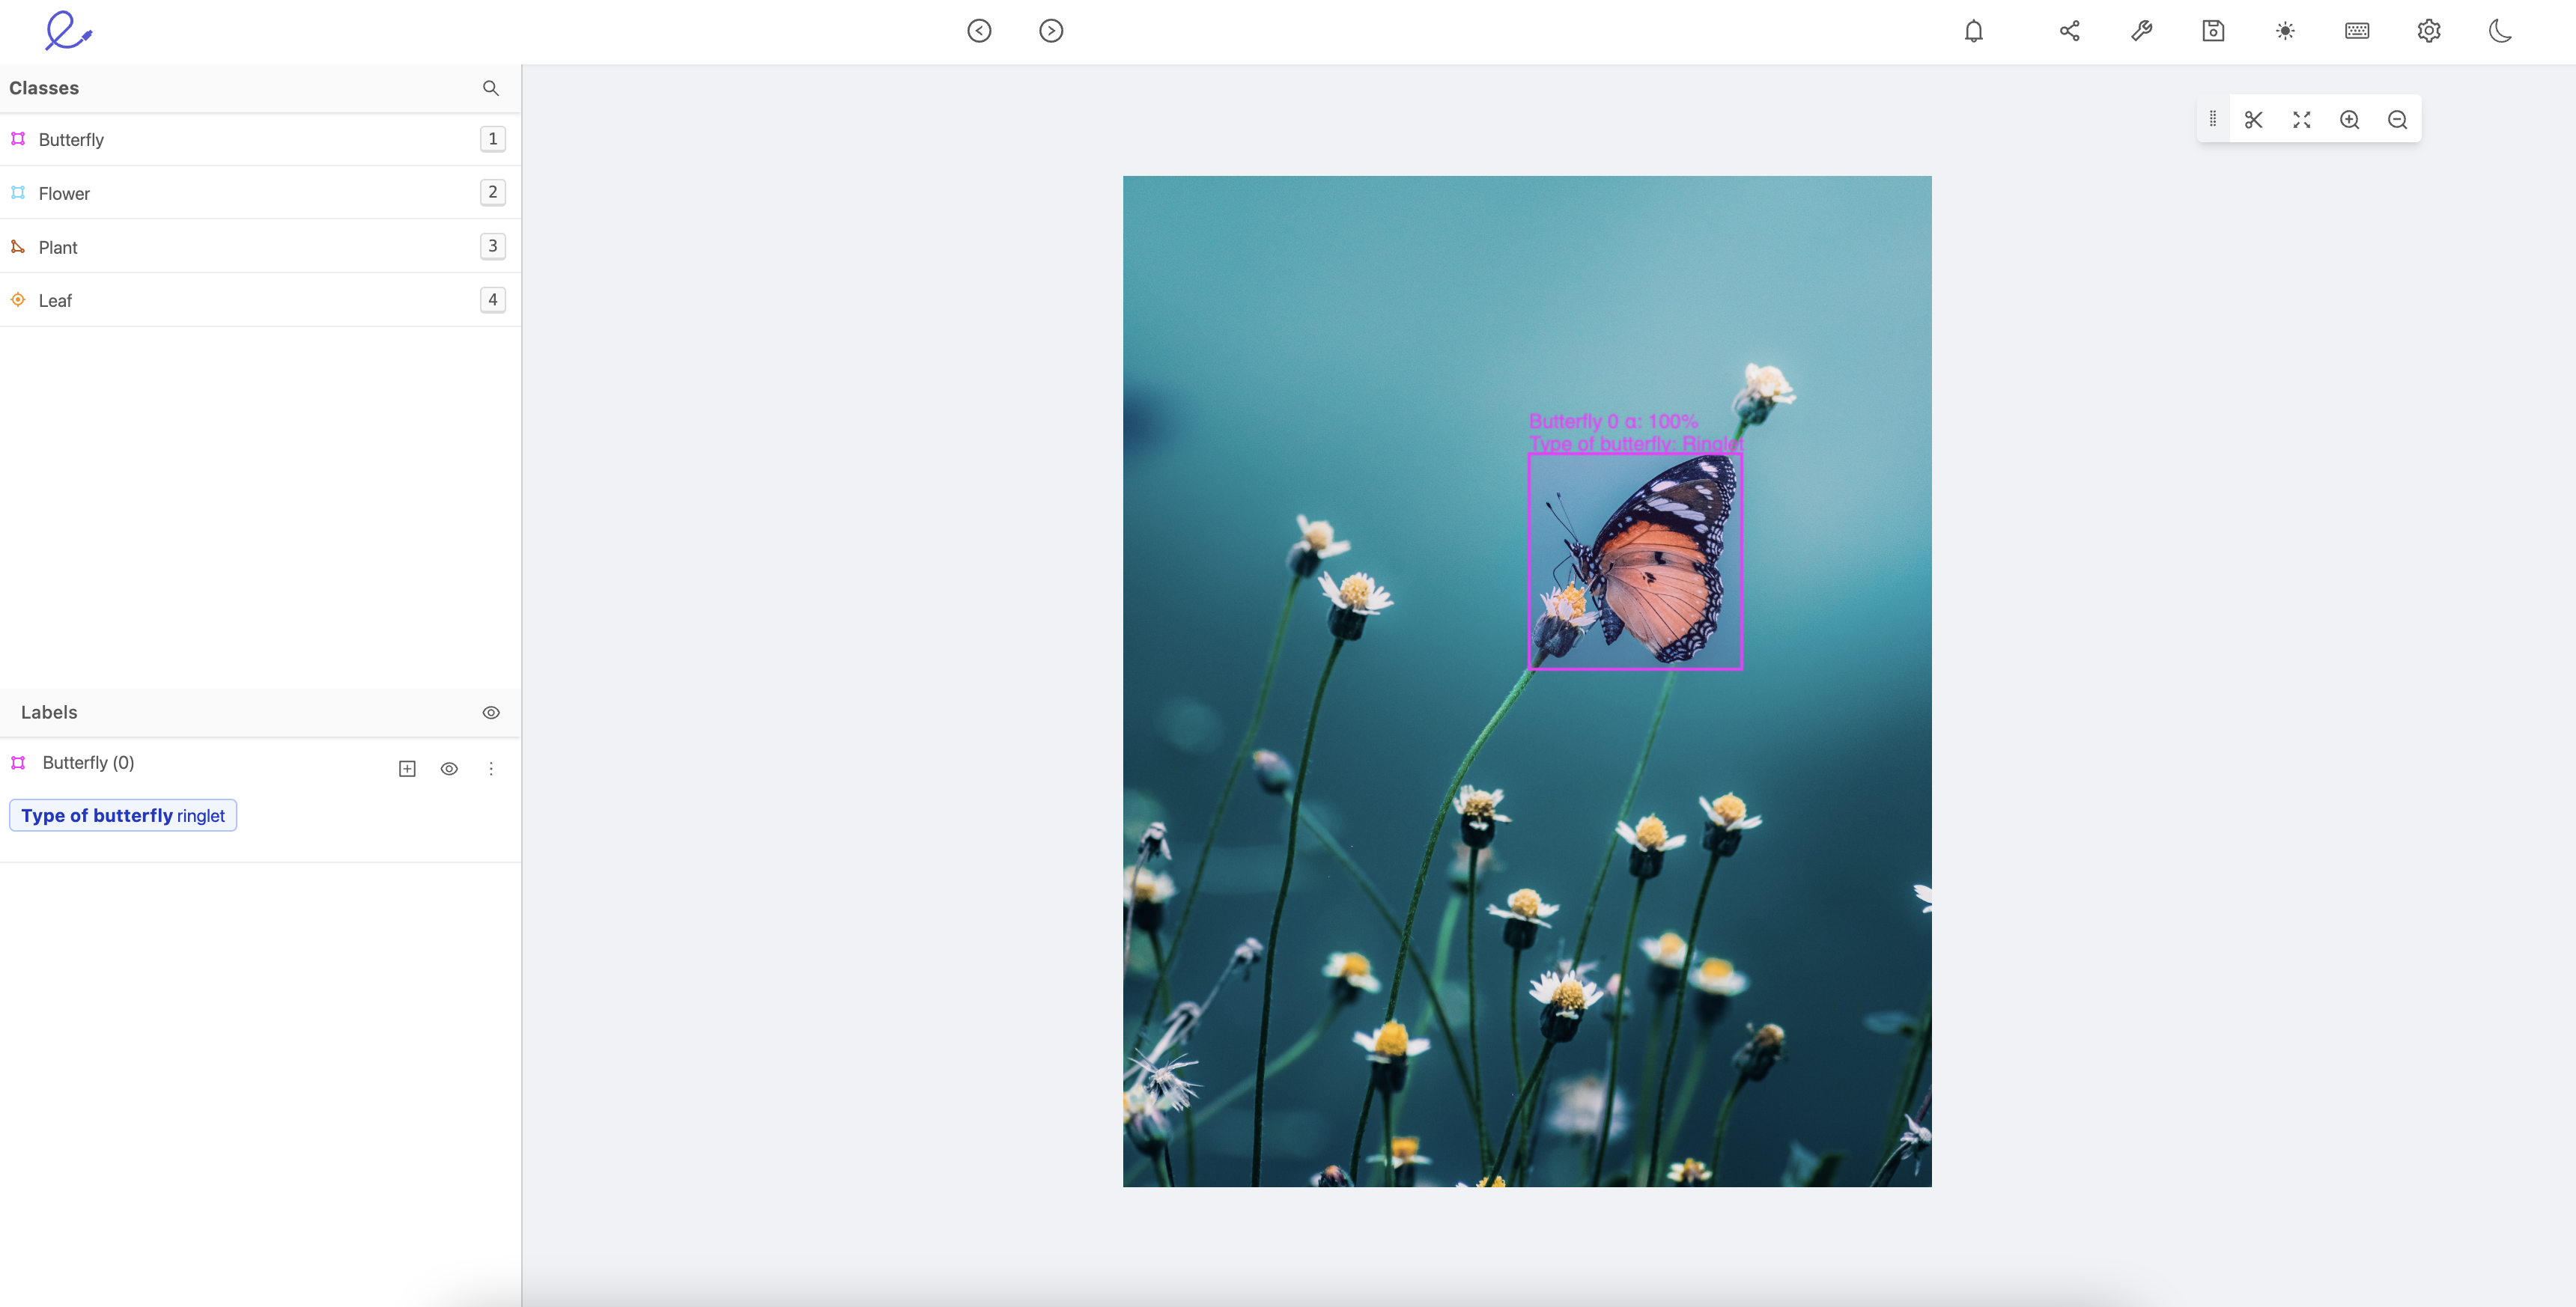
Labels can be assigned with static classifications as defined in the specified ontology. Static classifications define the global properties of an object (e.g., the butterfly is of type red admiral and is orange).
You can read more about automation for image annotation here.
Bounding box
Creating a bounding box requires an ontology with a bounding box annotation type. Instantiate a new bounding box label by clicking on the specified class in the 'Classes' menu, or by using the specified hotkey (e.g., 1, 2, 3).
Bounding box labels can be assigned with static classifications should they be defined in your ontology:
- Highlight an object by clicking on it in the editor canvas or by clicking on the Plus icon or start/end frame in the range overview for the specified bounding box
- Assign a classifications by clicking on the relevant buttons or using the set hotkeys (e.g., q, u).
Rotatable box
Traditional bounding boxes are great for annotating objects that appear in horizontal or vertical orientation, however, their accuracy may be limited when it comes to annotating objects at an angle. In such cases, use rotatable boxes to produce more accurate annotations.
Creating a rotatable bounding box requires an ontology with a rotatable box annotation type. Instantiate a new rotatable box label by clicking on the specified class in the 'Classes' menu or using the specified hotkey. Resize rotatable boxes like normal bounding boxes, and then grab the rotation handle to adjust the position until you're satisfied with the annotation's accuracy, as below.
Rotatable boxes can be assigned static classifications should they be defined in your ontology, and you can export the labels as usual.
Polygon
Polygons are often necessary if you want to train your applications on the tightest object boundaries. Creating a polygon requires an ontology with a polygon annotation type. Enable or disable free-hand drawing mode by pressing d on your keyboard. Polygon coarseness for polygons drawn free-hand is set in the 'Settings' drawer in the Drawing settings dropdown. Instantiate a new polygon label by clicking on the specified class in the 'Classes' menu or using the specified hotkey (e.g., 1, 2, 3).
A polygon can be closed by double-clicking anywhere on the canvas. Doing so will "snap" creating an edge between the last vertex to the first vertex drawn.
Polygon labels can be assigned static classifications should they be defined in your ontology:
- Highlight an object by clicking on it in the editor canvas or by clicking on the Plus icon or start/end frame in the range overview for the specified polygon
- Assign a classifications by clicking on the relevant buttons or using the set hotkeys (e.g., q, u)
Here's an illustration of an image containing polygon and polyline objects.
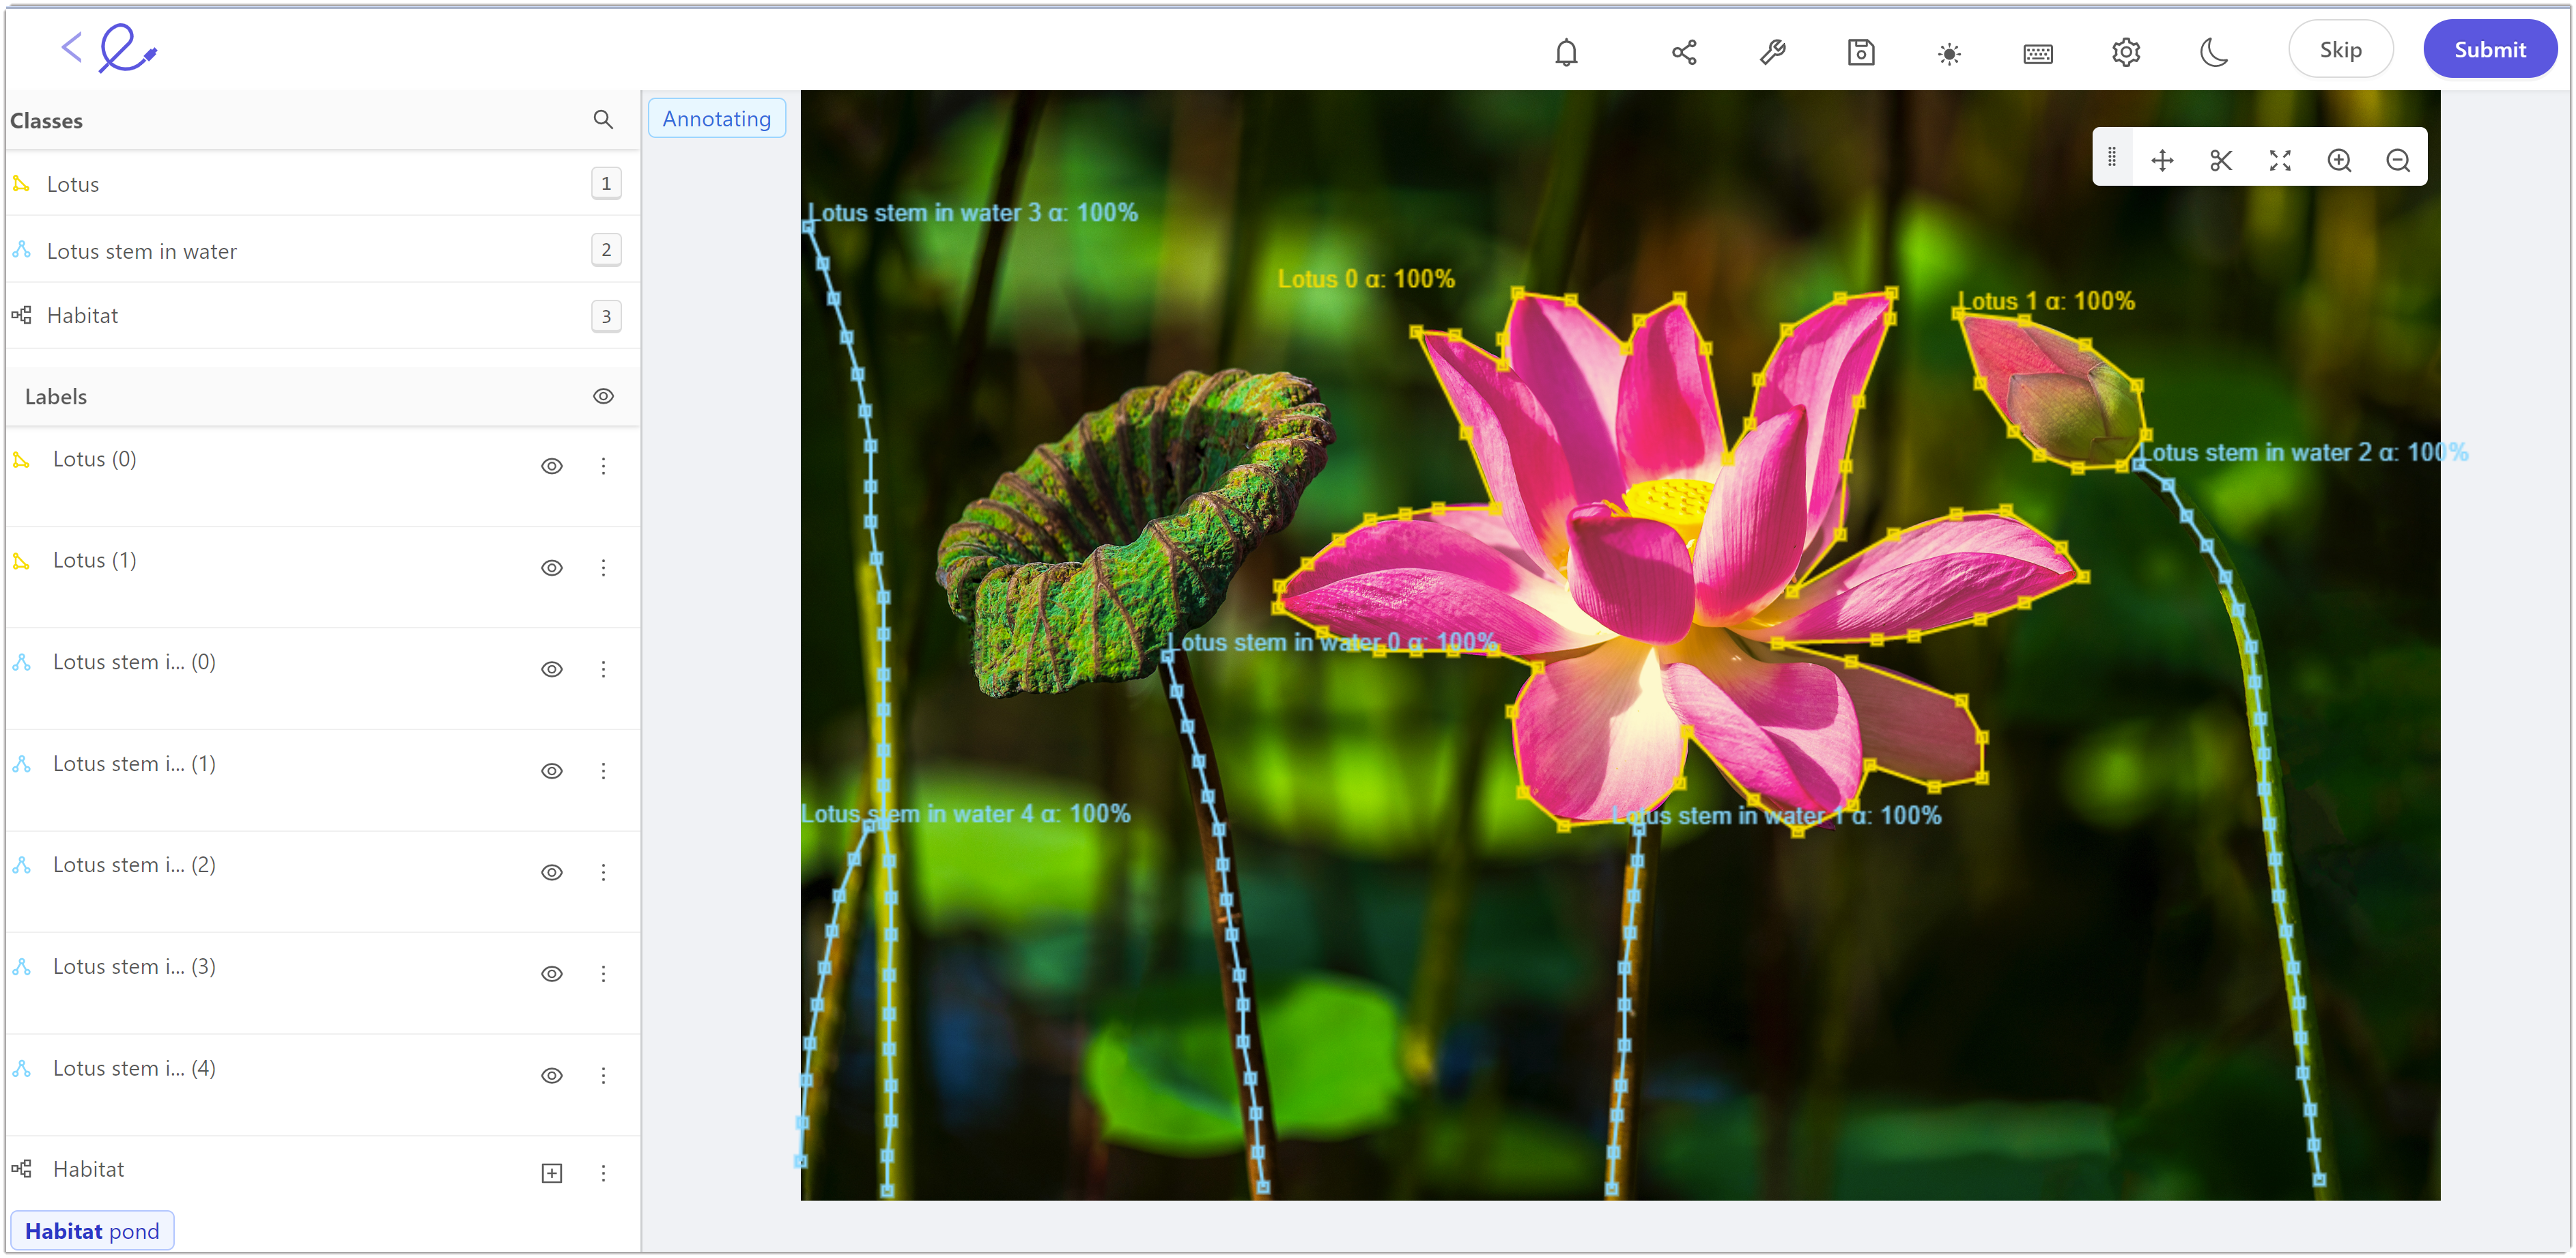
Polyline
Creating a polyline requires an ontology with a polyline annotation type. Enable or disable free-hand drawing mode by pressing d on your keyboard. Polyline coarseness for polylines drawn free-hand is set in the 'Settings' drawer in the Drawing settings dropdown. Instantiate a new polyline label by clicking on the specified class in the 'Classes' menu or using the specified hotkey (e.g., 1, 2, 3).
When free-hand drawing is off, each click of the mouse will place a point of the polyline. A polyline requires a minimum of two points. Double-click anywhere on the canvas to finish drawing the polyline. Note however, that the location of the double-click does not create a point or affect the geometry of the polyline in any way. If you've only created one point prior to double-clicking, the polyline will not be created and your polyline about to be created will be canceled. Ensure you single-click at least twice to create at least two separate points, then double-click to finish drawing the polyline.
Polyline labels can be assigned with static classifications should they be defined in your ontology:
- Highlight an object by clicking on it in the editor canvas or by clicking on the Plus icon or start/end frame in the range overview for the specified polyline
- Assign a classification by clicking on the relevant buttons or using the set hotkeys (e.g., q, u)
Keypoint
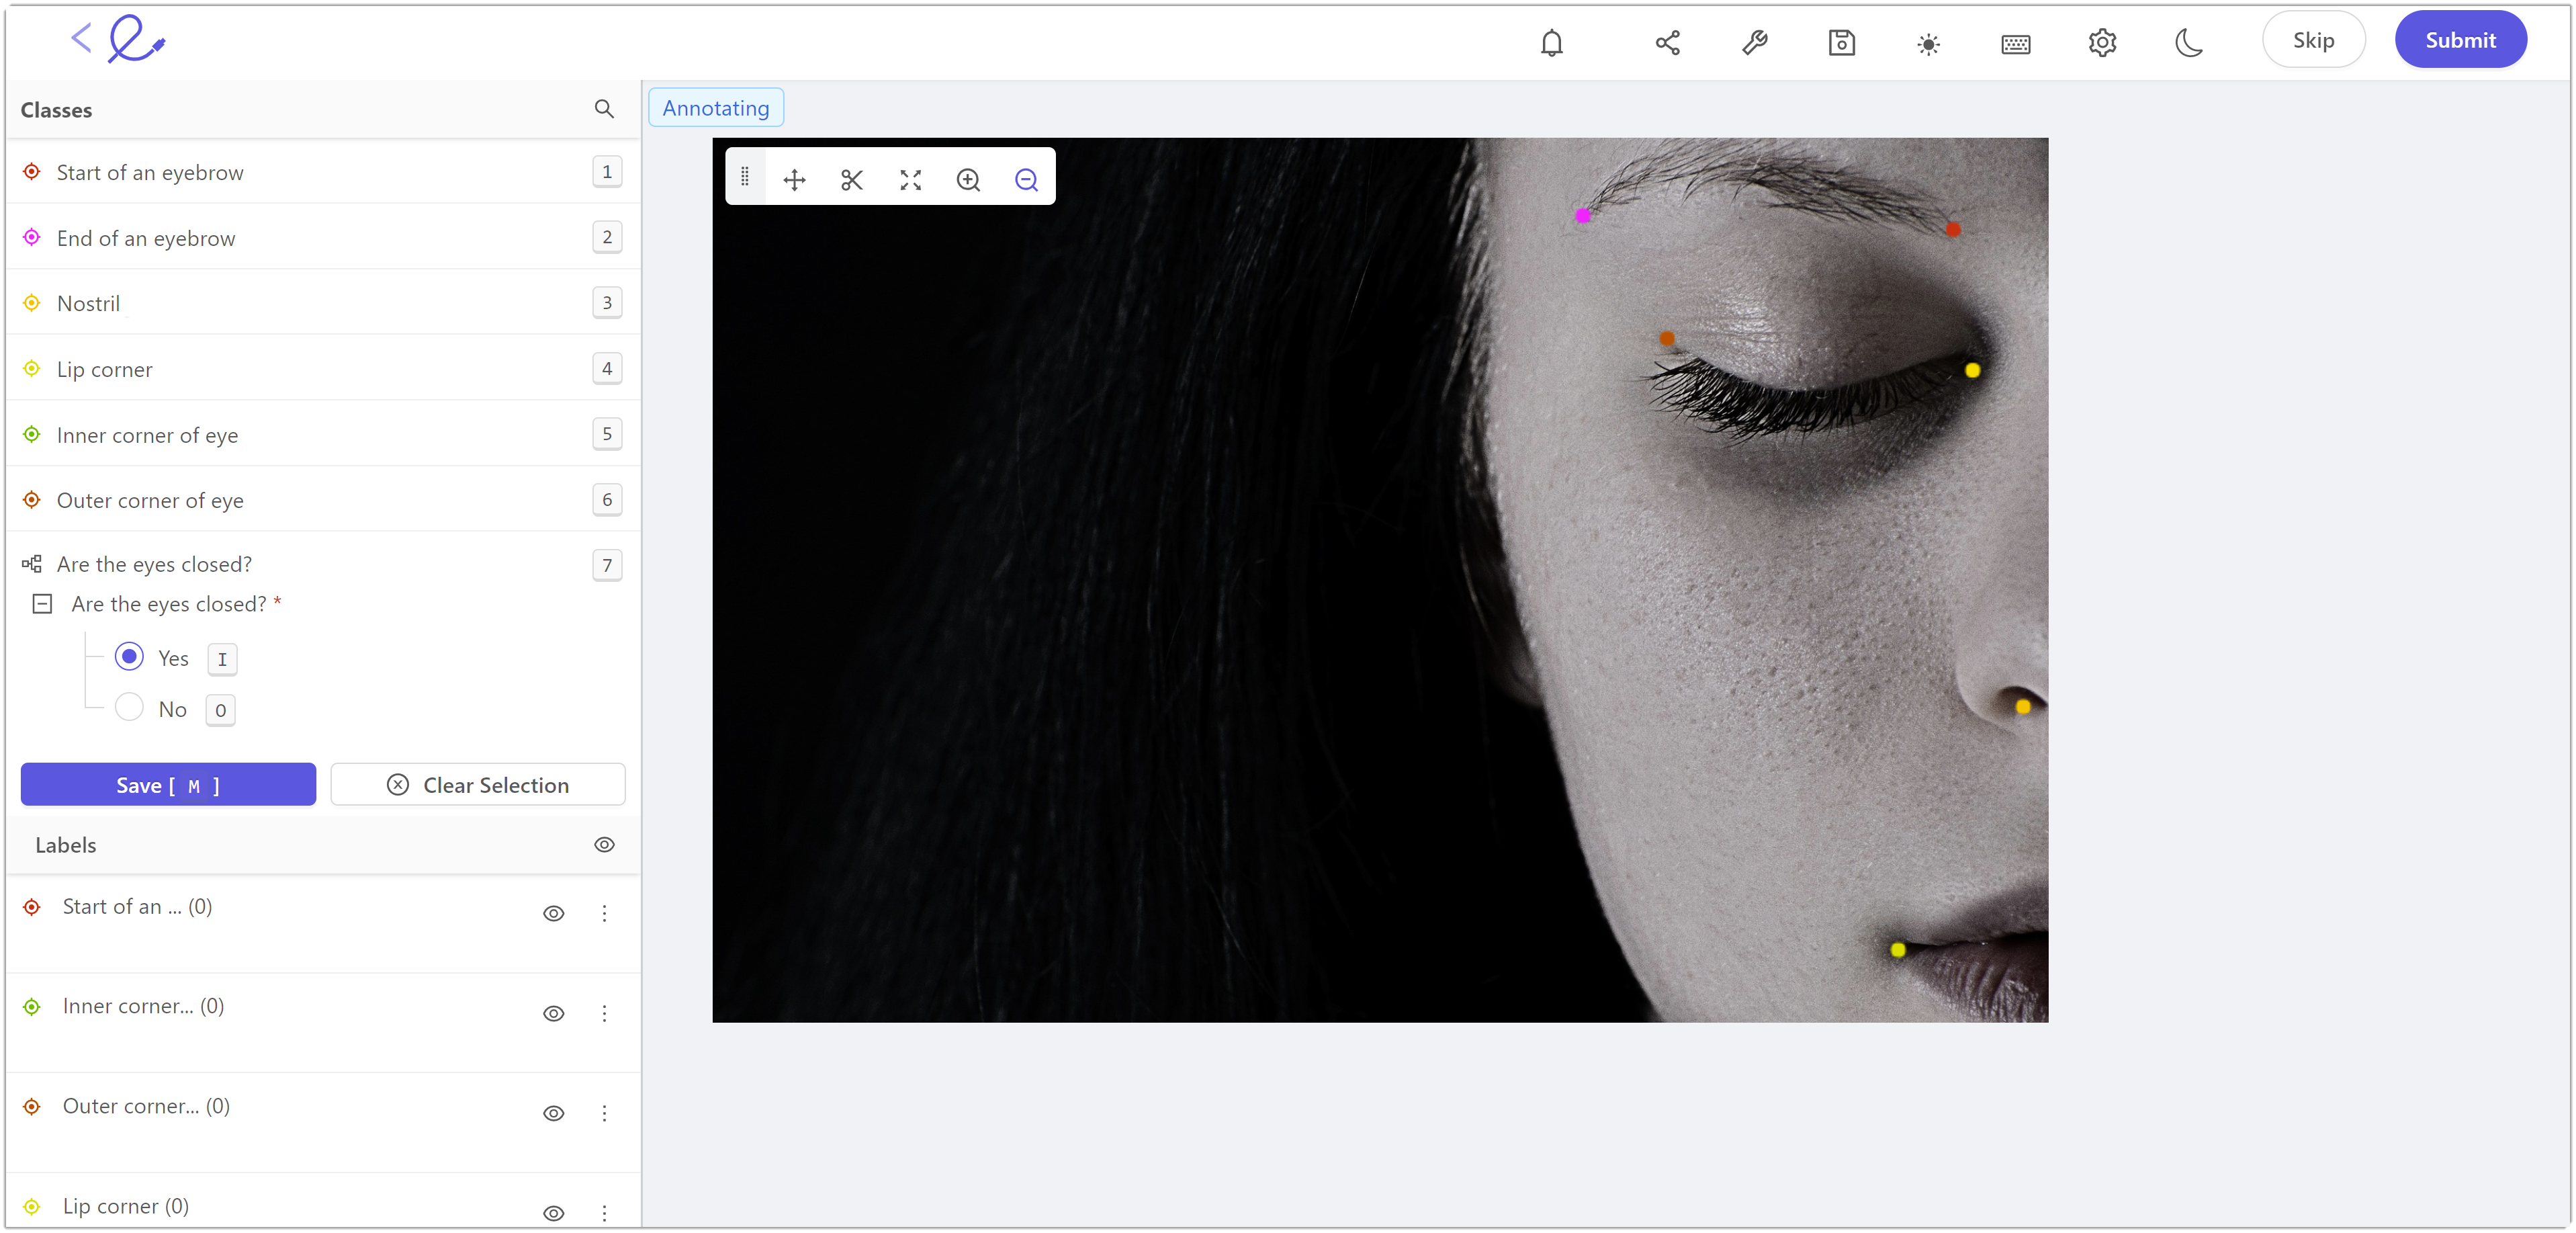
Creating a keypoint requires an ontology with a keypoint annotation type. Instantiate a new keypoint label by clicking on the specified class in the 'Classes' menu or using the specified hotkey (e.g., 1, 2, 3).
Keypoints labels can be assigned with static classifications should they be defined in your ontology:
- Highlight an object by clicking on it in the editor canvas or by clicking on the Plus icon or start/end frame in the range overview for the specified keypoint
- Assign classifications by clicking on the relevant buttons or using the set hotkeys (e.g., q, u)
Primitives
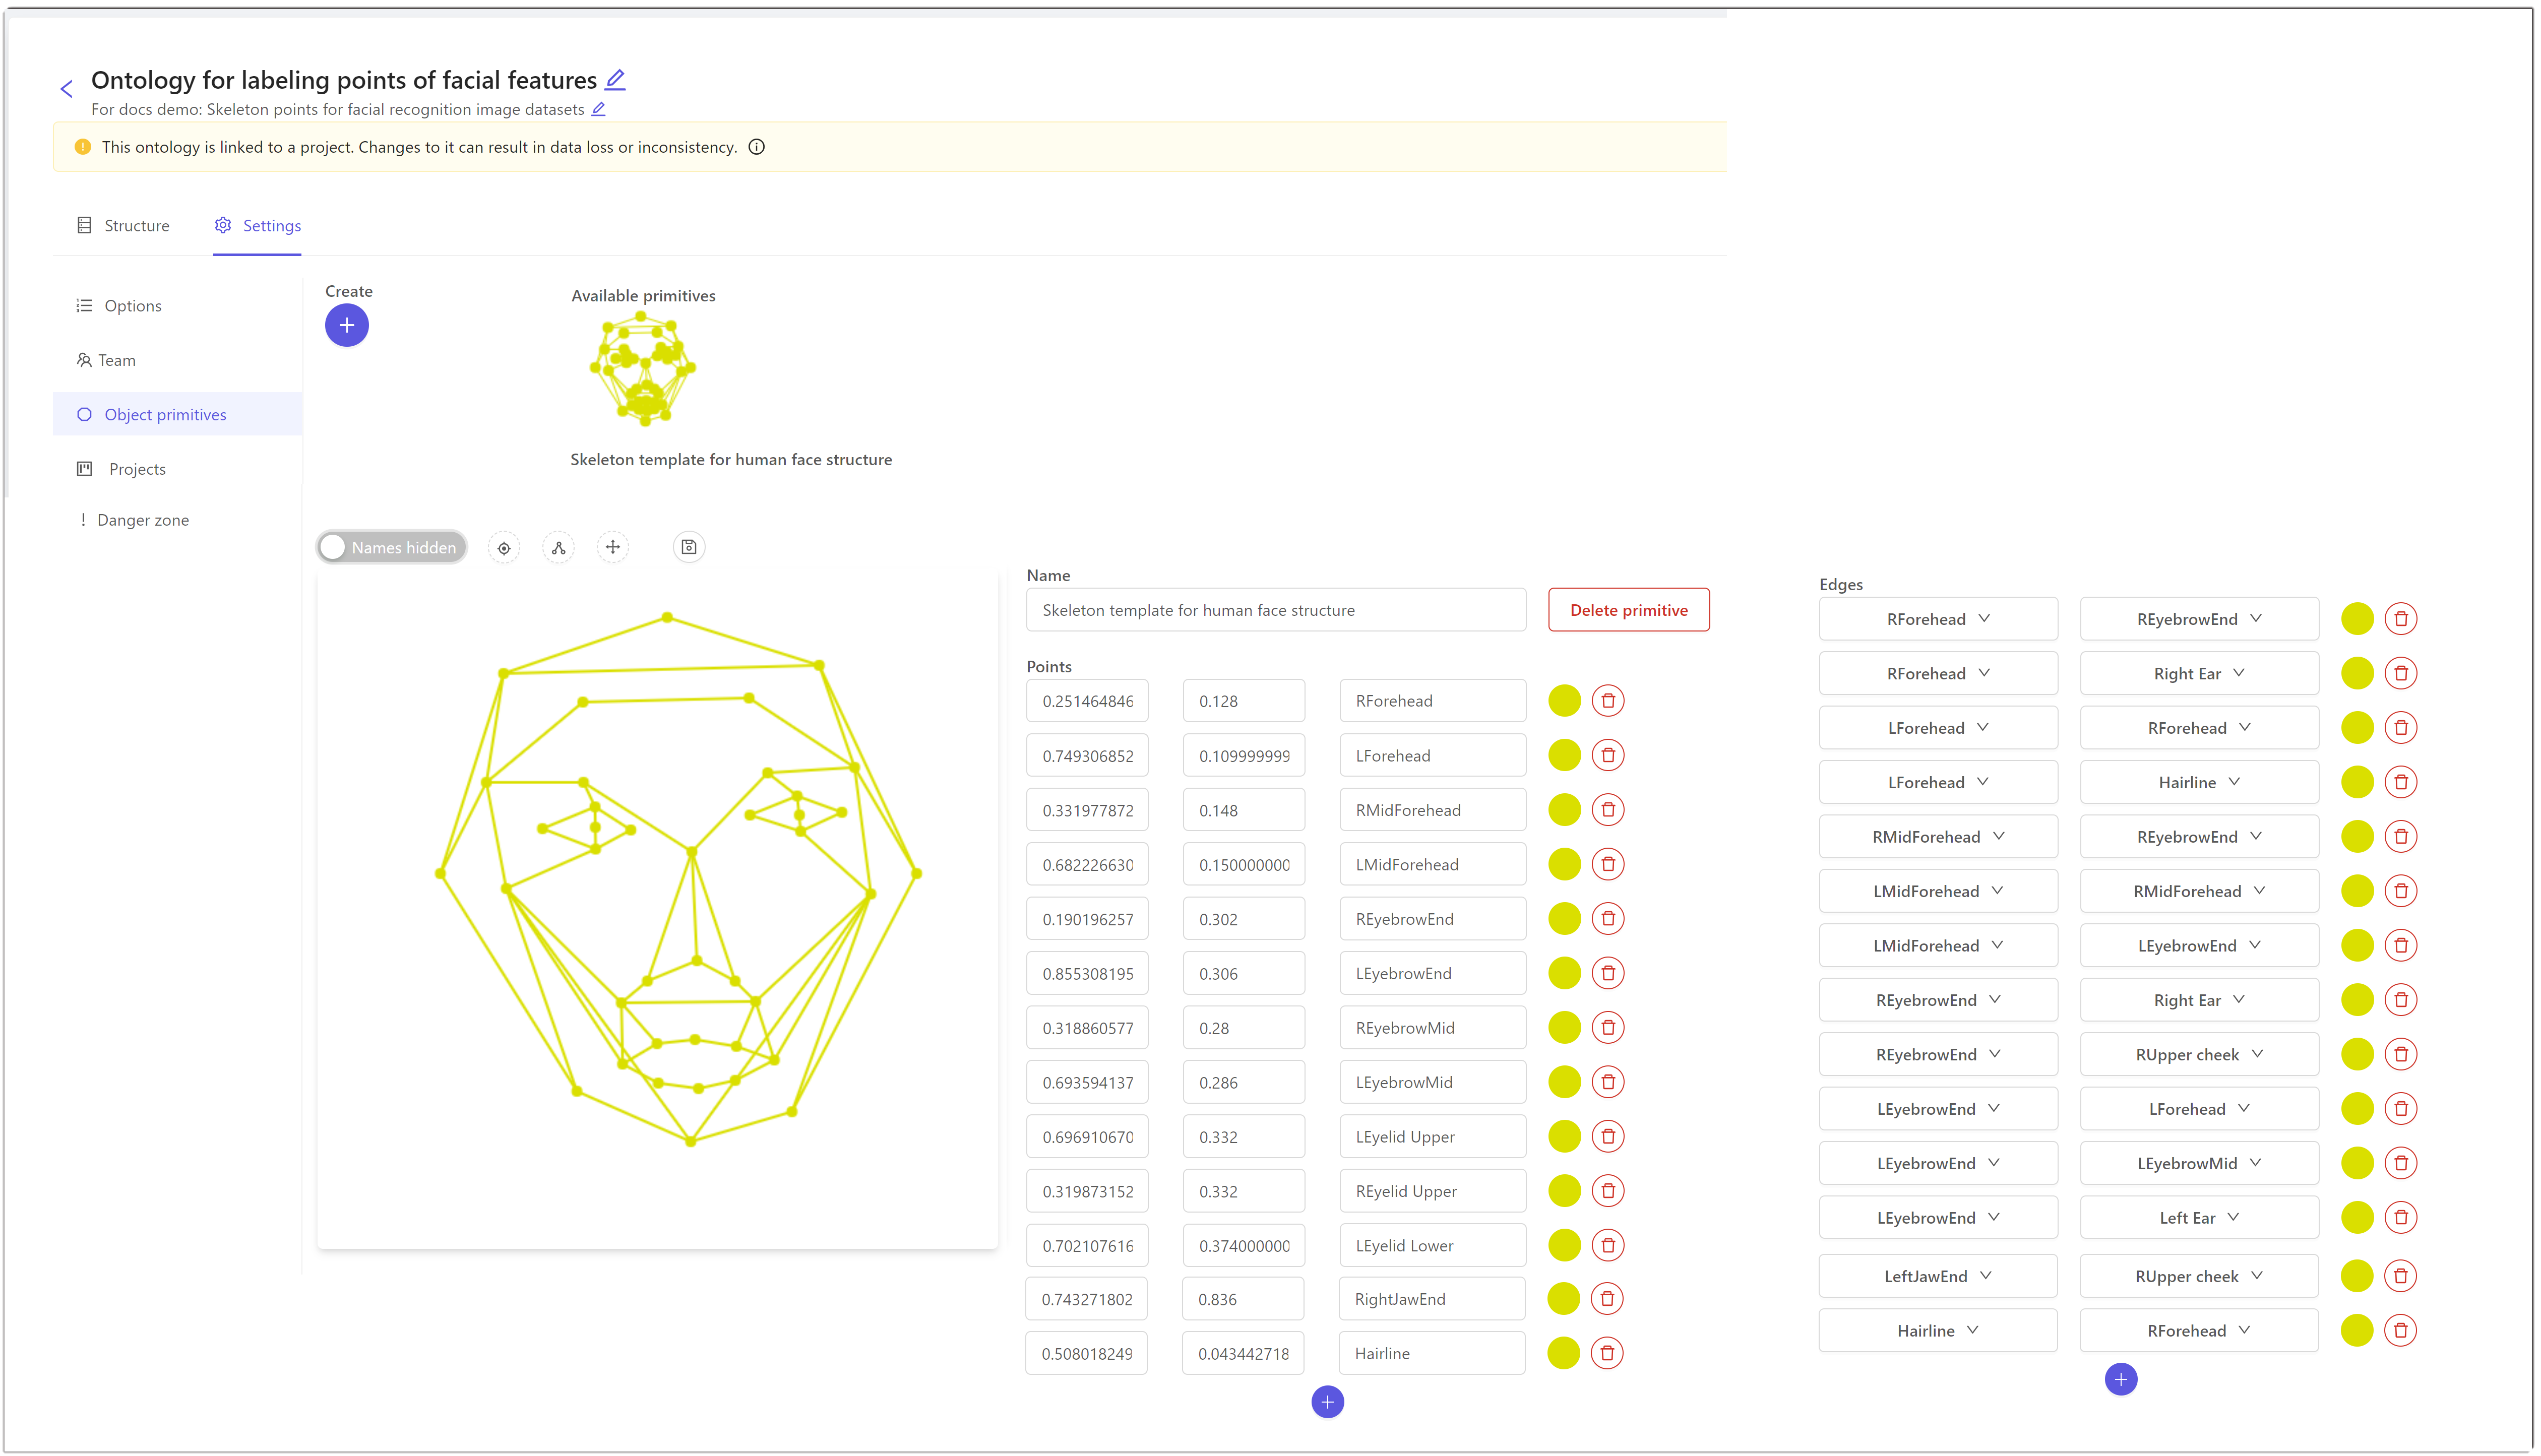
Creating a primitive (f.k.a. skeleton templates) requires an ontology with a primitive annotation type. Use primitives to templatize shapes (e.g., 3D cuboids, pose estimation skeletons) commonly used by your annotation team.
Instantiate a new primitive label by clicking on the specified class in the 'Classes' menu or using the specified hotkey (e.g., 1, 2, 3).
Primitives allow you to define properties of edges defined in your template as visible, occluded, or invisible. Toggle the edge property settings for a primitive by highlighting the primitive and clicking the Show controls button.
Primitive labels can be assigned with static classifications should they be defined in your ontology:
- Highlight an object by clicking on it in the editor canvas or by clicking on the Plus icon or start/end frame in the range overview for the specified primitive
- Assign classifications by clicking on the relevant buttons or using the set hotkeys (e.g., q, u)
Watch this quick demo to see how to use object primitives in the editor.
Segmentation masks / Bitmasks
Bitmasks allows you to create labels using a brush tool to select parts of an image. This can be useful when creating labels for vessel outlines, or labelling topologically separate regions belonging to the same frame classification.
Creating a mask segmentation requires an ontology with the Bitmask annotation type.
To make changes to a label created using Bitmasks, the label has to be deleted and re-created.
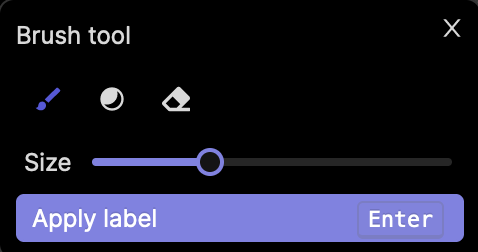
Brush tool
When you select your bitmask annotation type, the brush tool will be selected by default. You can adjust the size of the bitmask brush tool using the slider in the bitmask popup, as seen in the screenshot above.
The brush tool can be selected by clicking the ![]() icon, or by hitting f on your keyboard while the popup is open.
icon, or by hitting f on your keyboard while the popup is open.
When your label is ready, click Apply label, or press Enter.
Threshold brush
The Threshold brush tool specific to DICOM enables you to set an intensity value threshold for labels created using the bitmask annotation type. This means only parts of the image within the set intensity range will be labeled when selected using the Threshold brush tool.
To select the threshold brush, click the ![]() icon, or hit g on your keyboard while the popup is open. Adjust the size of the brush tool, as well as the range of intensity values you would like to include in your labels using the two sliders on the popup, as seen in the screenshot below.
icon, or hit g on your keyboard while the popup is open. Adjust the size of the brush tool, as well as the range of intensity values you would like to include in your labels using the two sliders on the popup, as seen in the screenshot below.
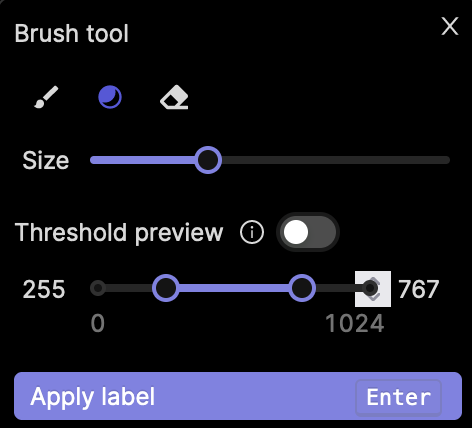
Use the Threshold preview toggle to see which parts of an image correspond to your set threshold. This allows you to see which parts of the image will be labeled when covered by the Threshold brush tool.
When your label is ready, click Apply label, or press Enter.
Eraser
The Eraser tool allows you to erase parts, or the entirety of your bitmask selection if the Apply label button has not been clicked yet.
To select the threshold brush, click the ![]() icon, or hit h on your keyboard while the popup is open.
icon, or hit h on your keyboard while the popup is open.
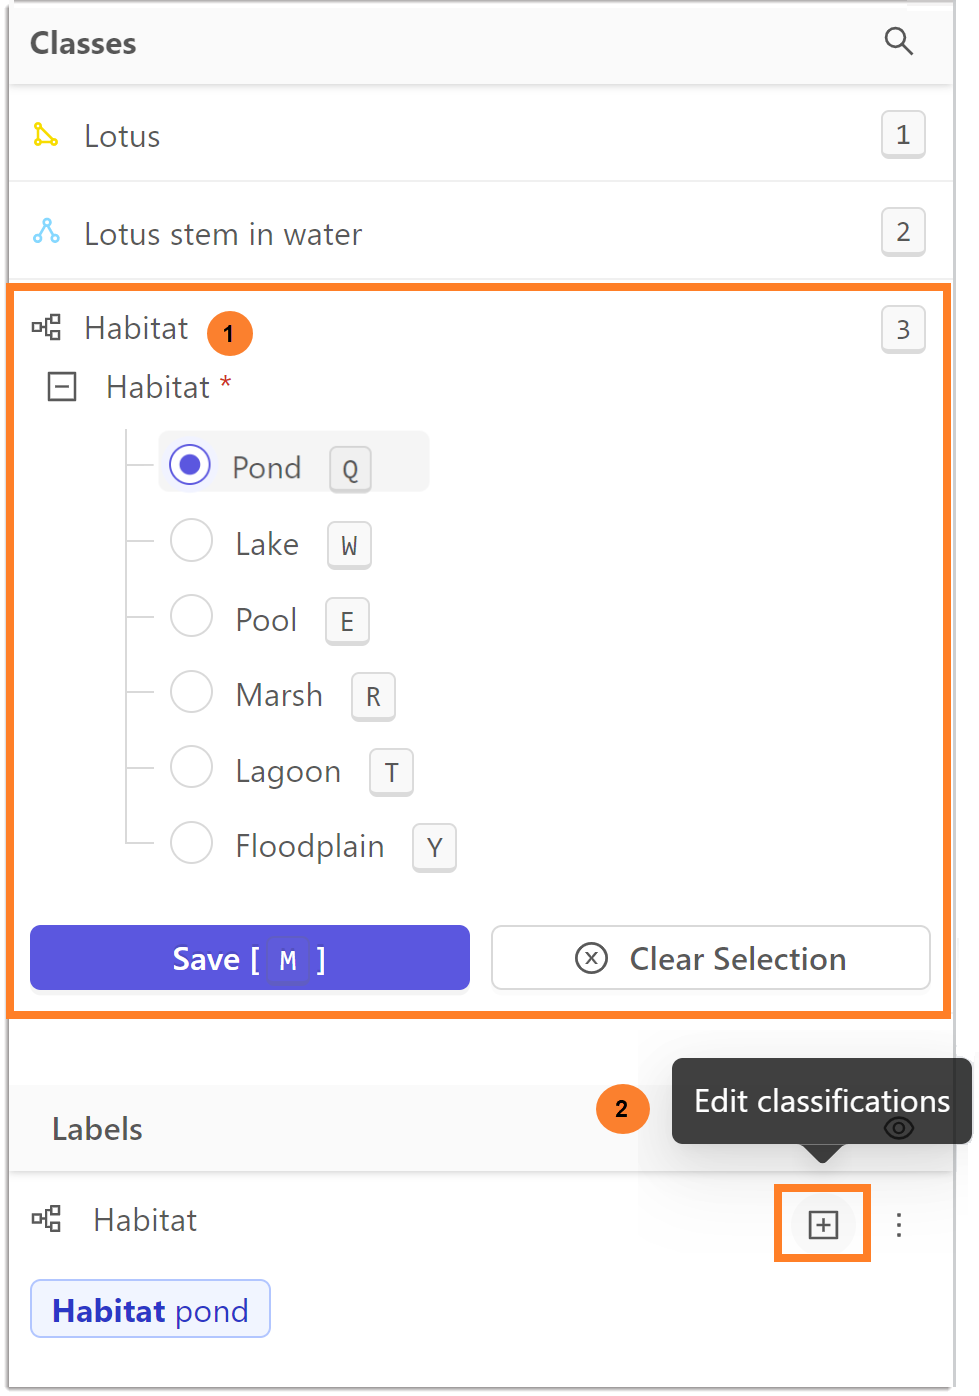
Frame classification
Creating frame classification(s) requires an ontology with a classification annotation type. Frame-level classifications consider the frame as a whole, not any given object's localization. Instantiate a frame-level classification label by clicking on the specified class in the 'Classes' menu or using the specified hotkey (e.g., 1, 2, 3).
Encord currently supports radio, checklist, and free-form text input classification types.
Edit existing classification labels by clicking on the Plus icon for the specified label.
Automation
Import model predictions
Encord's Python SDK & APIs allow you to import model predictions programmatically. Importing model predictions helps to pre-annotate your data to save annotation costs and use our quality control system for model validation.
Model training & inference
Encord allows you to build models for automated data labeling that target individual features in your ontology in an easy-to-use interface. We call these micro-models. Rapidly train micro-models using Encord's GPU-accelerated container orchestration system on sparse amounts of data.
You can read more about model creating, training, and using models here.