Videos & image sequences
Encord provides comprehensive support for video & image sequence annotations. With the video & image sequence editor, you can:
- Label using any annotation type
- Render videos and image sequences of any length
- Track and interpolate objects between frames
- Create frame-level and object event classifications
- Reduce manual annotations with automation (e.g., native model training & inference) features
Task Management
Before we get into the details of the label editor and making annotations, a quick note about scheduling annotation work. Annotation is done in the annotation phase of the task management system. In order to ensure annotation work is saved properly, it's crucial that each labeling task is properly assigned to an annotator, annotators always access the task through the Queue tab in the Task Management System, and only the assigned annotator works on any given task at any given time.
Navigation
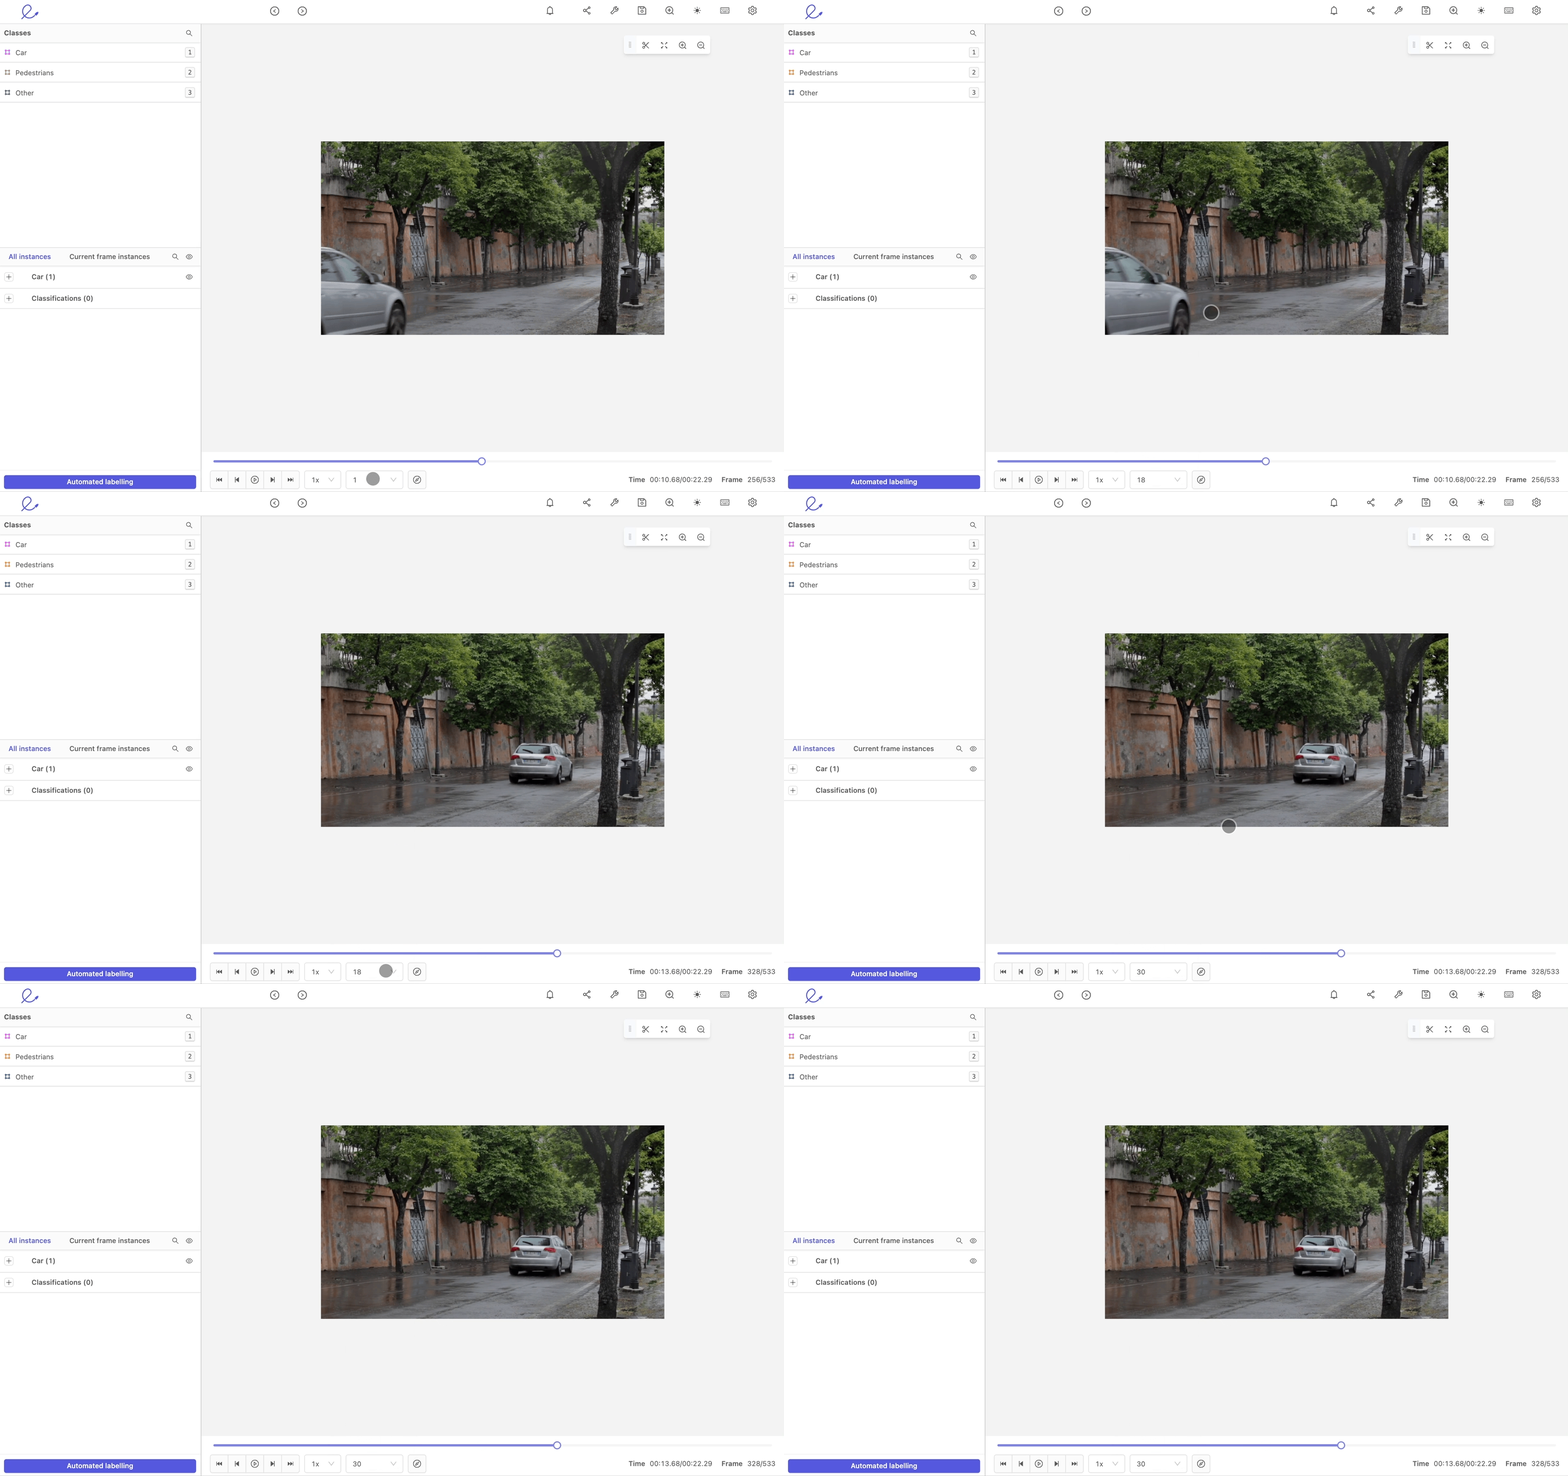
Play/pause the video by clicking the play/pause button or by pressing Space. Skip through frames in the video with the Left and Right arrow keys or the forward and backward buttons. The number of frames skipped is determined by the specified Frameskip interval. Frameskip intervals can be set using the predefined values or customized by entering a value in the New input and clicking the Plus icon.
Control video playback speeds with the playback speed dropdown. 1x is the set playback speed in the below example.
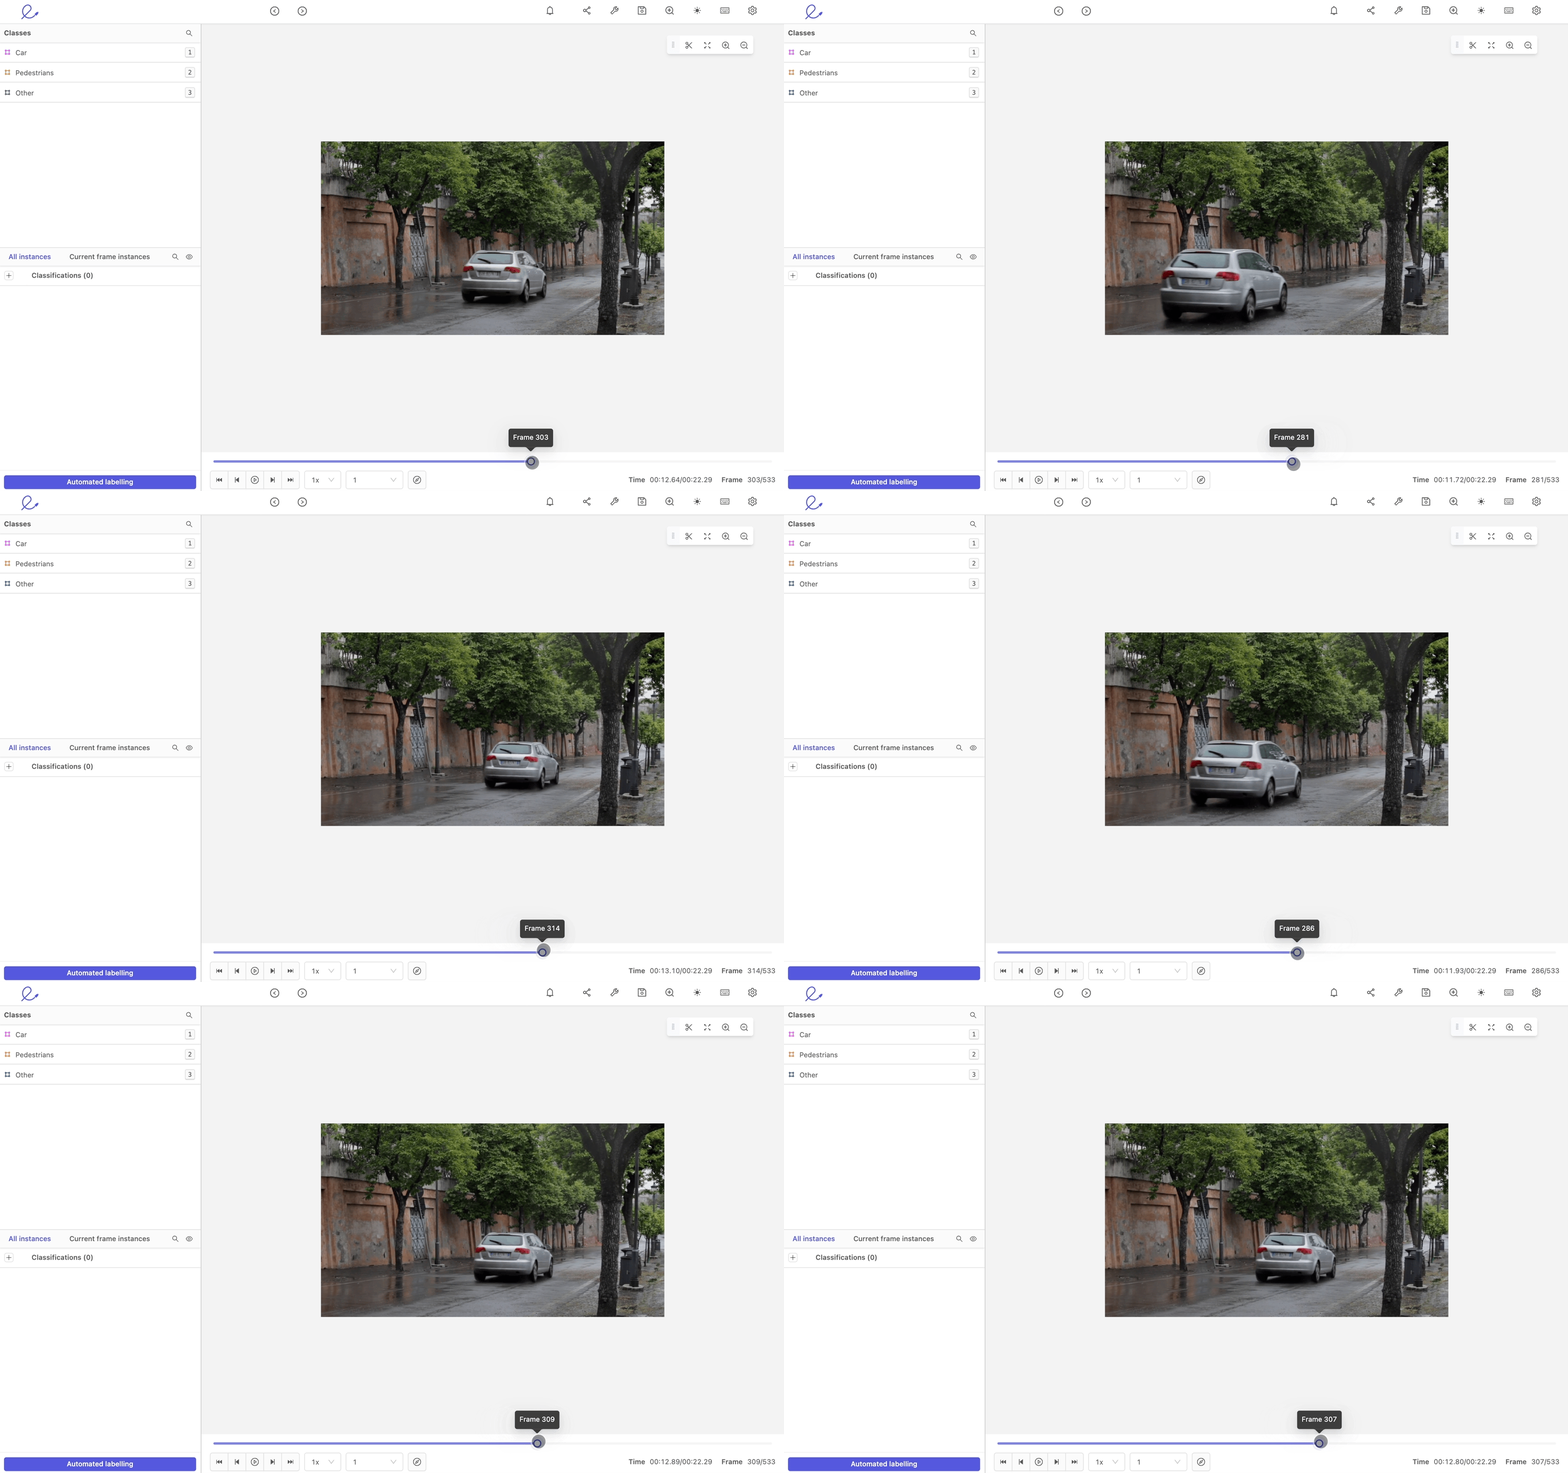
Navigate through the video by scrubbing through or clicking anywhere on the progress bar.
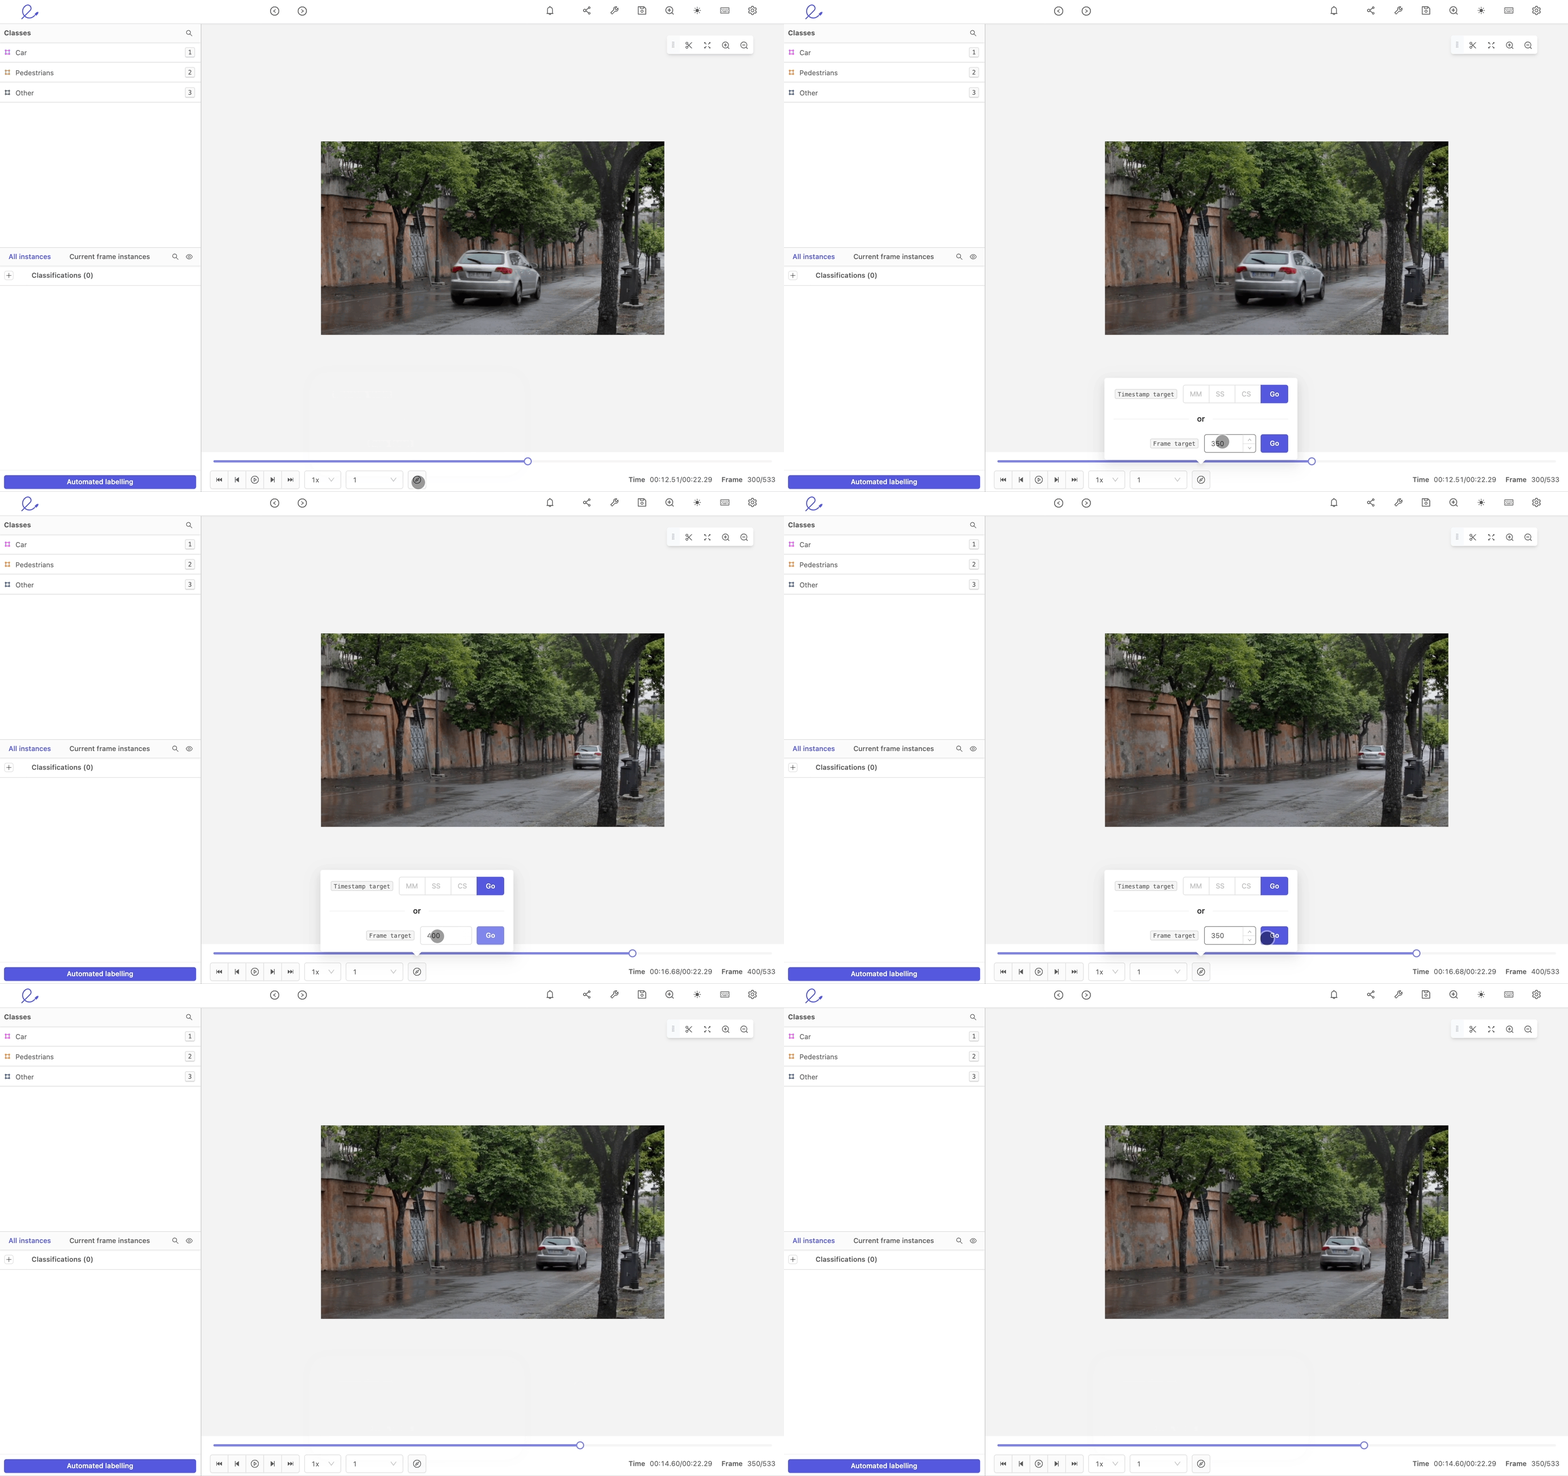
Navigate to a particular frame or timestamp by clicking the compass icon. Replace the value(s) with the desired target and click Go.
Annotation types
Objects are annotated using bounding boxes, polygons, polylines, keypoints or primitives. Frames are annotated using classifications. Instantiating objects or classifications in the video editor generates a UUID that uniquely identifies that instance across a range of frames (i.e., in the temporal dimension). The identifier is sometimes called a "track," with numerical IDs supplementing UUIDs for objects for visual aid.
Object instances can be assigned with static and dynamic classifications (i.e., temporal or "event" classifications that may change over time) as defined in the specified ontology. Static classifications define the global properties of an object (e.g., the car is red and has four wheels) whereas dynamic classifications change with time (e.g., the car is turning right from frames 0 to 100 and left from frame 101 to 150). Dynamic classifications are also sometimes called "actions" or "events".
Supported annotation types & corresponding features are listed in the table below. You can read more about the listed automation features here.
| Annotation type | Dynamic classification | Automated tracking | Interpolation | Import predictions | Model training & inference |
|---|---|---|---|---|---|
| Bounding box | ✅ | ✅ | ✅ | ✅ | ✅ |
| Rotatable bounding box | ✅ | ✅ | ✅ | ✅ | Coming soon |
| Polygon | ✅ | Coming son | ✅ | ✅ | ✅ |
| Polyline | ✅ | ✅ | ✅ | ✅ | Coming Soon |
| Point | ✅ | ✅ | ✅ | ✅ | ✅ |
| Primitive | N/A | ✅ | N/A | ✅ | N/A |
| Frame classification | N/A | N/A | N/A | ✅ | ✅ |
Bounding box
Creating a bounding box requires an ontology with a bounding box annotation type. Instantiate a new bounding box instance by clicking on the specified class in the 'Classes' menu, or by using the specified hotkey (e.g., 1, 2, 3).
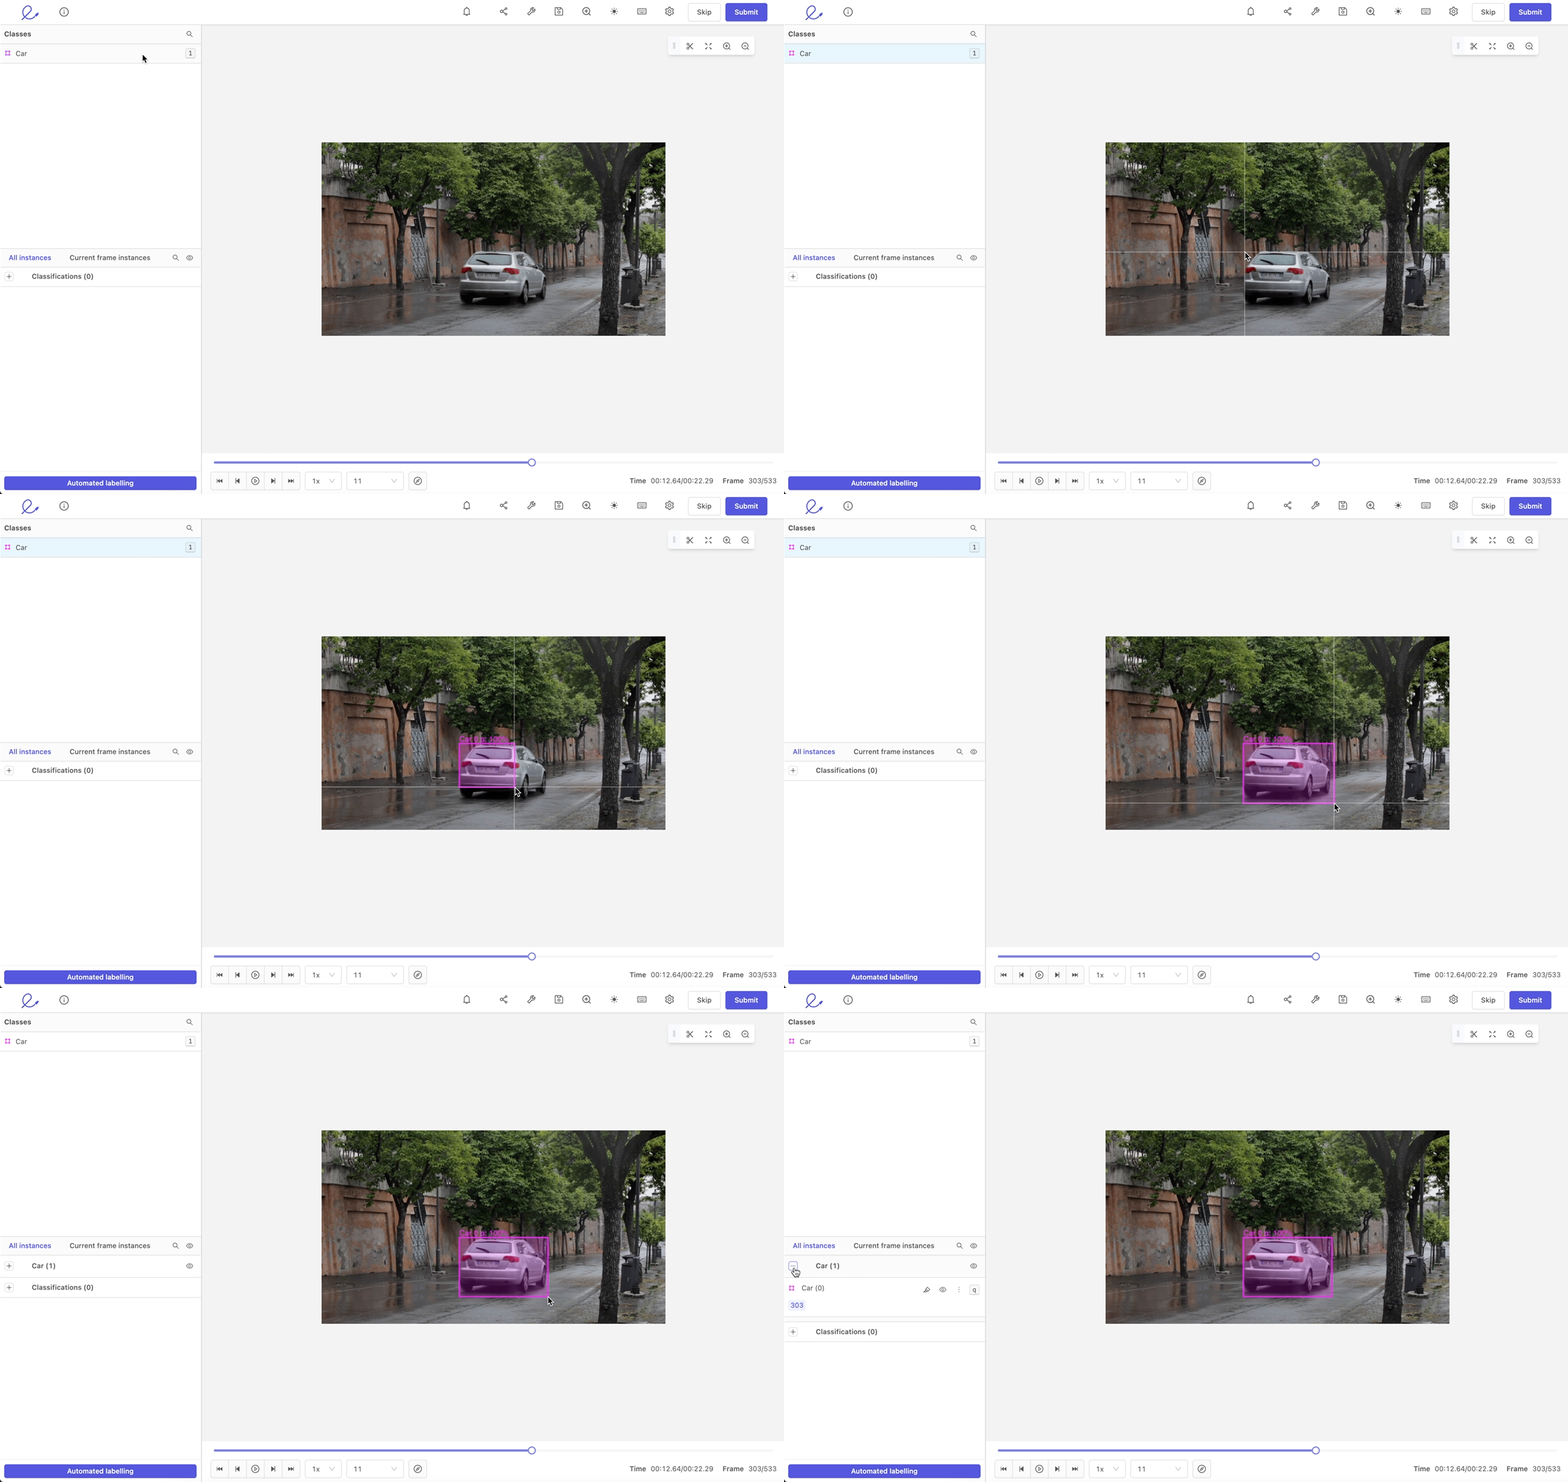
Instantiating existing bounding box instances (i.e., bounding boxes that should keep the same identifier in preceding or succeeding frames) can be done by clicking on the Highlight icon for the specified object or using the assigned hotkey (e.g., q, w, e).
Bounding boxes can be copy/pasted between frames using cmd (MacOS)/ctrl (Windows) + c to copy the object to the clipboard and cmd/ctrl + v to paste it on the desired frame.
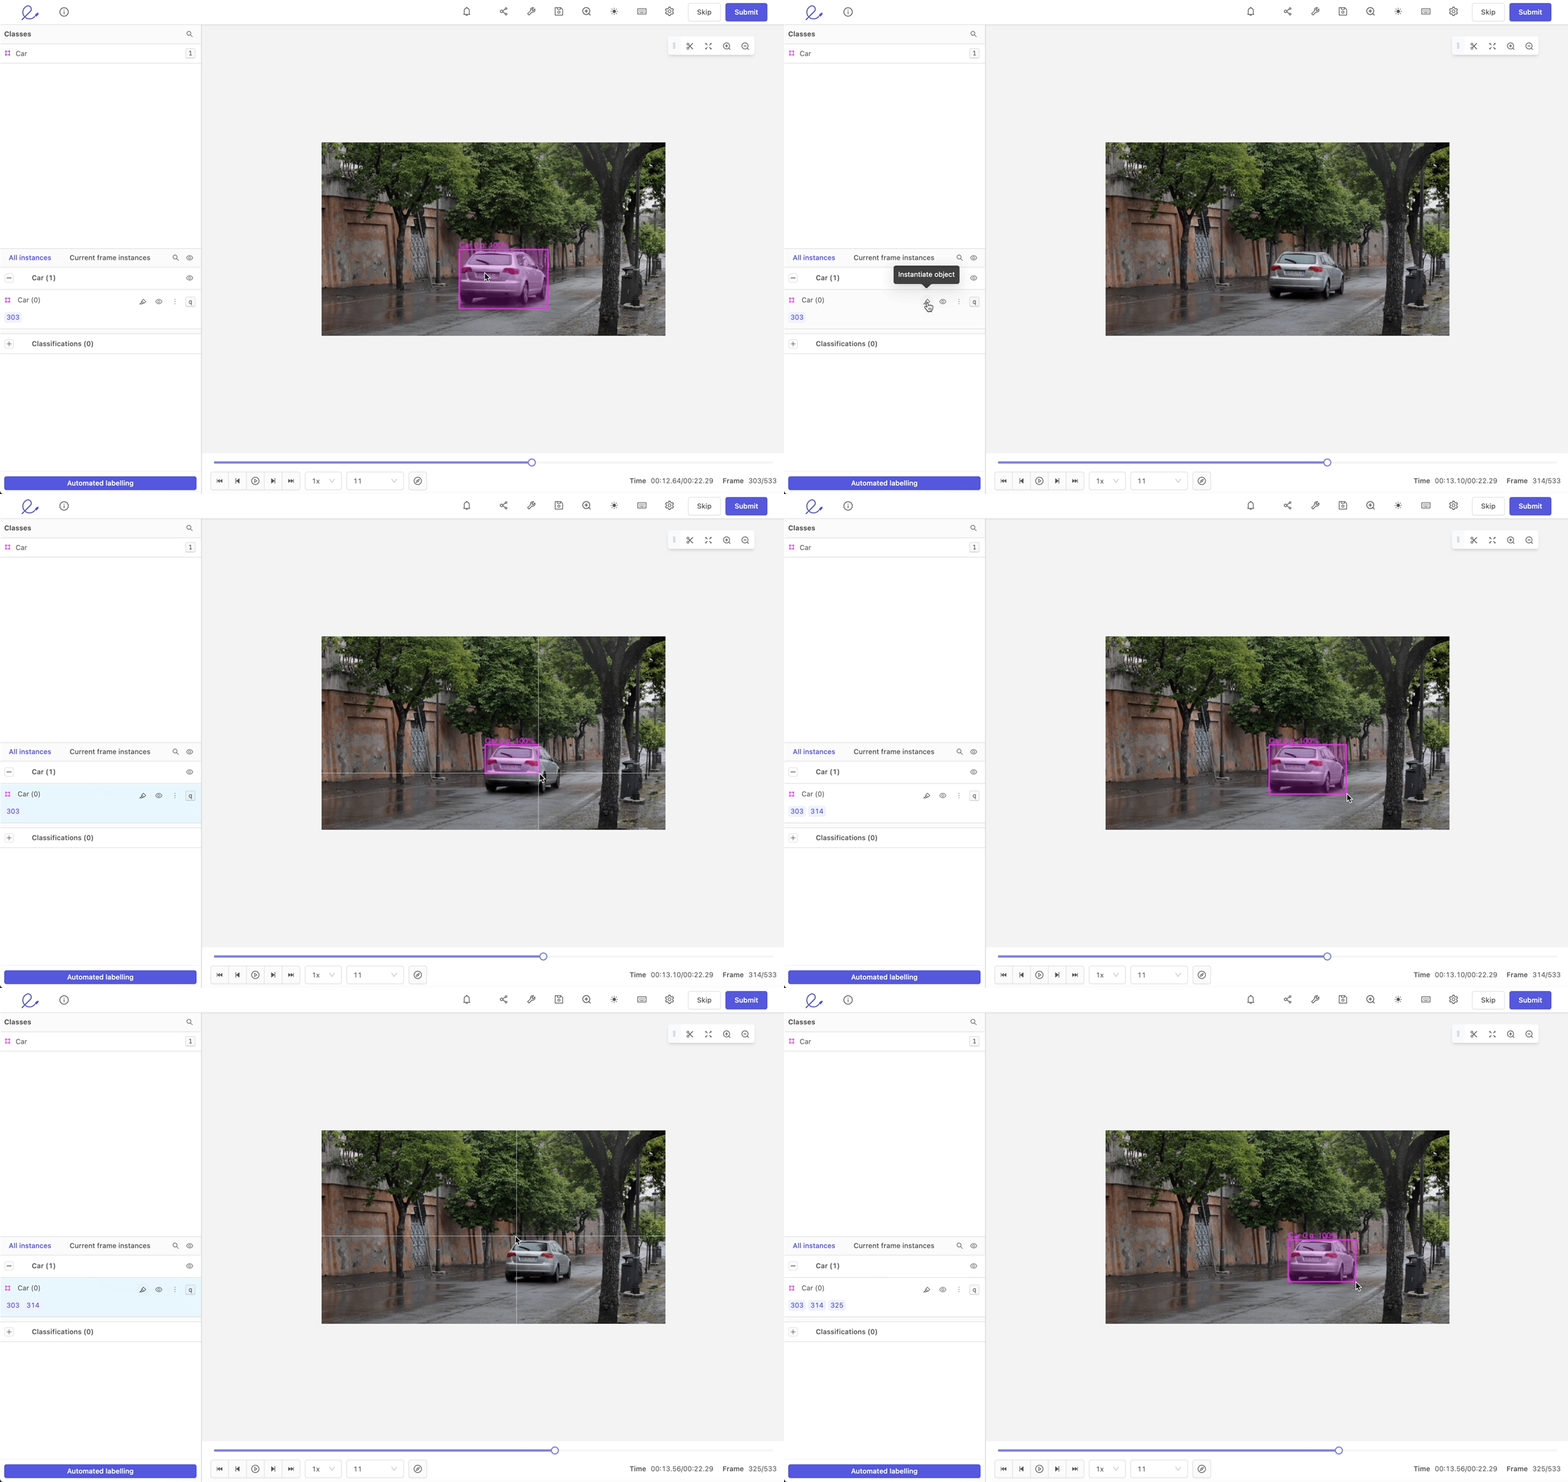
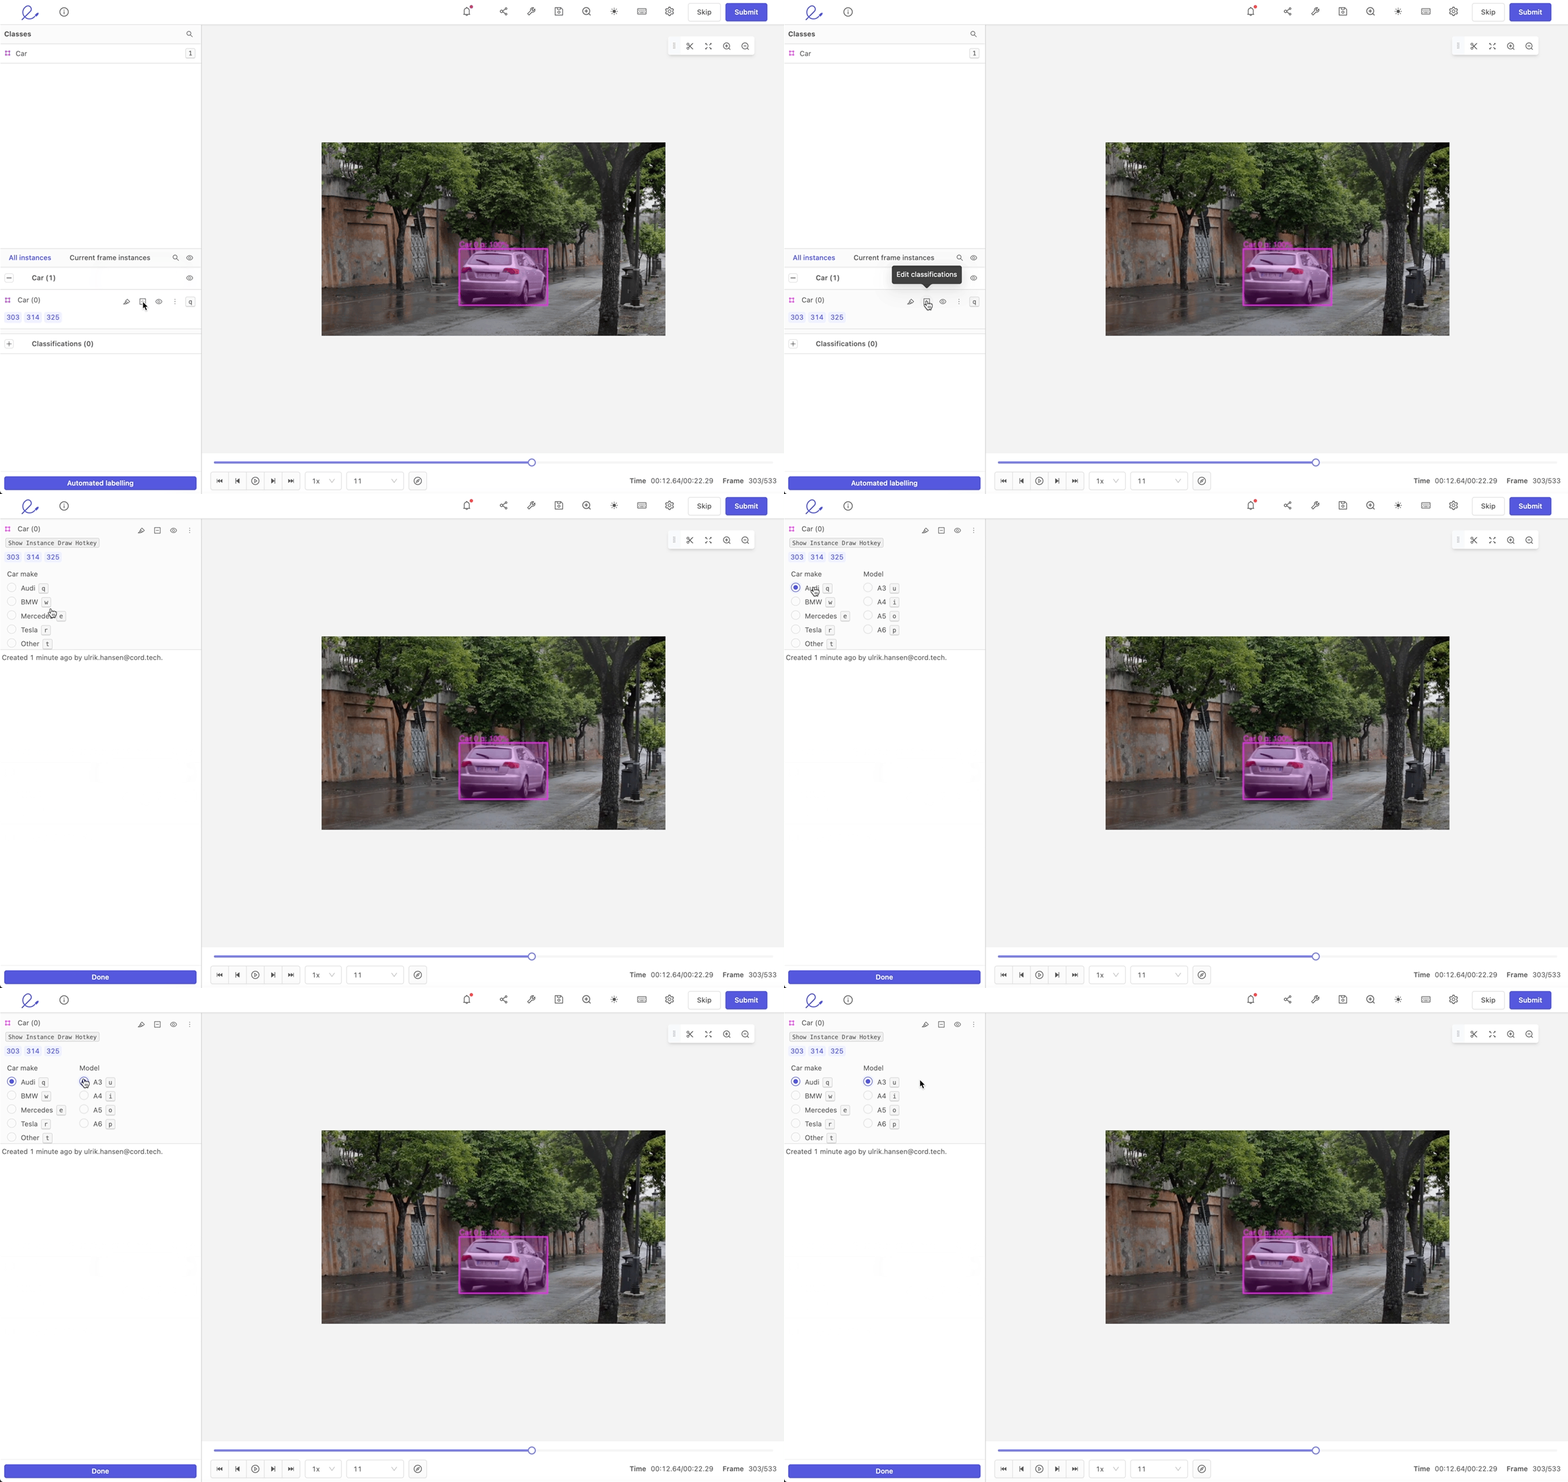
Bounding box instances can be assigned with static and dynamic classifications should they be defined in your ontology:
- Highlight an object by clicking on it in the editor canvas or by clicking on the Plus icon or start/end frame in the range overview for the specified bounding box
- Assign a classifications by clicking on the relevant buttons or using the set hotkeys (e.g., q, u).
Tracking
Run automated object tracking by highlighting an object and clicking shift + t on your keyboard.
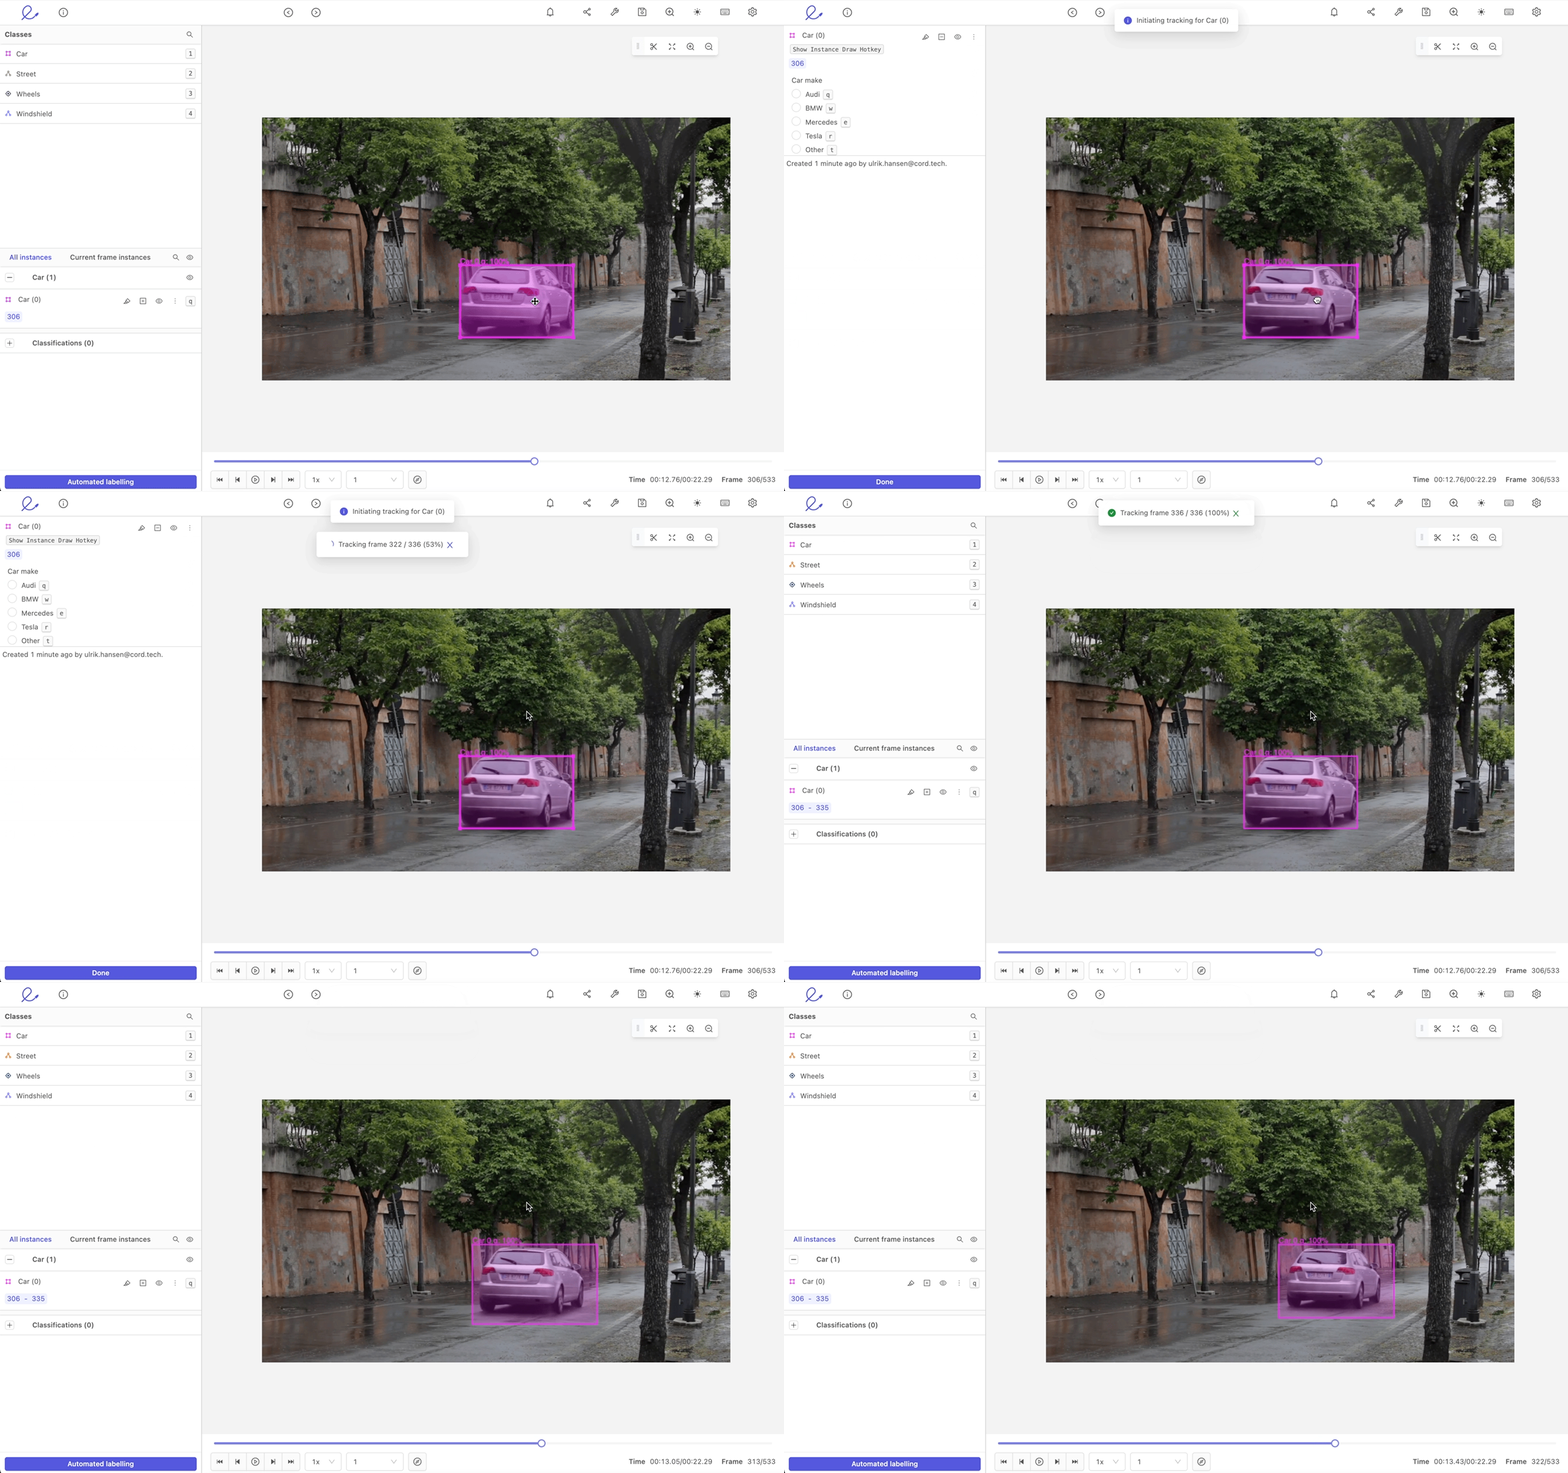
Object tracking can also be run by selecting the option Track from this frame in the object menu. The number of predicted frames is set to 30 by default. The number of predicted frames can be changed in the 'Settings' drawer in the Single object tracking settings dropdown.
Click the Automated labeling button to open the 'Automated labeling' drawer to run multiple object tracking.
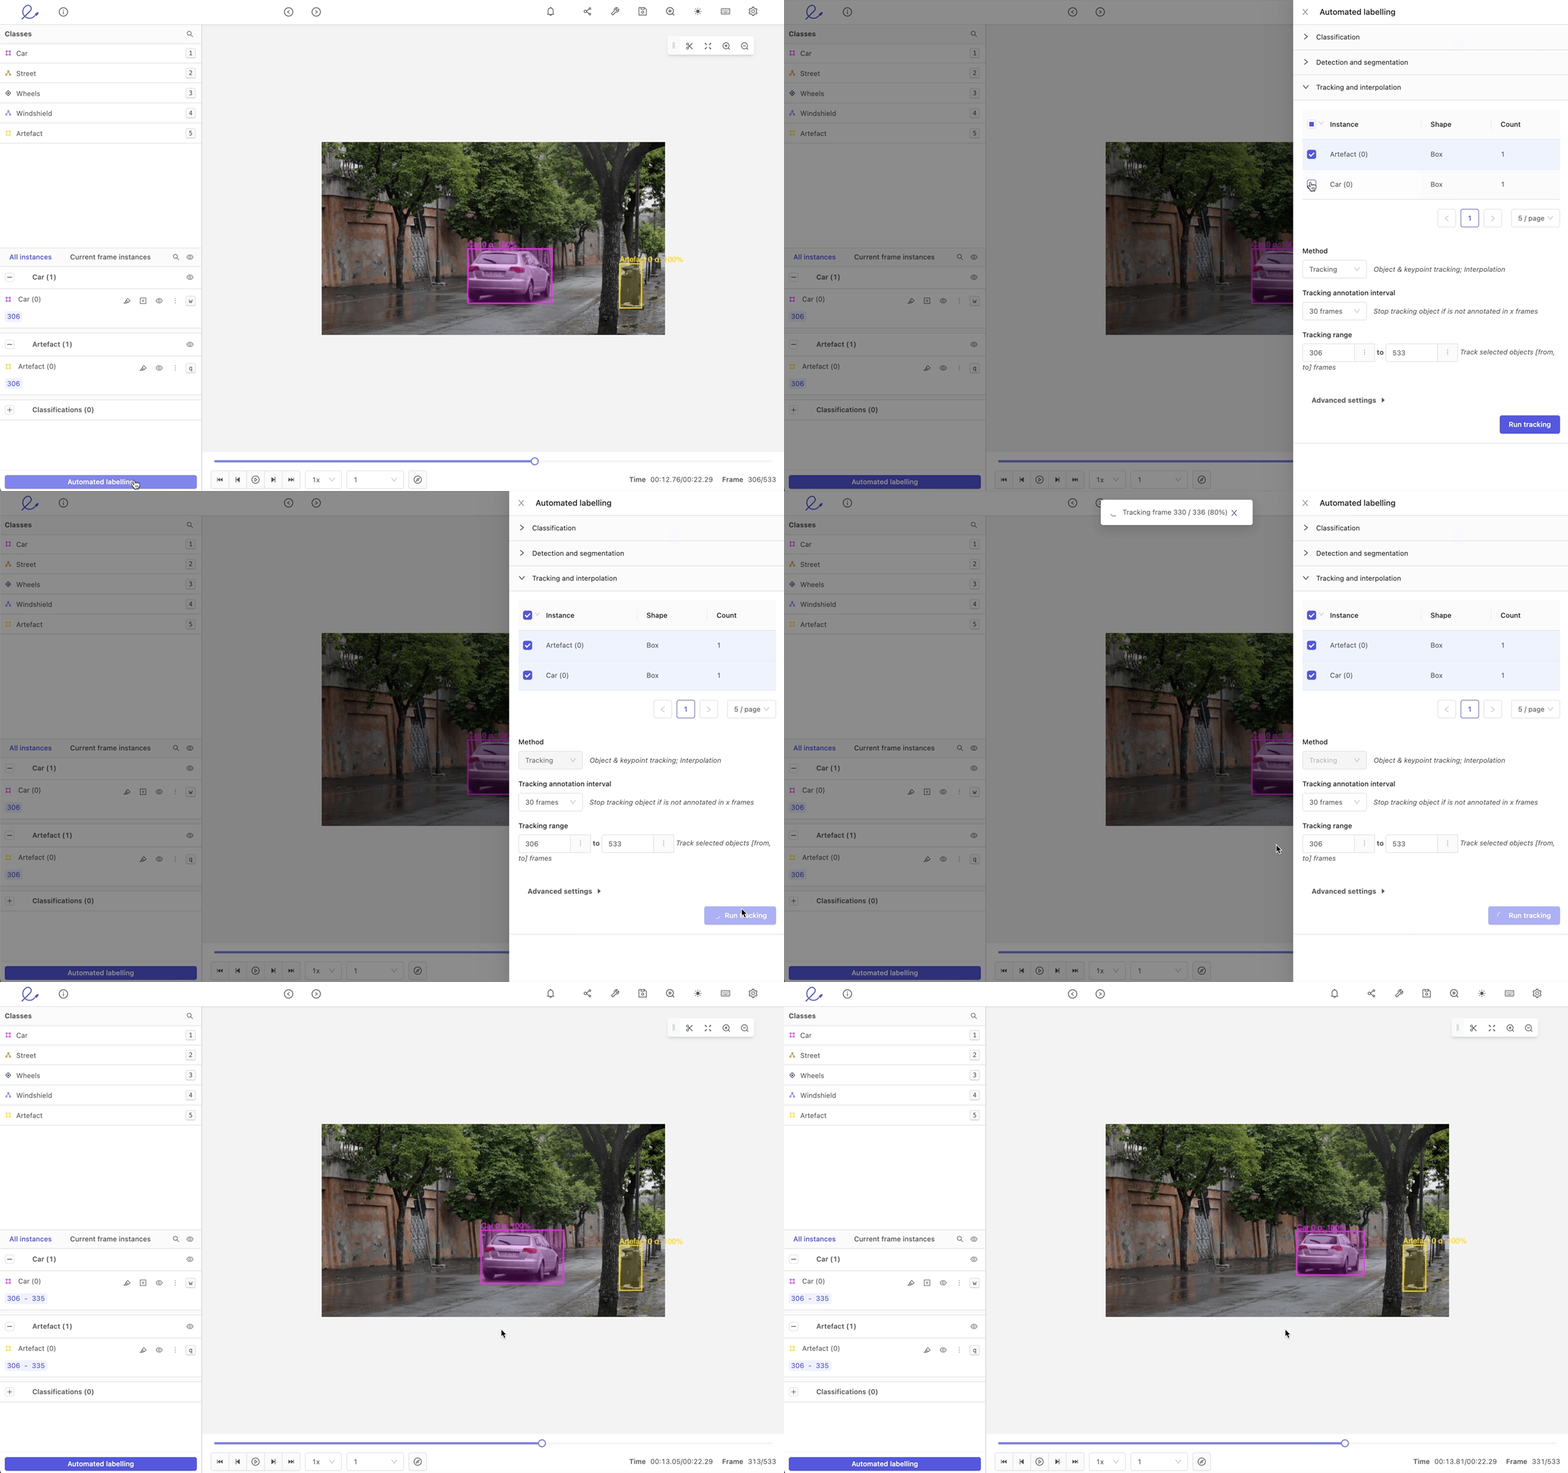
You can read more about automated object tracking here.
Interpolation
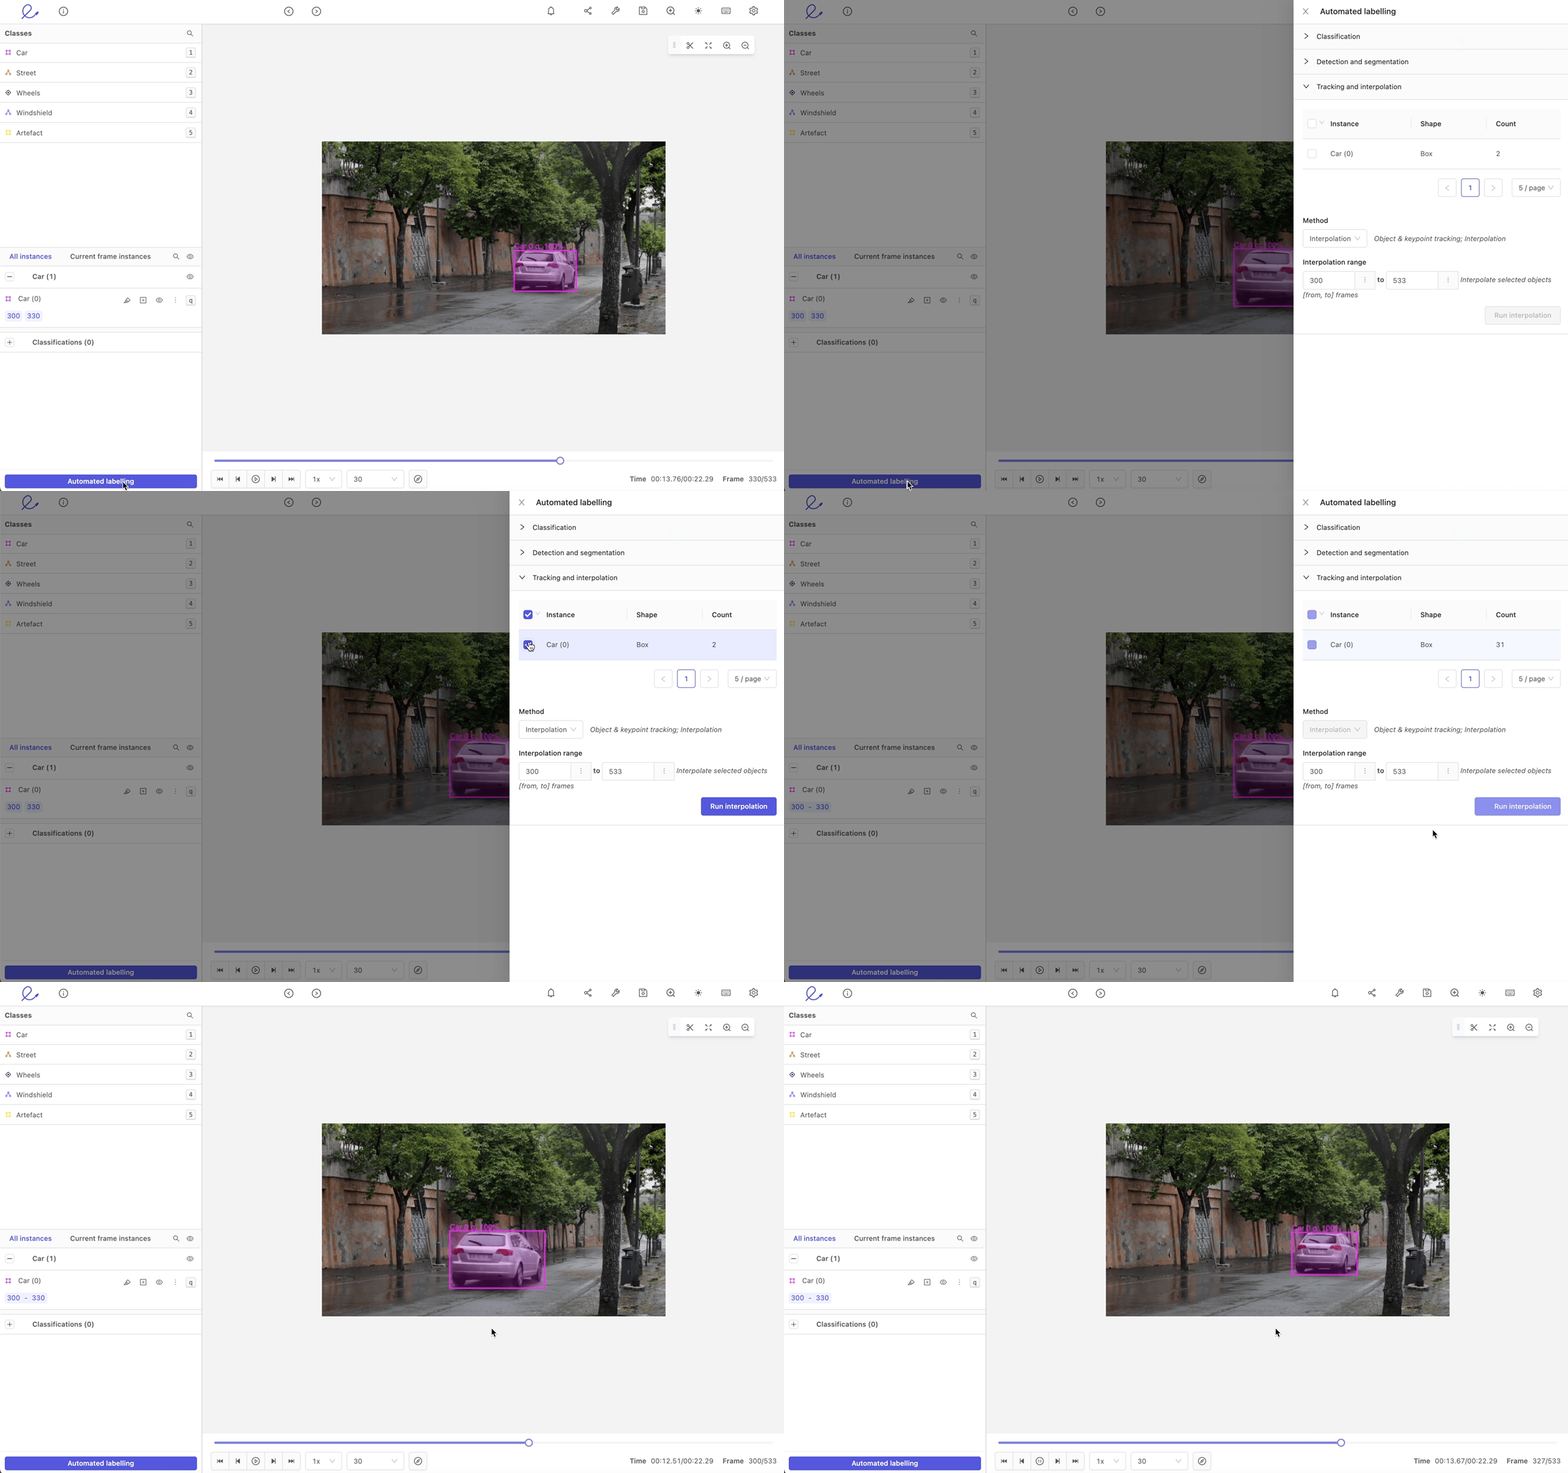
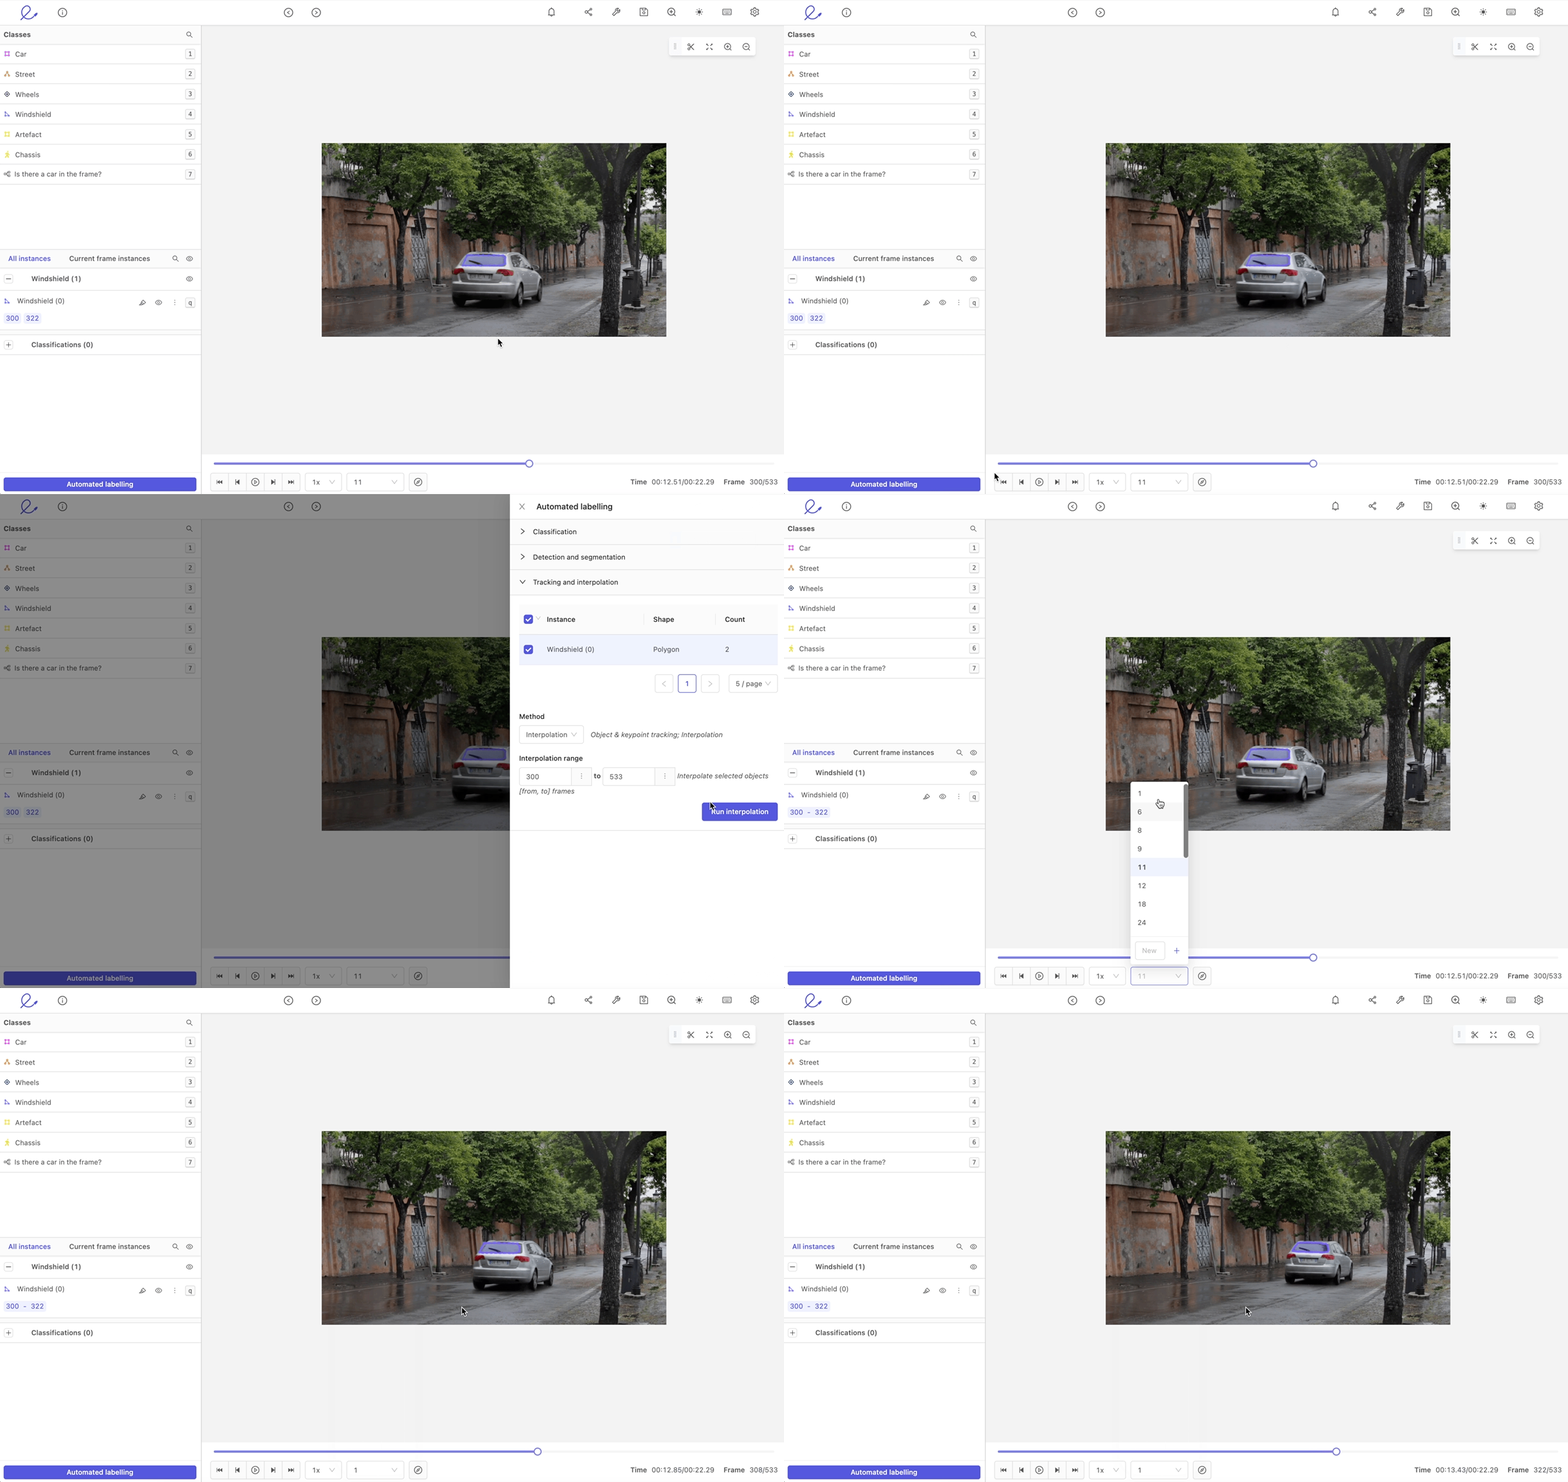
Interpolation is run via the 'Automated labeling' drawer. Click the Automated labeling button to open the drawer. Select Interpolation from the dropdown menu, select the desired objects to interpolate, set the interpolation range (i.e., the range of frames) and click the Run interpolation button. Please note that you need a minimum two labels of an instance to run interpolation.
You can read more about interpolation here
Rotating box
Traditional bounding boxes are great for annotating objects that appear in horizontal or vertical orientation, however, their accuracy may be limited when it comes to annotating objects at an angle. In such cases, use rotatable boxes to produce more accurate annotations.
Creating a rotatable bounding box requires an ontology with a rotatable box annotation type. Rotatable box labels can be assigned with static classifications should they be defined in your ontology.
Instantiate a new rotatable box label by clicking on the specified class in the 'Classes' menu or using the specified hotkey. Resize rotatable boxes like normal bounding boxes, and then grab the rotation handle to adjust the position until you're satisfied with the annotation's accuracy, as below.
Polygon
Creating a polygon requires an ontology with a polygon annotation type. Enable or disable free-hand drawing mode by pressing d on your keyboard. Polygon coarseness for polygons drawn free-hand is set in the 'Settings' drawer in the Drawing settings dropdown. Instantiate a new polygon instance by clicking on the specified class in the 'Classes' menu or using the specified hotkey (e.g., 1, 2, 3).
A polygon can be closed by double-clicking anywhere on the canvas. Doing so will "snap" creating an edge between the last vertex to the first vertex drawn.
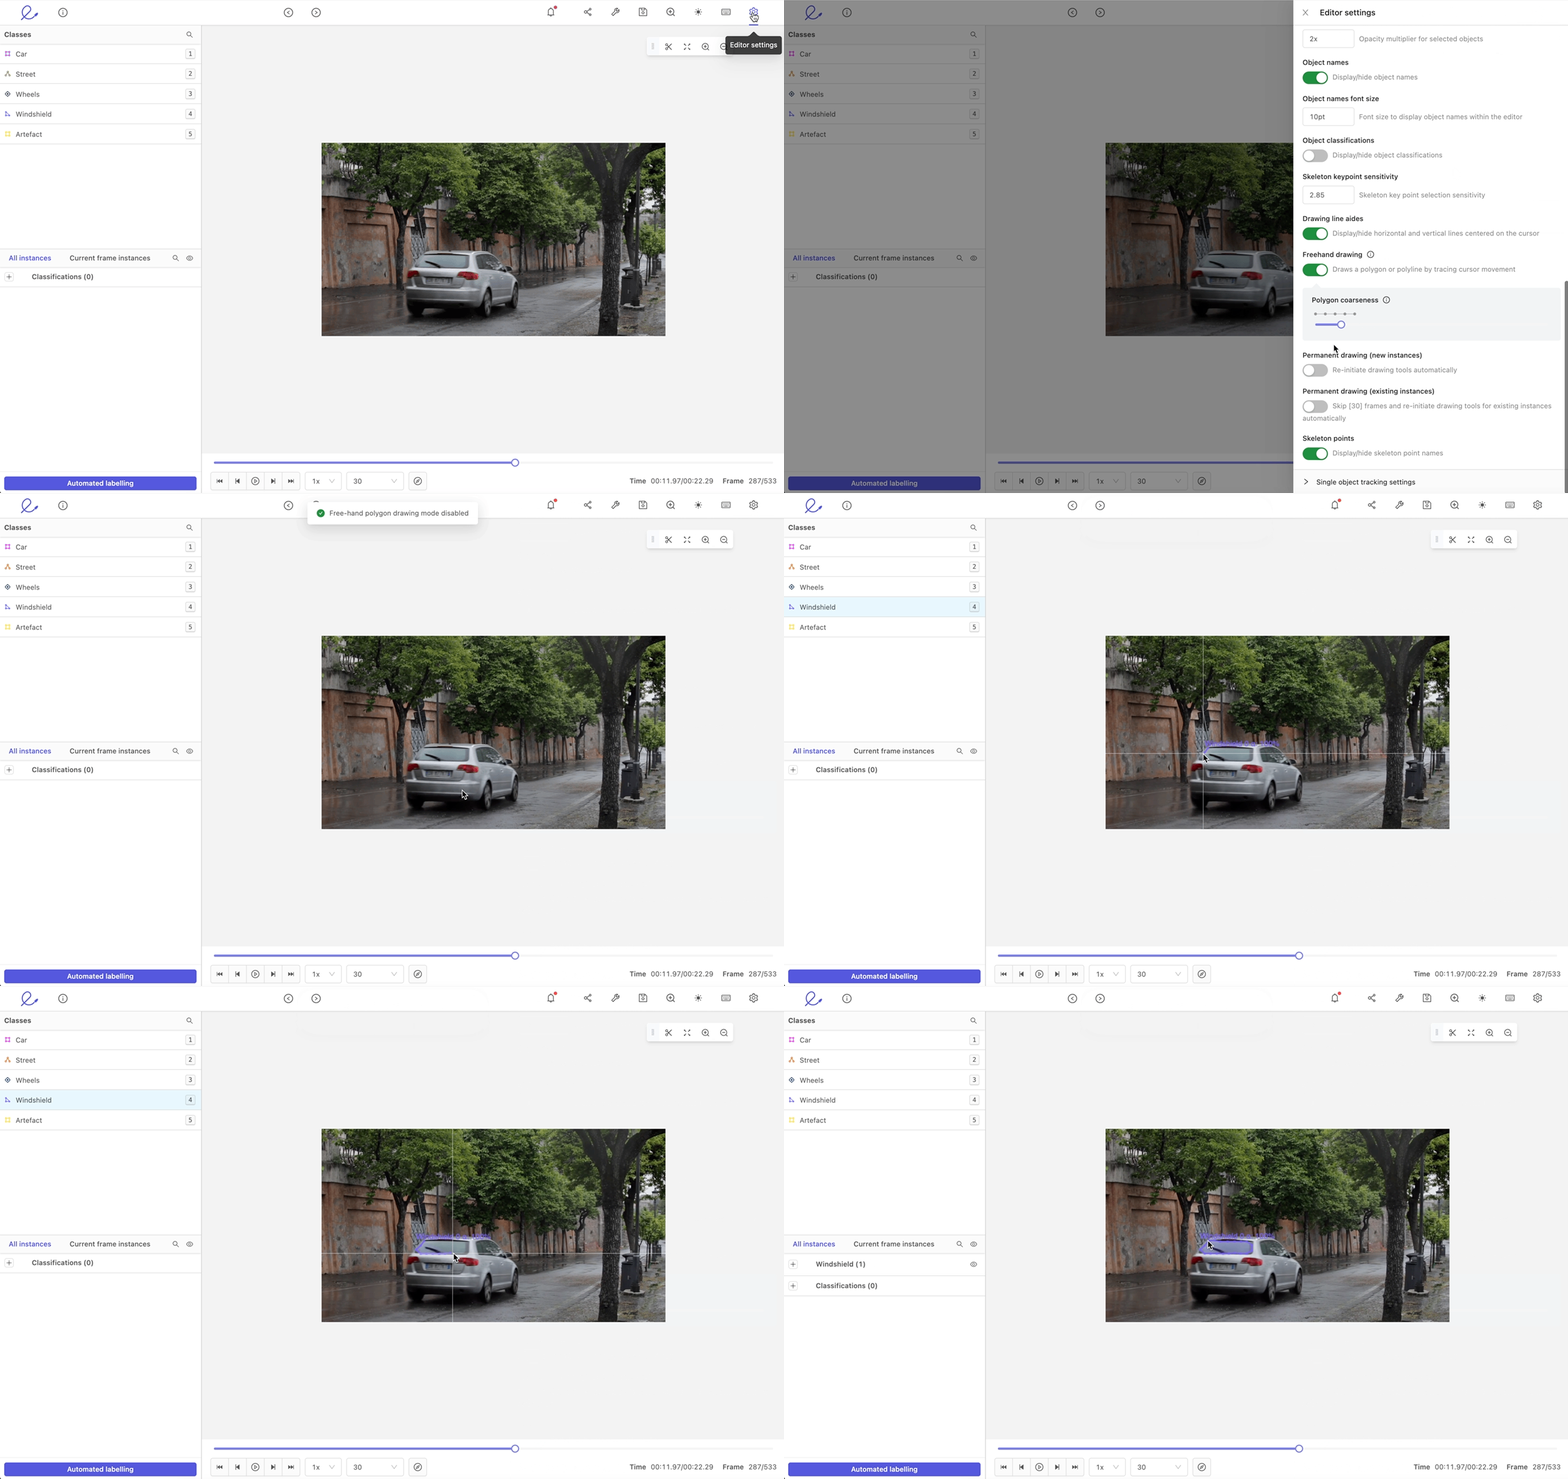
Instantiate existing polygon instances (i.e., polygons that should keep the same identifier in preceding or succeeding frames) by clicking on the Highlight icon for the specified object or using the assigned hotkey (e.g., q,
w, e). See the bounding box [documentation](/annotate/editor/videos#bounding-box) for visual instructions on how to instantiate existing polygons.Polygons can be copy/pasted between frames using cmd (MacOS)/ctrl (Windows) + c to copy the object to the clipboard and cmd/ctrl + v to paste it on the desired frame.
Polygon instances can be assigned with static and dynamic classifications should they be defined in your ontology:
- Highlight an object by clicking on it in the editor canvas or by clicking on the Plus icon or start/end frame in the range overview for the specified polygon
- Assign classifications by clicking on the relevant buttons or using the set hotkeys (e.g., q,u).
See the bounding box documentation for visual instructions on how to assign classifications.
Interpolation
Run polygon interpolation following the instructions for bounding box, which you can find here. Unlike other linear interpolation methods, Encord's polygon interpolation algorithm does not require a matching number of vertices between polygon objects in set keyframes. Our algorithm also allows you to draw polygons in arbitrary directions (e.g., clockwise, counterclockwise, and otherwise).
Editing polygons with the brush tool
You can edit existing polygons with the brush tool. This allows you to create complex shapes in a much faster way than going vertex by vertex. To use the brush tool, select an existing polygon and then click on the brush tool button. This will show the brush tool settings panel where you can choose brush or eraser and change its size. Once you are done editing, click the "x" to go back to the label editor. Use the scissors tool if you'd like to remove vertices.
Polyline
Creating a polyline requires an ontology with a polyline annotation type. Enable or disable free-hand drawing mode by pressing d on your keyboard. Polyline coarseness for polylines drawn free-hand is set in the 'Settings' drawer in the Drawing settings dropdown. Instantiate a new polyline instance by clicking on the specified class in the 'Classes' menu or using the specified hotkey (e.g., 1, 2, 3).
Polylines can be copy/pasted between frames using cmd (MacOS)/ctrl (Windows) + c to copy the object to the clipboard and cmd/ctrl + v to paste it on the desired frame.
Complete a polyline by double-clicking anywhere on the canvas.
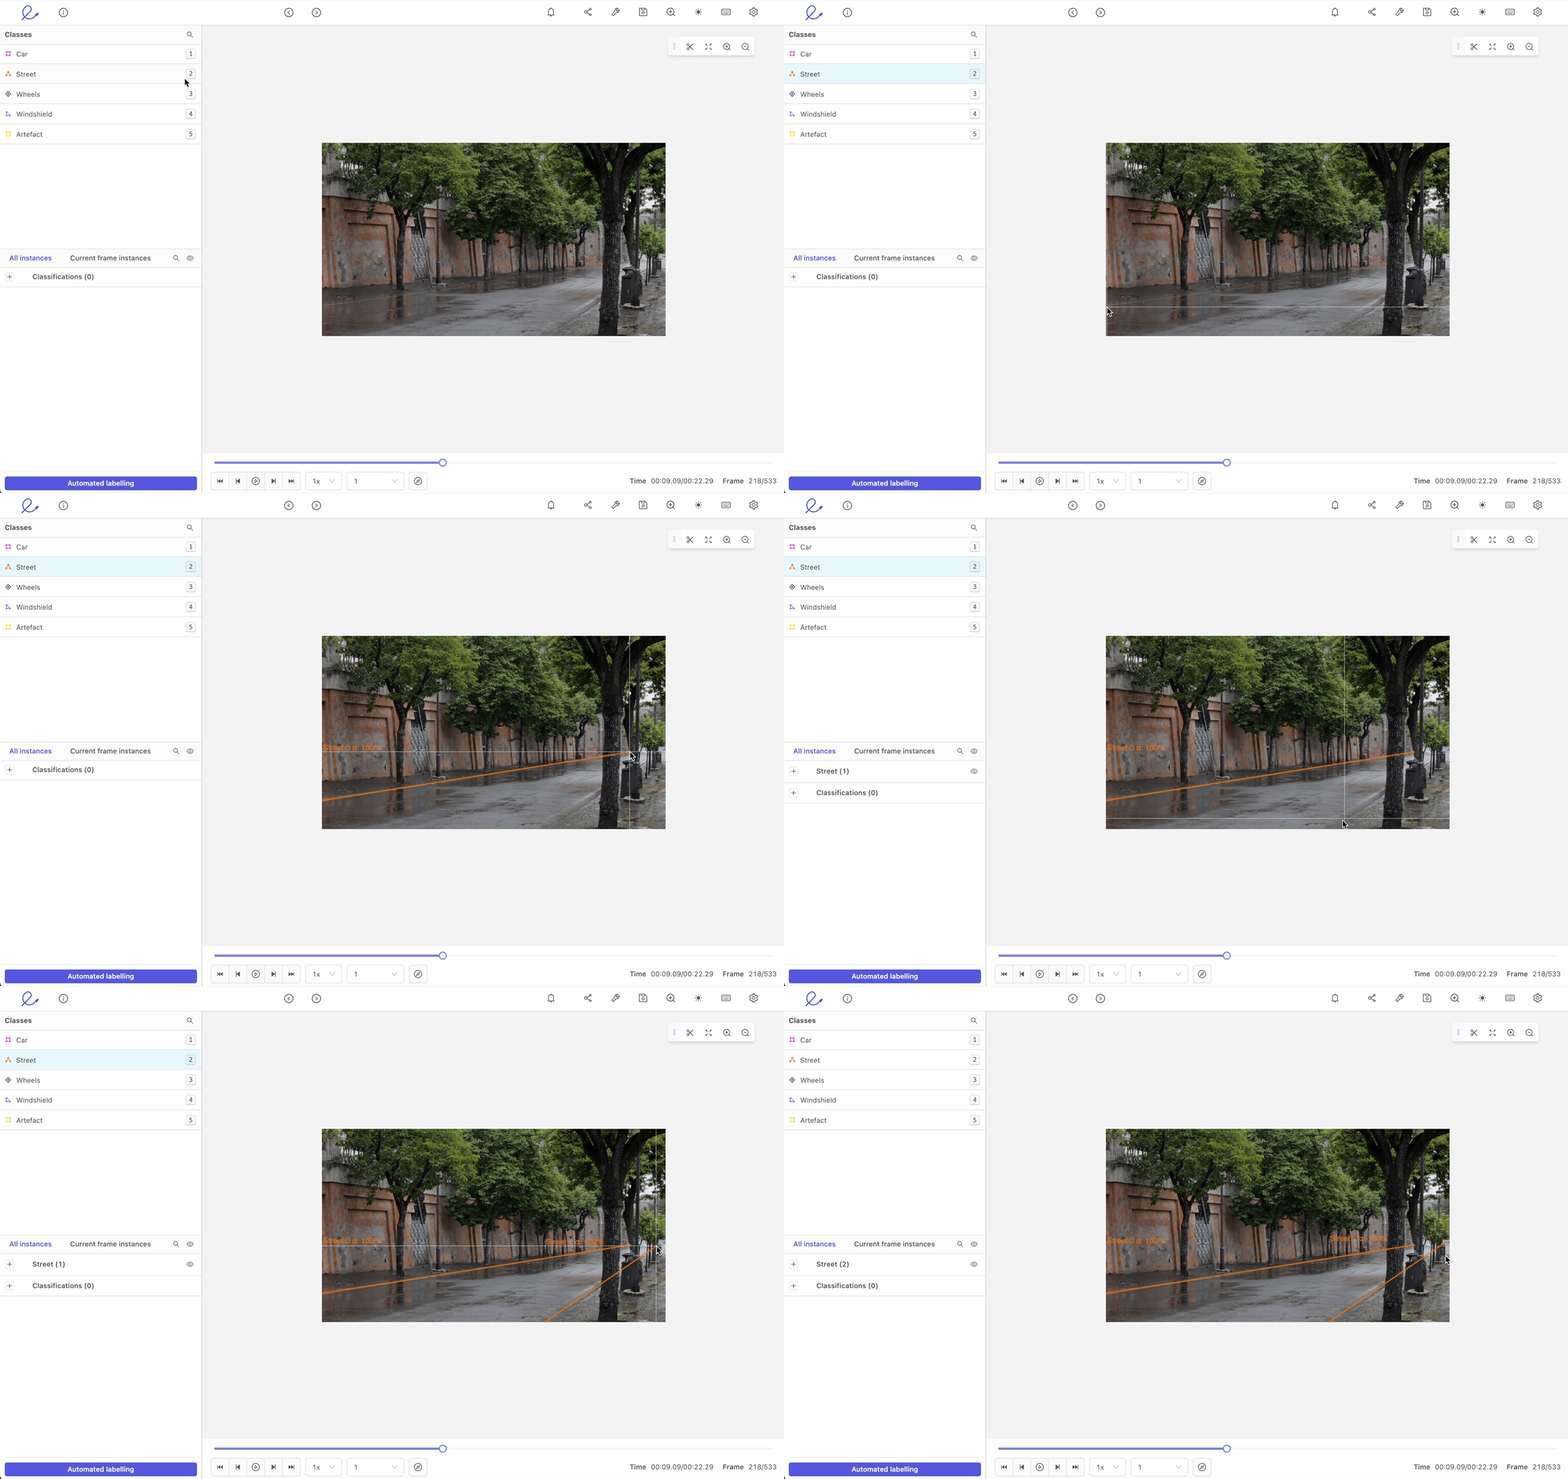
Instantiate existing polyline instances (i.e., polylines that should keep the same identifier in preceding or succeeding frames) by clicking on the Highlight icon for the specified object or using the assigned hotkey (e.g., q, w, e). See the documentation for visual instructions on how to instantiate existing polylines.
Polyline instances can be assigned with static and dynamic classifications should they be defined in your ontology:
- Highlight an object by clicking on it in the editor canvas or by clicking on the Plus icon or start/end frame in the range overview for the specified polyline
- Assign a classification by clicking on the relevant buttons or using the set hotkeys (e.g., q, u)
Keypoint
Creating a keypoint requires an ontology with a keypoint annotation type. Instantiate a new keypoint instance by clicking on the specified class in the 'Classes' menu or using the specified hotkey (e.g., 1, 2, 3).
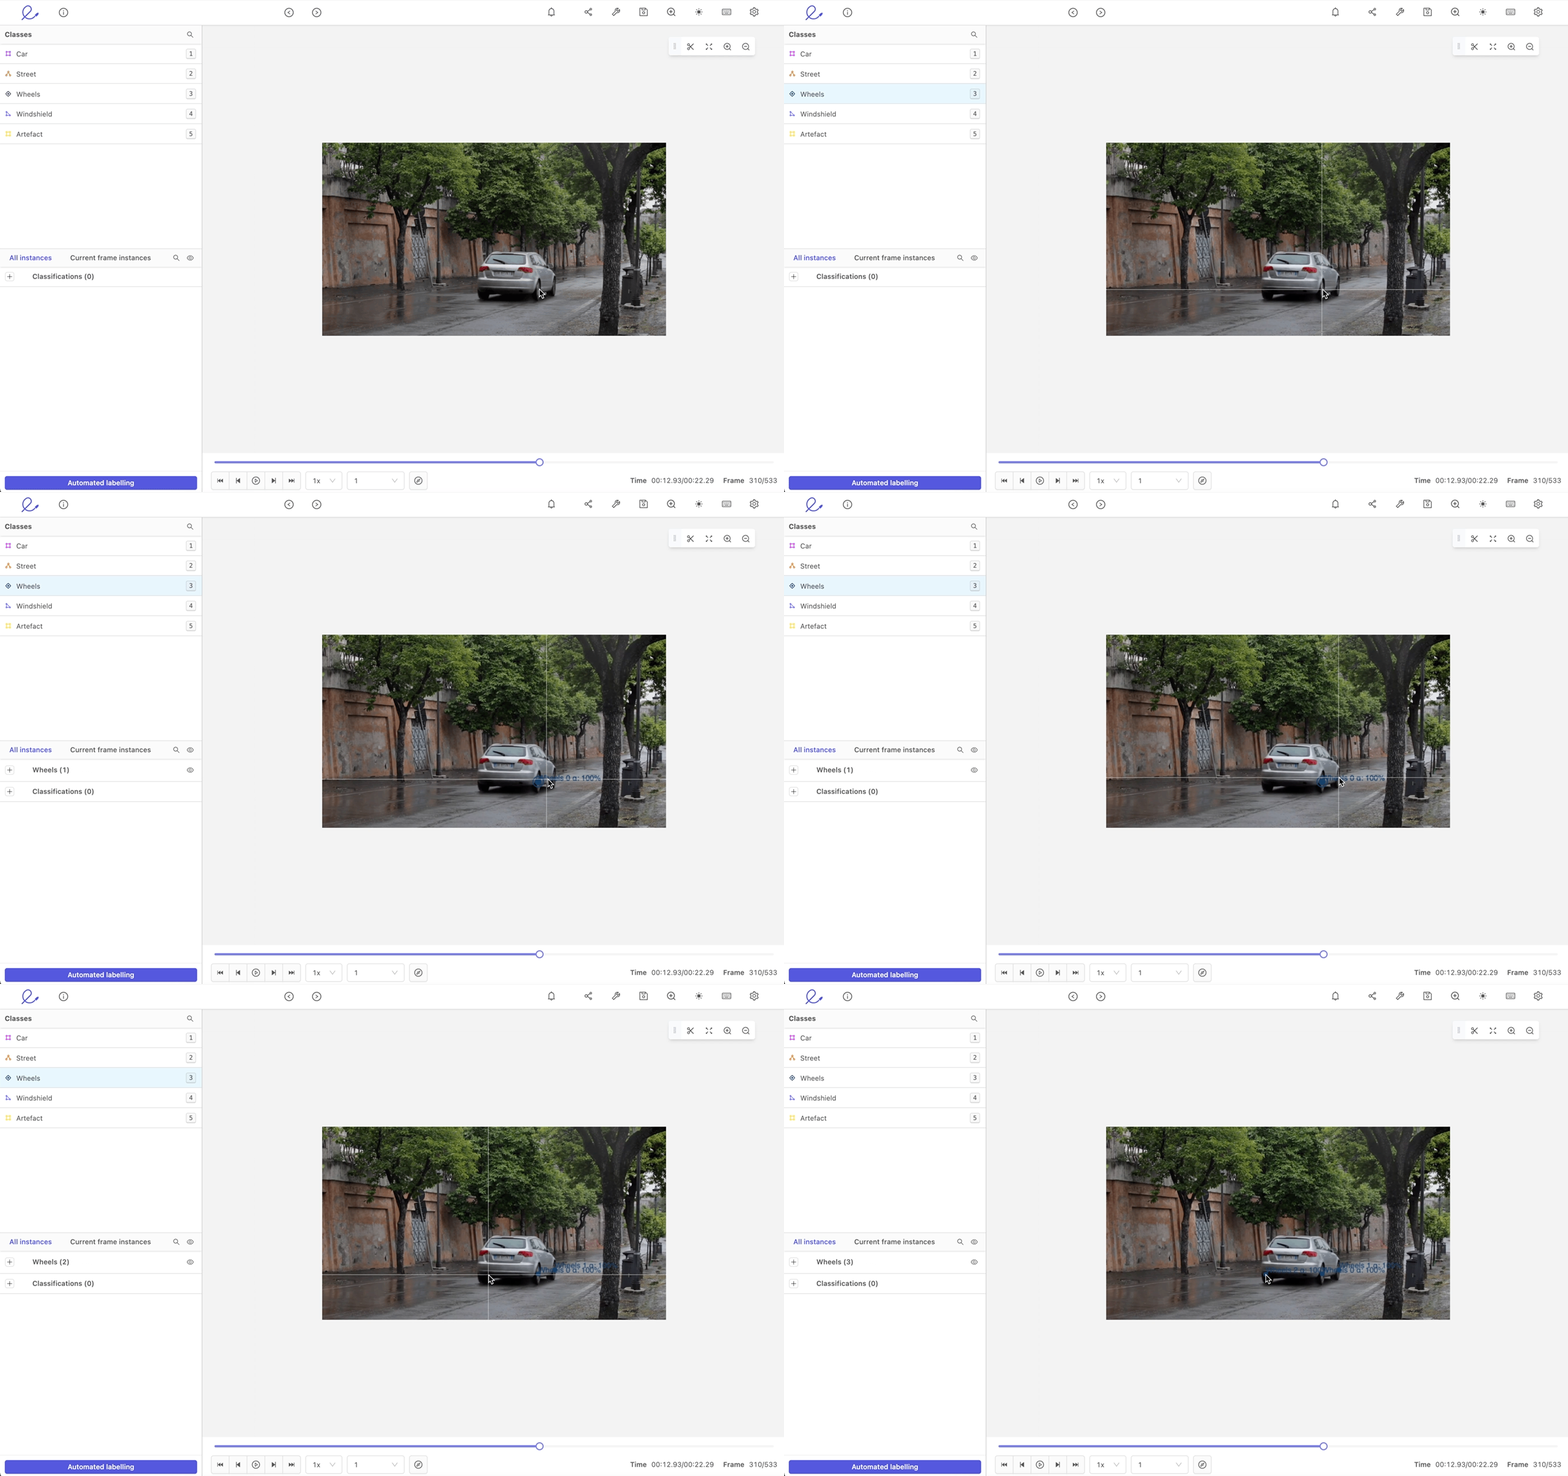
Instantiate existing keypoint instances (i.e., keypoints that should keep the same identifier in preceding or succeeding frames) by clicking on the Highlight icon for the specified object or using the assigned hotkey (e.g., q,
w, e). See the bounding box [documentation](#bounding-box) for visual instructions on how to instantiate existing keypoints.Keypoints can be copy/pasted between frames using cmd (MacOS)/ctrl (Windows) + c to copy the object to the clipboard and cmd/ctrl + v to paste it on the desired frame.
Keypoint instances can be assigned static and dynamic classifications should they be defined in your ontology:
- Highlight an object by clicking on it in the editor canvas or by clicking on the Plus icon or start/end frame in the range overview for the specified keypoint
- Assign classifications by clicking on the relevant buttons or using the set hotkeys (e.g., q,u).
See the bounding box documentation for visual instructions on how to assign classifications.
Automated tracking
Run automated keypoint tracking following the instructions for bounding box, which you can find here.
Interpolation
Run keypoint interpolation following the instructions for bounding box, which you can find here.
Primitives
Creating a primitive (f.k.a. skeleton templates) requires an ontology with a primitive annotation type. Use primitives to templatize shapes (e.g., 3D cuboids, pose estimation skeletons ) commonly used by your annotation team.
Instantiate a new primitive instance by clicking on the specified class in the 'Classes' menu or using the specified hotkey (e.g., 1, 2, 3).
Instantiate existing primitive instances (i.e., primitives that should keep the same identifier in preceding or succeeding frames) by clicking on the Highlight icon for the specified object or using the assigned hotkey (e.g., q, w, e). See the bounding box documentation for visual instructions on how to instantiate existing primitives.
Primitives can be copy/pasted between frames using cmd (MacOS)/ctrl (Windows) + c to copy the object to the clipboard and cmd/ctrl + v to paste it on the desired frame.
Primitives allow you to define properties of edges defined in your template as visible, occluded, or invisible. Toggle the edge property settings for a primitive by highlighting the primitive and clicking the Show controls button.
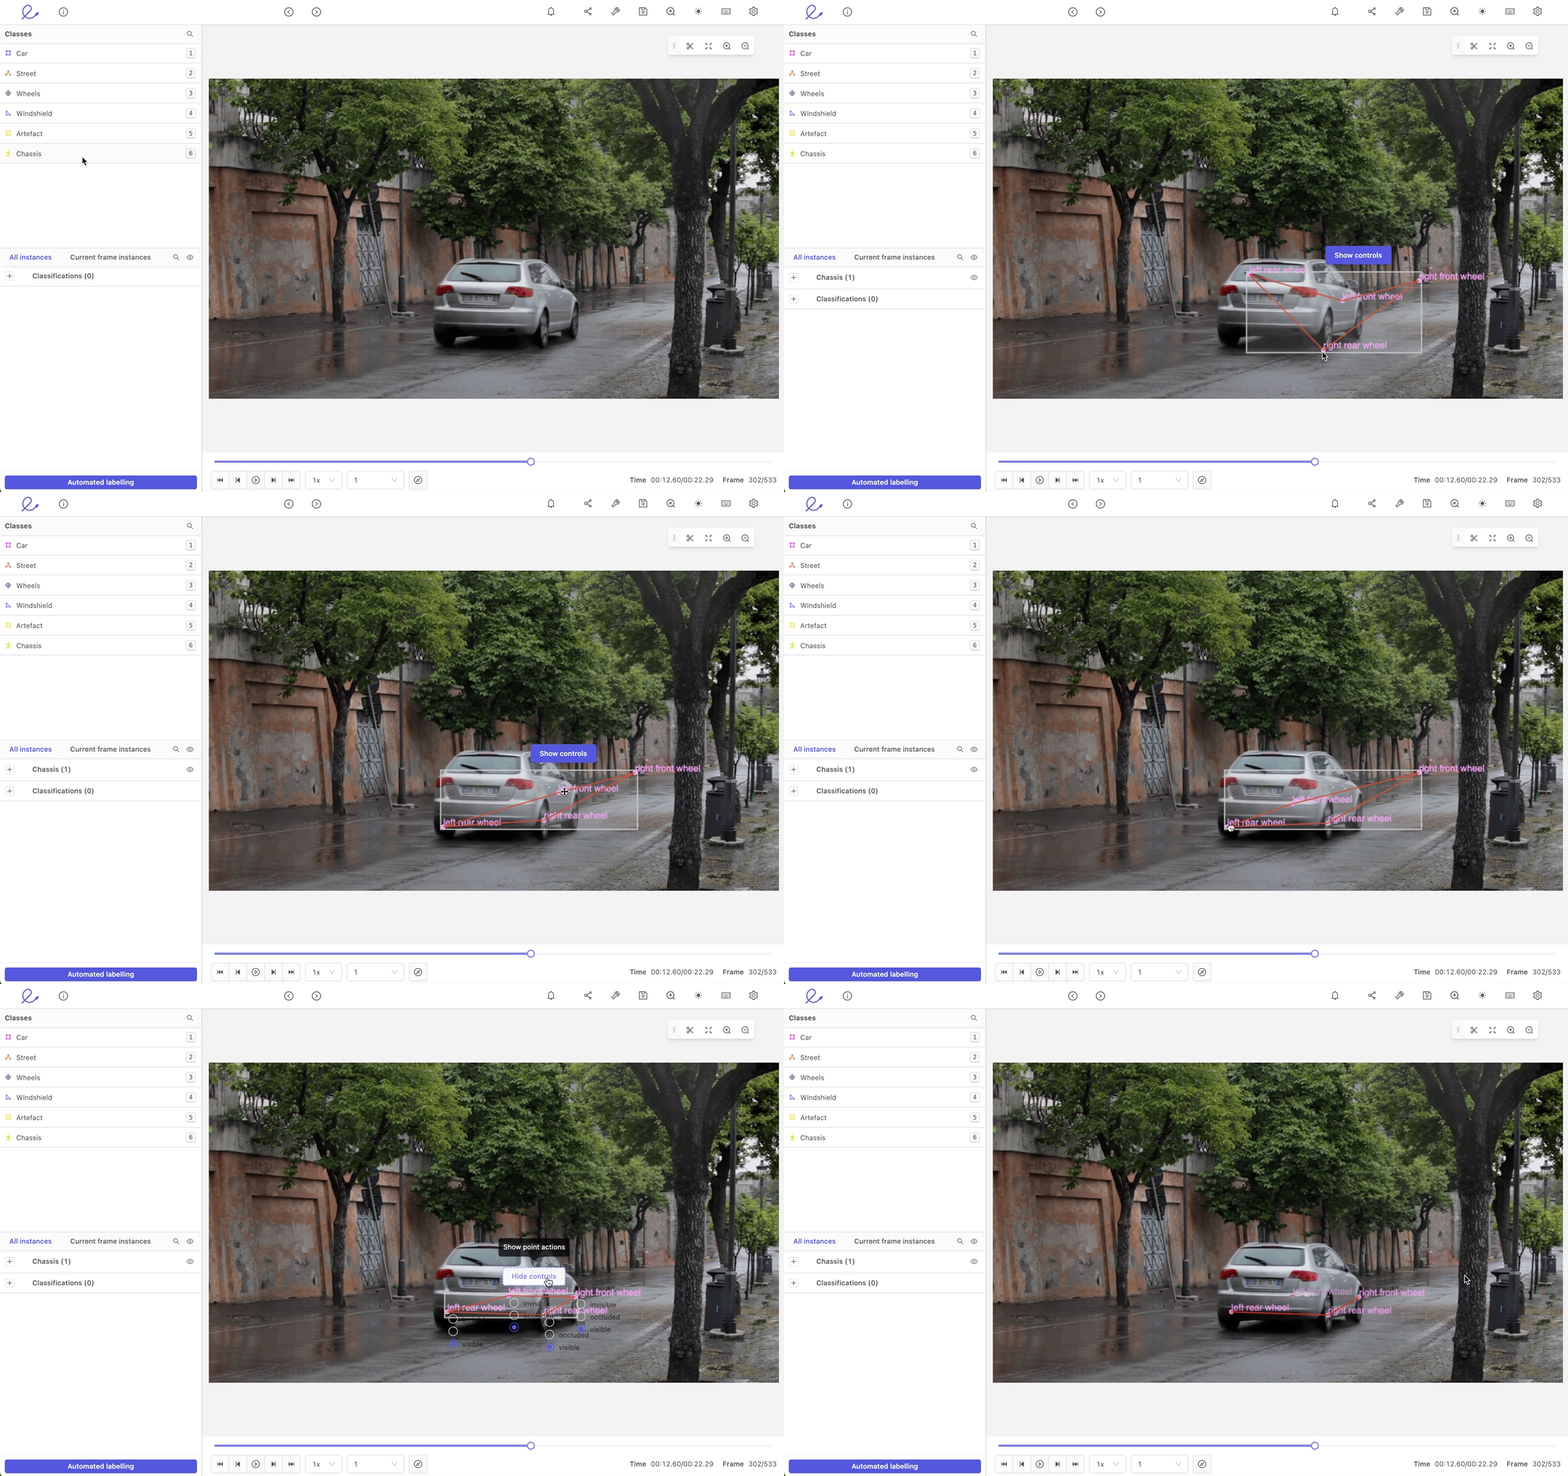
Primitive instances can be assigned with static and dynamic classifications should they be defined in your ontology:
- Highlight an object by clicking on it in the editor canvas or by clicking on the Plus icon or start/end frame in the range overview for the specified primitive
- Assign classifications by clicking on the relevant buttons or using the set hotkeys (e.g., q, u) See the bounding box documentation for visual instructions on how to assign classifications.
Automated tracking
Run automated primitive tracking following the instructions for bounding box, which you can find here.
Interpolation
Run primitive interpolation following the instructions for bounding box, which you can find here.
Frame classification
Creating frame classification(s) requires an ontology with a classification annotation type. Frame-level classifications consider the frame as a whole, not the objects' localization. Instantiate a frame-level classification instance by clicking on the specified class in the 'Classes' menu or using the specified hotkey (e.g., 1, 2, 3).
Set the desired start and end frame by clicking the Set start to current and Set end to current buttons or using the set hotkeys c and v, respectively. Click the This frame button or the x hotkey to set the slider to only the current frame (e.g., frame 100). Add additional ranges by clicking the Add range button or pressing the n hotkey to add a frame range (e.g., if a car enters and leaves the frame throughout a video). Click the Save button or the m hotkey to save the instance. Use the This frame & save button or the z hotkey to classify and save the results for a single frame quickly.
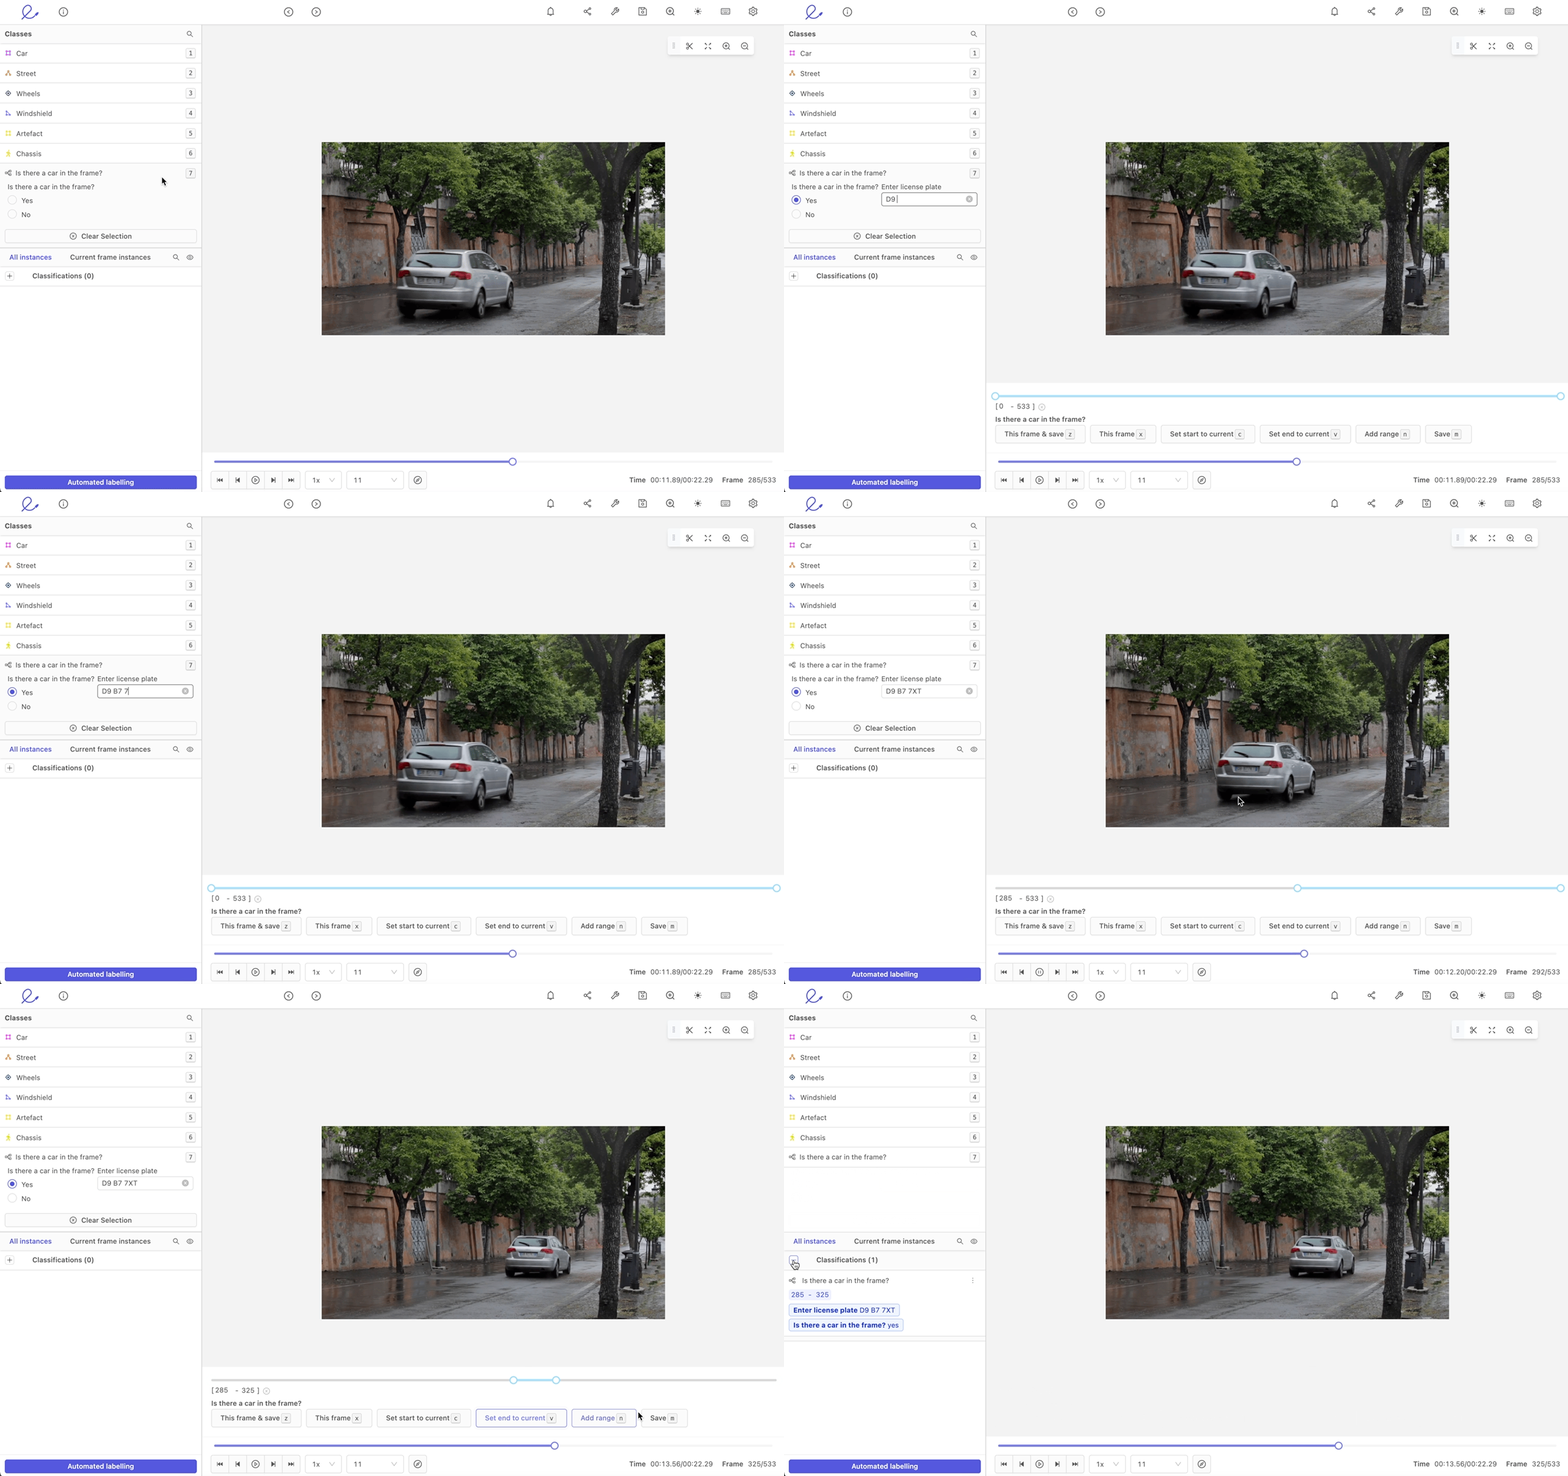
Encord currently supports radio, checklist, and free-form text input classification types.
Edit existing classification instances by clicking on the Plus icon for the specified instance in the 'Classifications' pane in the 'All instances' section.
Dynamic classification
Static classifications define the global properties of an object (e.g. the car is red and has four wheels) whereas dynamic classifications change with time (e.g., the car is turning right from frames 0 to 100 and left from frame 101 to 150). Dynamic classifications are also frequently called "actions" or "events". Assigning dynamic classifications to objects requires an ontology with the dynamic classification flag for a particular nested classification on an object.
Encord supports dynamic classifications for all object annotation types (i.e., bounding box, polygon, polyline, keypoint, and primitives).
Highlight the desired object to assign dynamic classifications. Dynamic classifications are recognized by the Dynamic tag next to the given feature in the ontology. Dynamic classifications are only applied in the frames specifically indicated but can be edited in ranges if they span multiple frames.
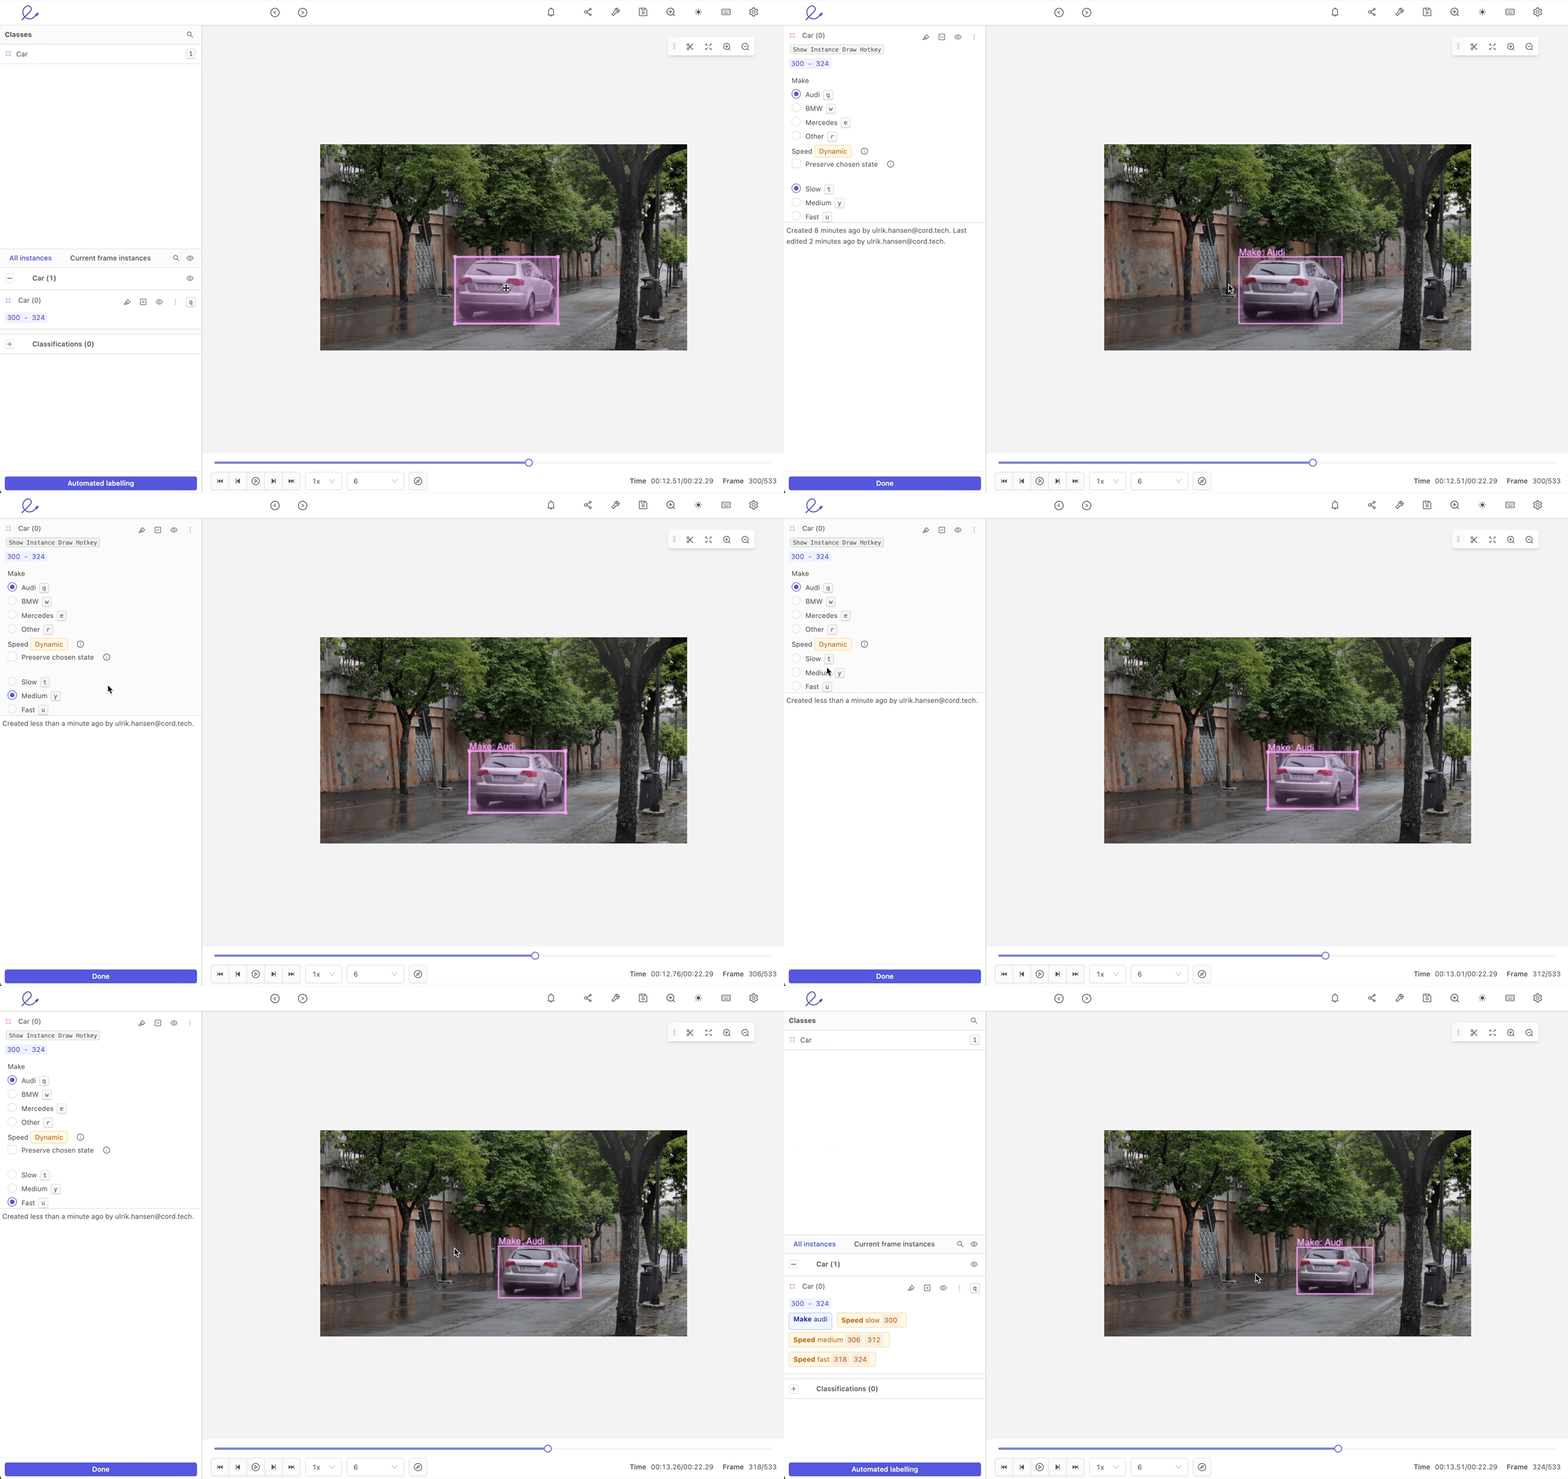
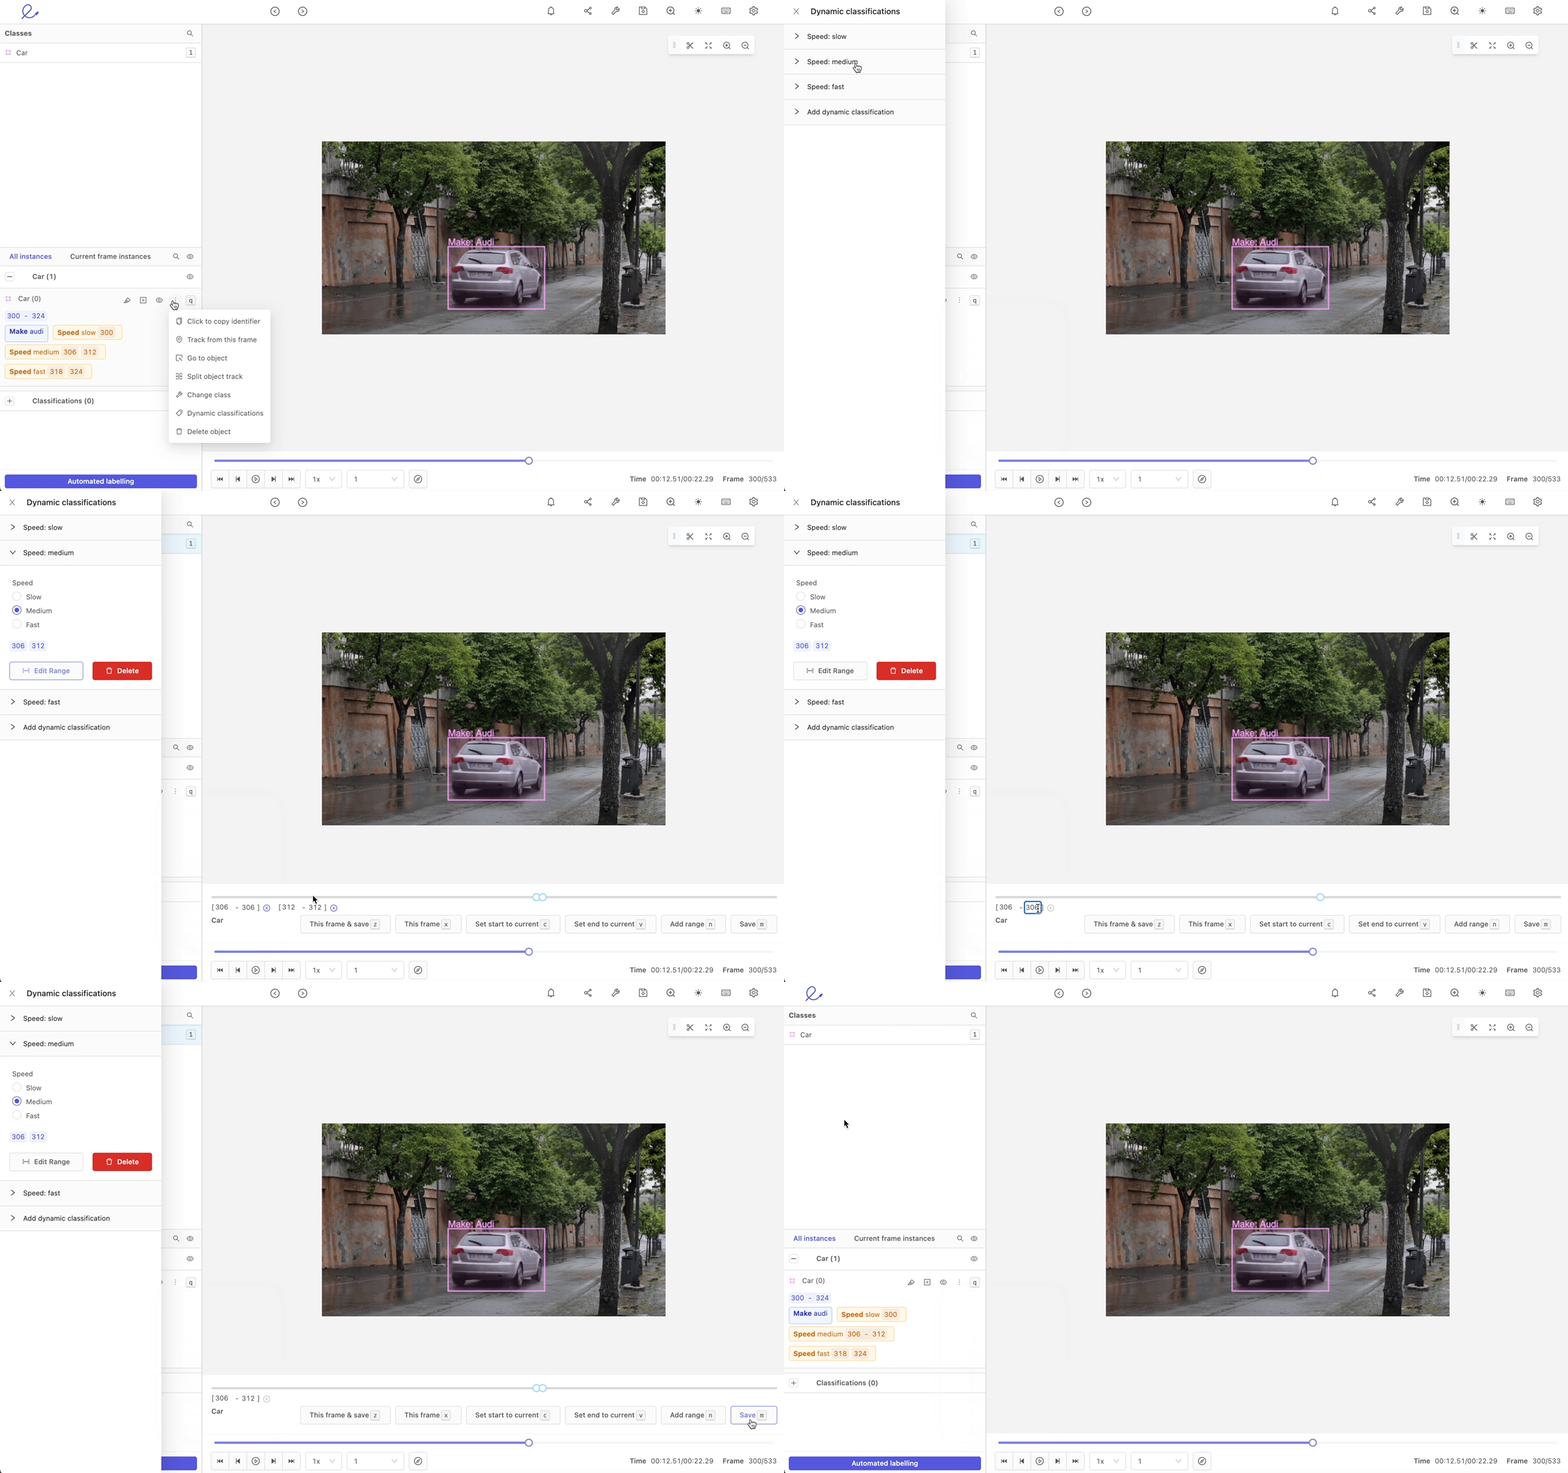
Edit the ranges of dynamic classifications by toggling the object menu dropdown, selecting the relevant dynamic classification, and clicking the Edit range button. Use the progress bar to change the specified range.
Editor timeline
The editor timeline is a visualization of the times and durations at which objects and instances appear within a video. Every object added by an annotator will automatically appear on the timeline at the point in time where it is added. The colors of an object on the timeline match those used to label the objects in the video.
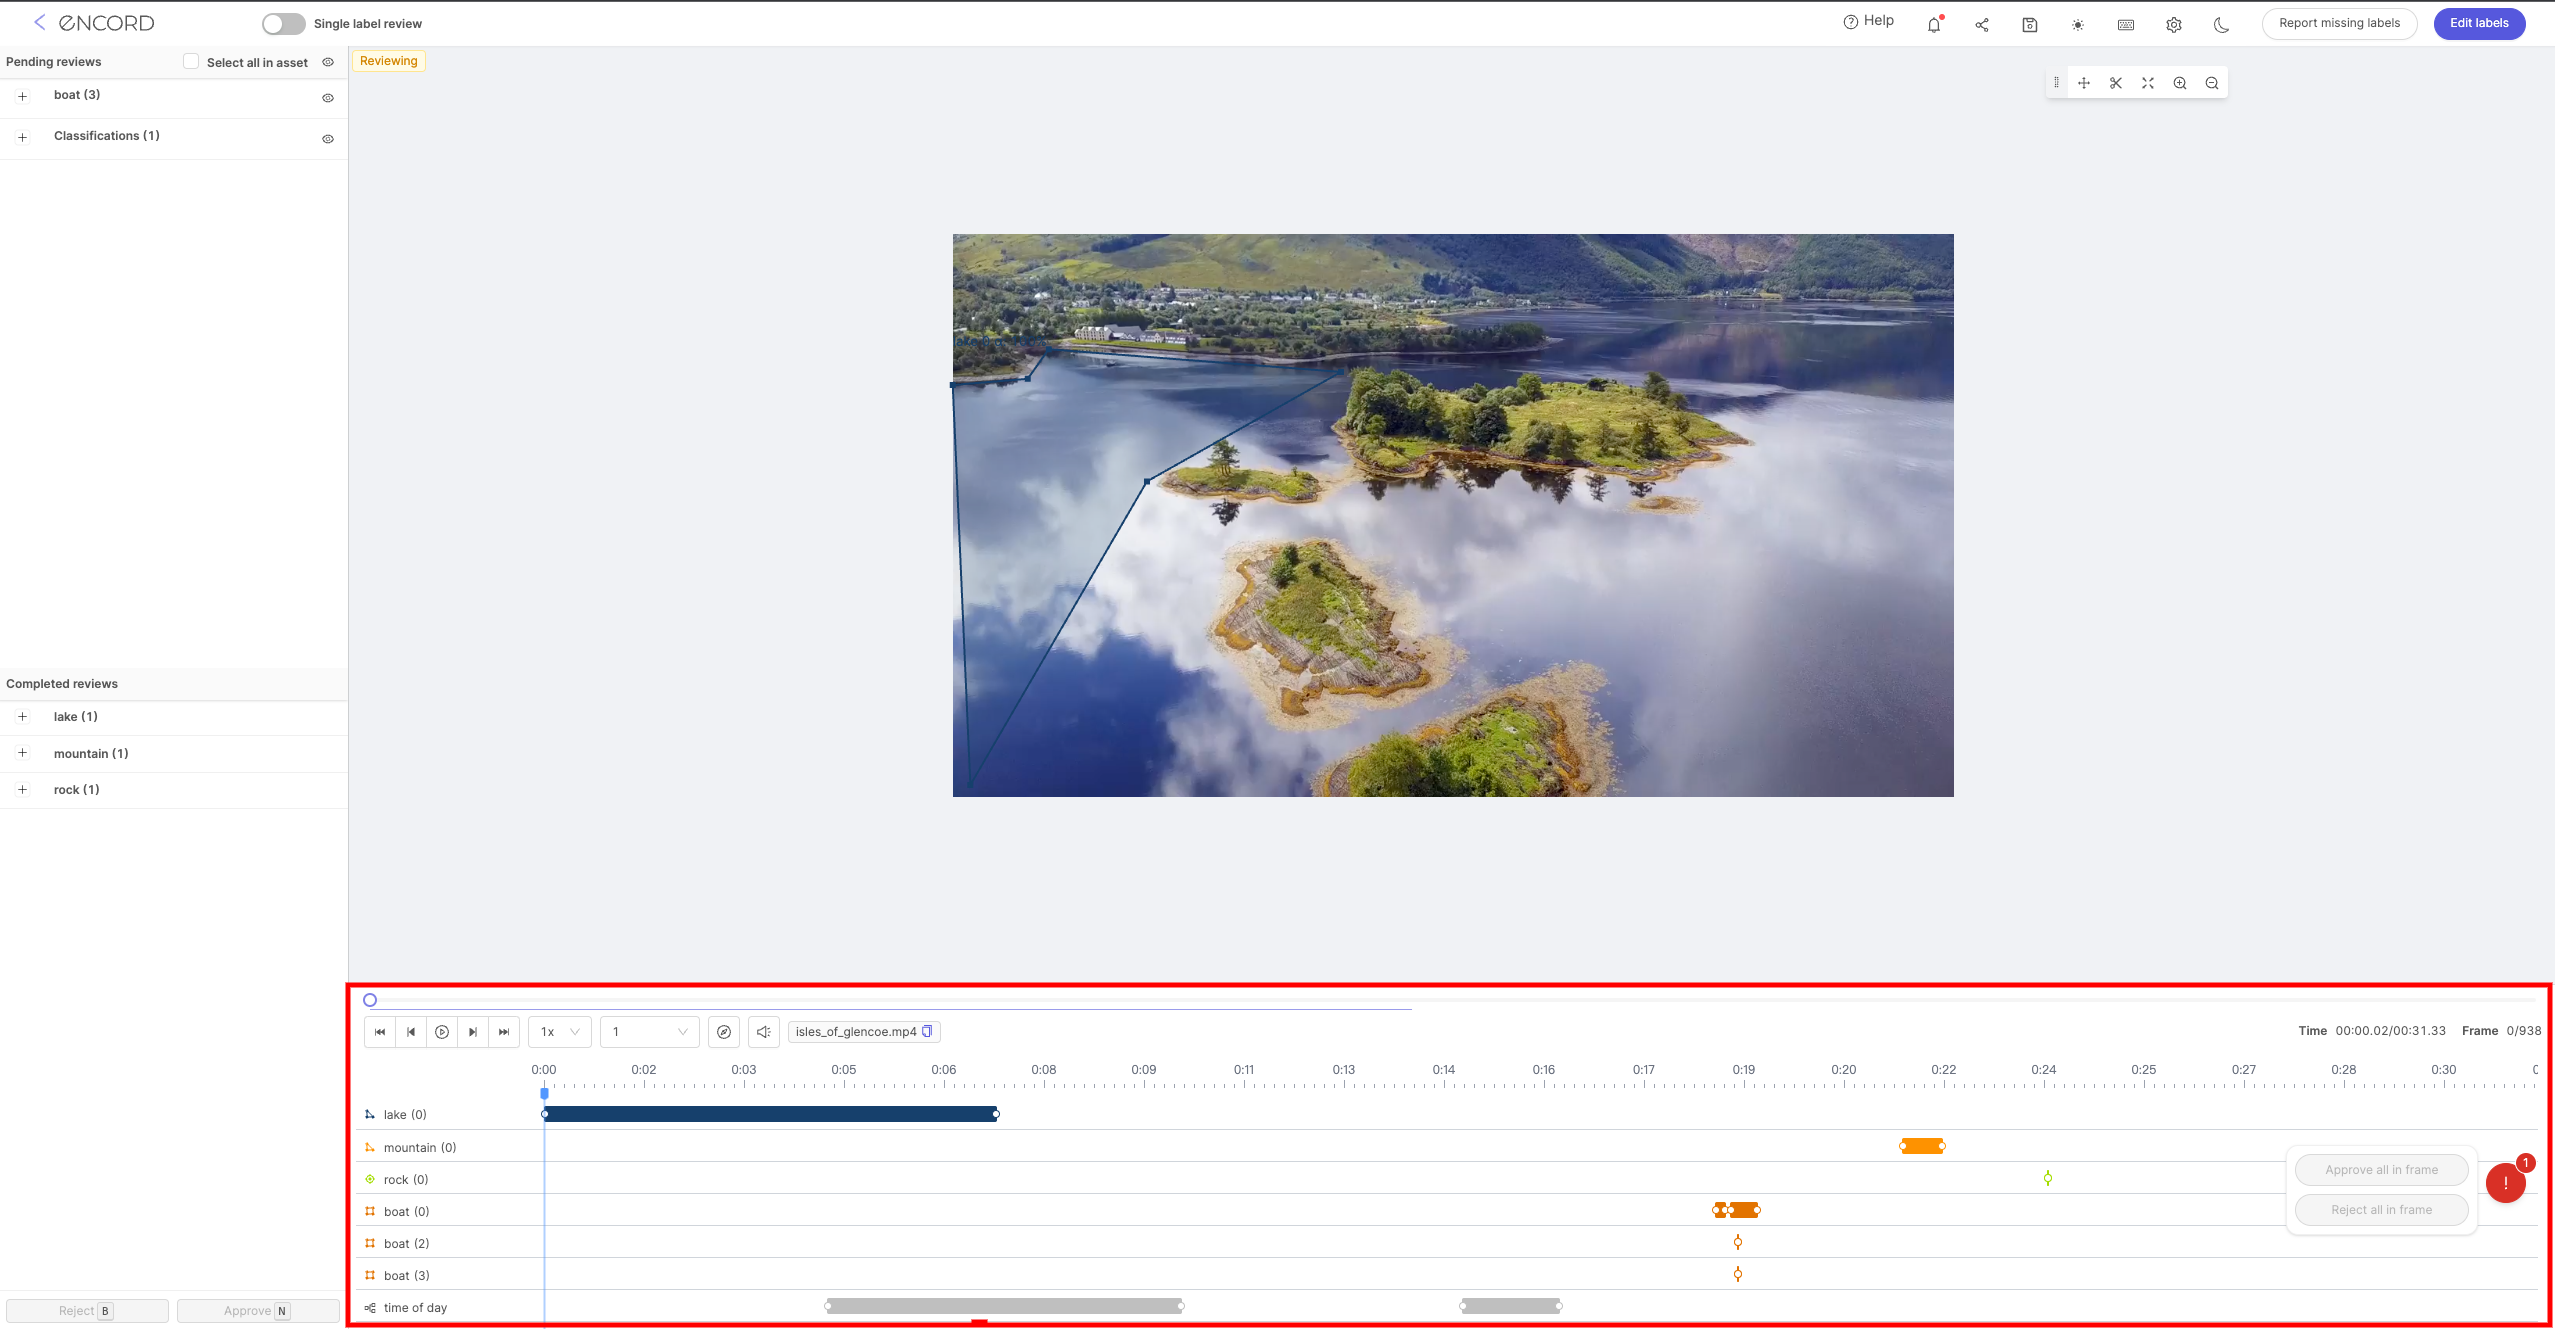
For example, the timeline in the image above shows that:
- The 'lake' object was added at the start of the video (0:00), and is present in all frames in the first 7 seconds of the video.
- There are 3 separate instances of a 'boat' object - the times in the video at which they appear, and the duration of the annotations.
The timeline moves as the video is played, so that the location of the cursor on the timeline always corresponds to the frame currently being displayed.
Clicking an object or instance on the timeline will bring up the first frame at which it is present, and display the instance label's classification properties.
The editor timeline is visible by default when using the label editor. It can be re-sized or completely removed by dragging it either up or down, as seen below.
The editor timeline is available in both the 'Annotation' and 'Review' states for videos.
Automation
Supported annotation types & corresponding automation features are listed in the table below.
| Annotation type | Automated tracking | Interpolation | Import predictions | Model training & inference |
|---|---|---|---|---|
| Bounding box | ✅ | ✅ | ✅ | ✅ |
| Rotatable bounding box | ✅ | ✅ | ✅ | Coming soon |
| Polygon | Coming soon | ✅ | ✅ | ✅ |
| Polyline | Coming soon | ✅ | ✅ | Coming soon |
| Point | ✅ | ✅ | ✅ | ✅ |
| Primitive | ✅ | ✅ | ✅ | N/A |
| Frame classification | N/A | N/A | ✅ | ✅ |
Automated object tracking
Encord's automated object tracking feature uses a proprietary algorithm that runs without using a representational model. The algorithm works by matching pixel information inside the annotation to subsequent pixels in neighboring frames.
Read more about object tracking and how to use it in our step-by-step guide.

Interpolation
Encord's interpolation feature uses a proprietary linear interpolation algorithm that runs without using a representational model or matching pixel information in neighbouring frames.
Our interpolation algorithm has been built with pragmatic usage in mind. For example, unlike other linear interpolation methods, Encord's interpolation algorithm does not require a matching number of vertices between objects in set keyframes. Our algorithm also allows you to draw object vertices in arbitrary directions (e.g., clockwise, counterclockwise, and otherwise).
Use our step-by-step guide to learn how to use the interpolation feature, and how to improve interpolation results using re-interpolation.
Auto-segmentation
Image segmentation refers to the process of dividing an image into multiple regions or sets of pixels, without constraints on the shape of said regions. The goal of an auto-segmentation tool is to tighten an original polygon segmentation to best match the edges of an enclosed object.
Encord's auto-segmentation feature uses a probabilistic algorithm that considers a neighborhood of a polygon as potential object. It then adjusts the boundaries of the original polygon to best match the inferred object.
To use it, open the Settings drawer and scroll down to the Drawing settings section, and turn the switch for Auto-segmentation ON. Then, draw a polygon around your target object. With auto-segmentation on, there is no need to be completely precise. Finish drawing the polygon and the auto-segmentation feature ensures the polygon will "snap" down to a snug fit around the object of interest.
Import model predictions
Encord's Python SDK & APIs allow you to import model predictions programmatically. Importing model predictions helps to pre-annotate your data to save annotation costs and use our quality control system for model validation.
Model training & inference
Encord allows you to build models for automated data labeling that target individual features in your ontology in an easy-to-use interface. We call these micro-models. Rapidly train micro-models using Encord's GPU-accelerated container orchestration system on sparse amounts of data.
You can read more about creating, training, and using models here.