Label editor
Annotation and review tasks are completed in a purpose-built user interface in the label editor. The label editor interface has two modes which depend on if you're performing an annotate or a review task.
Video tutorials
Video Tutorial - How to annotate
Video Tutorial - How to review annotations
Video Tutorial - Label editor settings
Annotation mode

Annotation mode components
- A. Editor header
- B. Skip and Submit
- C. Quick toolbar
- D. Classes
- E. Instances and Frame labels
- F. Annotation canvas: displays the media asset and provides interface for drawing and editing labels.
- G. Automated labeling
- H. Media navigation controls
Skip and Submit labels
Annotation tasks are completed in the label editor. Hit the Submit button once labeling work is completed and you're confident that the quality and coverage of created labels meet the project requirements. The submitted labels will be selected for review, depending on the project's Quality configuration.
Skipping this task will put it in the back of the task queue, and the next annotation task will automatically open in the label editor if available. When submitting, be sure to resolve all issues first, then press Submit.
Classes
In annotation mode, the Classes section of the label editor shows you the available ontology classes, both objects and classifications. You can create a new instance by either clicking the desired class, or by using the indicated instantiation hotkeys. Learn more about ontologies in general here or learn more about the details of ontology structure on Encord.
Instances and Frame labels
The canvas is your labeling area to annotate the 'instances' of the ontology classes. When you define object instances, sometimes known simply as objects, you are creating an instance of that class. For example, if Apple is the class, 'Apple (0)' is the object.
Confidence score
Each instance or label is assigned a confidence score (denoted with the symbol α) which appears next to the label name.
The confidence score is a measure of a machine learning model's certainty that a given prediction is accurate. The higher the confidence score, the more certain a model is about its prediction.
Manual labels are always assigned α = 100%, while label predictions created via micro-models and automated methods such as interpolation will have a confidence score below 100% (α < 100%).
Micro-models allow you to select a Minimum confidence threshold that determines the lowest confidence that label predictions can have to appear as annotations. It ranges from 0 to 1.
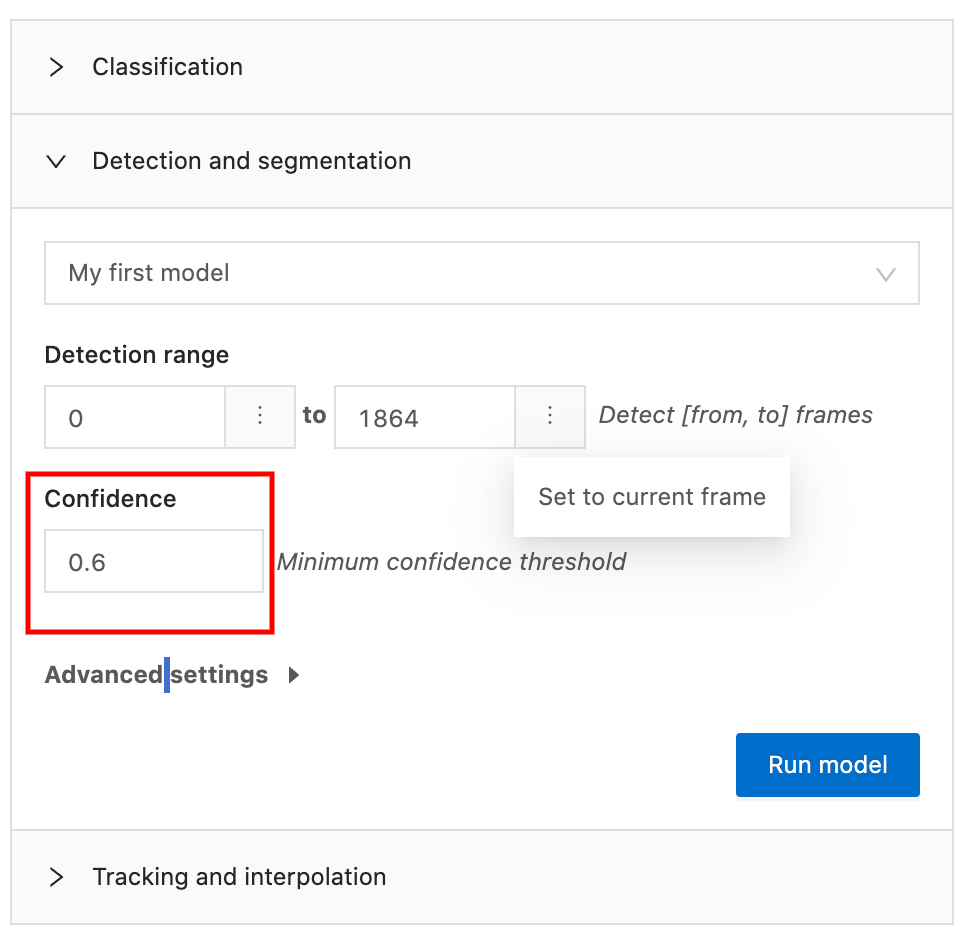
A Minimum confidence threshold of 0.6, as seen in the image above, states that only labels above a confidence score α = 60% will be accepted as labels.
Instance details pane
The sidebar displays the ontology Classes and Instance and frame labels panes, you can click on an instance in the
canvas to open the Instance details pane for that instance. Alternatively, it can be opened by clicking on the
'Edit classifications' ![]() button on a label instance in the Instances tab. Here, you can view the instance class, the instance ID and any nested
classifications if present.
button on a label instance in the Instances tab. Here, you can view the instance class, the instance ID and any nested
classifications if present.
More than just confirming existing information, the details pane, as implied by the 'Edit classifications' button that directs you here, allows you to modify the nested classifications as well. Additionally, for dynamic classifications, you can use the 'Preserve chosen state' feature. When toggled 'ON', subsequent labels of that instance will be created with the dynamic classification having the same value as was selected in the frame where 'Preserve chosen state' was selected.
Note also the Show Instance Draw Hotkey at the top of the pane under instance ID. Mouse over this section to show the
hotkey used to create further labels of this instance. This can be a more convenient way to confirm the drawing hotkey for
this instance, as compared to searching for the instance among the Instance and frame labels pane. To avoid conflicts
with hotkeys used to set nested classifications, you must close the details pane before you can create new labels of
that instance.
Finally, click the frames in the frame range in blue under the Show Instance Draw Hotkey section to jump to the start and end
of various frame ranges where the instance appears. Note that the instance details pane will remain open until you either click
on another instance, click Done or press the Esc key.

Object search
Click the magnifying glass icon to open the Search object interface. Choose the ontology class, and then the sequential ID of the desired instance, and it will appear in the search result area, directly under the class and ID selection fields.
Instances tab
The Instances tab shows all the instantiated objects and classifications in a given data asset.
Objects are grouped first by class, and sorted by creation time within each class, with earlier objects on top. They are named in an "ABC (0)" format, where ABC is the ontology class and 0 is the first instance annotation. Frame-level classifications are all stored under the 'Classifications' section, and sorted by creation time with the oldest first.
To work with the details of any given instance, expand its class in the Instances tab and the following icons in the desired instance row to perform any of the following actions.
Instantiate icon ![]() : Use the Instantiate icon to
create new labels of the given object. You can also use the assigned instance draw hotkey to create new labels of a
given instance.
: Use the Instantiate icon to
create new labels of the given object. You can also use the assigned instance draw hotkey to create new labels of a
given instance.
Edit classifications icon ![]() : Edit
classifications for an existing object. You can reach the same interface by clicking an annotation in the canvas as
well.
: Edit
classifications for an existing object. You can reach the same interface by clicking an annotation in the canvas as
well.
Hide icon ![]() : Click the Hide icon at the class level to toggle display or all instances of that class.You can hide or show individual objects by clicking in the corresponding object row as well.
: Click the Hide icon at the class level to toggle display or all instances of that class.You can hide or show individual objects by clicking in the corresponding object row as well.
Click the three dots icon (![]() ) to access additional actions.
) to access additional actions.
Copy identifier: Each object instance is automatically assigned a unique alphanumeric ID, which can be used to identify it within the project. This ID is sometimes known alternately as a feature hash, instance hash, or instance identifier. For objects and classifications, it may also be known as the object hash or classification hash, respectively. Use this button to copy the instance identifier to your clipboard -- which may help in workflows using specific instances in source code or for other purposes.
Track from this frame: Initiates single object tracking, a form of automated labeling that will create labels for the specified object from the current frame, according to the Single object tracking settings section in the editor settings.
Go to object: Navigate to the specified object in the data asset. If it is present in more than one frame, go to the first frame.
Split object track: In some cases, particularly when many objects overlap, labels may be associated with the correct instance in several frames, but later become associated with a different instance. In those cases, use the Split object track feature, which will split the labels from one instance into two at the frame specified.
Change class: Use the dropdown in the modal to change the current class of an instance. Note that you can only switch within classes of the same annotation type, i.e. you cannot switch from a bounding box to a polygon.
Dynamic classifications: Use dynamic classifications to attach temporally sensitive attributes to objects in a video or image sequence. For example, annotate heavily occluded objects to help models perceive object occlusions in videos. Use this interface to launch the dynamic classifications editor which allows to create, edit, and delete ranges of dynamic classification on this object.

Delete object: Delete an object from a single frame or a range of frames. To delete labels between frame ranges, move the frame slider to the desired frames, or input the From and To (exclusive) values in the relevant form. Delete actions are recorded in the User activity log. You can view the deleted objects in the Activity reports.
Frame labels tab
The Frame labels tab will show all instances with a label in the current frame, and will be empty when there are no labels in a given frame.
Automated Labeling
See our documentation on micro-models to learn how to create, train, and use models to automate labeling!
Segment anything model (SAM)
Segment anything model (SAM) allows you to create labels around distinct features in all supported file formats.
- Click the
 icon within the Polygon class.
 - Click on the part of the frame or image you would like segmented.
- Left-click a section you would like to add to your label.
- Right-click a part of the selected area to remove it from the label.
- Click Add label once the area you want labeled is highlighted.
A step-by-step guide for using Encord's segment anything model can be found here.
Bulk label operations
Fixing incorrect labels are an important step in producing high-quality datasets. With bulk label operations, annotators can merge labels which should really be one instance, or efficiently delete multiple labels in bulk.
Merge operations
Merge one or more label objects into a single object. To do this, select all the involved objects from the Select objects to be merged drop-down menu. Then, select the target object in the form field which says Select objects to be merged into. Press Merge to execute the merge operation.

Delete operations
Encord also lets you perform bulk delete operations as follows:

Remove labels of a specific class From the Select class menu, select a class to delete, and specify the frame range in the respective fields, and click the Delete button.
Delete all labels within a frame range Use Delete all labels from range as needed to delete all annotations across all classes within a frame range.
Delete labels below confidence Labels generated by automatic labeling agents, such as micro-models, have an associated confidence which indicates the degree of certainty the agent had when making the prediction. A confidence of 1 is essentially "ground truth", so numbers less than that are percentages of confidence. Explore your predicted labels to find confidence levels which are of acceptable / unacceptable quality, and delete all those below a given confidence threshold at once with this convenient feature.
Review mode
Video Tutorial - How to review annotations
As a reviewer, your label editor workspace will look as below. Learn how to use the features in the components illustrated below.

Review mode components
- A. Single label review toggle
- B. Editor header
- C. Report missing labels / Edit labels
- D. Pending reviews pane
- E. Quick toolbar
- F. Completed reviews pane
- G. Approve and Reject all in frame buttons
- H. Reject and Approve buttons
- I. Media navigation controls
Single label review
The normal review mode displays all labels simultaneously, allowing you to quickly approve or reject many labels in bulk actions. Alternately, enter the Single label review mode by toggling the switch at the top left. The single label review mode automatically highlights the selected instance, and hides all other objects. This allows you to carefully review one instance at a time including their nested classifications, and quickly iterate through the different instances using the Up and Down keys on your keyboard or by clicking the appropriate buttons in the UI.
- This Single label review feature can also be considered "turbo review mode," analogous to the "turbo attribute mode" in annotation mode, because it allows the reviewer to quickly step through and review instance attributes.
- "Turbo attribute mode" in the editor settings is disabled while in review mode.
Report missing labels / Edit labels
These features are not available for projects created using 'Workflows'.
Missing labels
If a reviewer determines that a label is missing entirely (as opposed to annotated incorrectly), they can use the report missing labels feature to indicate labels are missing in a given frame or image. Navigate to the frame with the missing labels and use the Report missing labels button to create a report at that frame. You can only create one missing label report per frame per review task -- subsequent reports at the same frame in the same task will overwrite previous reports. Missing label reports will be sent back to the annotator via the same issues list as rejected labels.
Edit labels
It's sometimes faster, more convenient, and less error-prone to have reviewers make some edits to annotations, rather than outright rejecting them, which requires the return of the entire set of labels to the annotator. Press the Edit labels button to enter review-edit mode and make any necessary changes, and press it again to return to review mode. Currently, only a subset of label operations are supported in review-edit mode:
- Objects: moving the object or individual vertices
- Classifications: changing the classification value
- Objects and classifications: changing nested classifications
We are continuously expanding the capabilities of review-edit mode while maintaining a simple UX. Contact product@encord.com if there are particular capabilities which would assist your workflow.
Pending reviews pane
All labels for review for a particular data asset assigned to the reviewer are automatically loaded into the Pending reviews pane. The labels are grouped by ontology class.
Completed reviews pane
Completed reviews are displayed in the Completed reviews pane. You can click on specific objects to highlight them. Labels can be selected and then approved or rejected for a given instance or in bulk using the Reject and Approve buttons or the matching hotkeys, b for reject and n for approve. Approved labels appear in a green background and rejected labels appear in red.
Approve and Reject all in frame buttons
The Approve all in frame and Reject all in frame buttons take the named action without having to select a particular instance or set of instances. Please note that any instance with labels in current frame will have all of its labels fall under the target of the approve or reject action.
This often speeds up workflows, particularly in images, where you can judge whether all instances are correct or not by looking at an individual frame.
Reject and Approve buttons
To reject/approve multiple object instances across frames, select the instances, and then click the Reject or Approve button, as appropriate. Alternately, you may press b for reject and n for approve.
Controls common to both modes
Editor header

The Editor header at the top-right of the navigation bar contains buttons and menu items to perform labeling activities as well as manage general app settings and notifications.
| Icon | Name | Description |
|---|---|---|
Notification bell icon | shows the history and status of recent actions you've taken in the application, such as uploading datasets, training models, or exporting labels. | |
Copy URL to clipboard | Copy the URL of the asset you are currently reviewing/annotating. | |
Bulk label operations (only available in Annotation mode) | Open the 'Bulk label operations' drawer, which allows one to merge label instances and and perform various bulk delete operations. | |
Save labels | Manually initiate saving labels to the server. | |
Adjust brightness and contrast | Adjust the brightness and contrast of the dataset you have opened in the canvas. | |
Keyboard shortcuts | View a list of keyboard shortcuts you can use in the Encord app. | |
Label editor settings | Settings to control your annotation and review experience and workflows. | |
Dark mode | Toggle dark mode on and off. |
The ![]() icon has now been added to the Editor header. It allows you to add a comment to the frame currently being viewed in the label editor
icon has now been added to the Editor header. It allows you to add a comment to the frame currently being viewed in the label editor
Quick toolbar

A toolbar with handy tools to:
- Rotate the label editor.
- Adjust filters; contrast, brightness, and gamma.
- Trim polygon vertices.
- Add comments to a frame or image.
- Quickly center an image.
- Zoom in and out.
- Trimming polygon vertices (the scissors tool) is currently not available in review or review-edit mode.
- Click the zoom icon again to disable zoom.
Rotate the label editor
Click the ![]() icon on the quick toolbar to bring up a pop-up that enables you to rotate the label editor by using the slider, as shown below.
icon on the quick toolbar to bring up a pop-up that enables you to rotate the label editor by using the slider, as shown below.

Click the ![]() icon in the pop-up to rotate the editor in increments of 90 degrees.
icon in the pop-up to rotate the editor in increments of 90 degrees.
Media navigation controls
The video frame slider lets you quickly scroll through frames in a video asset. Below the frame slider are a range of controls to let you play, skip and navigate through media. Notice that the navigation controls are not displayed in single images files, as well as any media with only 1 frame.
Icon descriptions
| Icon | Name | Description |
|---|---|---|
 | Go to first / last frame | Navigate directly to the beginning and end of videos, image sequences, and DICOM files. |
 | Jump forward / backward to annotation | Jump forward or backward from the current frame to a frame that contains annotations. Use the settings menu to add them into the player controls panel. |
 | Frame skip backward / forward | Skip back or forth by the current frame skip interval. You can also add a custom value directly from the frame skip interval selector, or in the settings. |
 | Play / Pause | Play or pause the media. Alternately, use the spacebar while no other page elements are selected. |
 | Playback speed | Adjust the playback speed from 1/8x to 8x. |
 | Navigate to frame | To go to a specific location in the media, click on this icon and the target frame number or timestamp in the appropriate field, then press 'Go'. |
The Time and Frame rate information for each frame is displayed in the far lower right corner.
Comments
Comments can be added to a task, to individual frames within a task, or to specific locations within a frame.
Adding a comment
Select the ![]() icon on the editor header, and click the location on the frame currently being viewed to add a comment.
icon on the editor header, and click the location on the frame currently being viewed to add a comment.
Alternatively, you can add comments pertaining to the entire task, or the frame as a whole by clicking the ![]() icon located in the top right corner of the label editor.
icon located in the top right corner of the label editor.
Viewing all comments in a task
To see all the comments in the task that is currently open, click the ![]() icon located in the top right corner of the label editor.
icon located in the top right corner of the label editor.
The symbols to the left of each comment imply whether the comment pertains to a particular frame, or the entire task.
| Icon | Meaning |
|---|---|
| This comment applies to the entire task | |
| This comment applies to a particular frame | |
| This comment applies to a particular location within a frame |
The numbers on frame-level and location specific comments show which frame the comment applies to. Click on the number to open up the frame in the label editor.
Editor settings menu
Video Tutorial - Label editor settings
The Encord label editor is a powerful and configurable tool to help you annotate data and review annotations as quickly and efficiently as possible. The settings drawer is where you can confirm details about your data assets, change settings and access tools to customize your labeling experience and workflow.
The settings drawer is divided into four sections: Data details, General settings, Drawing settings, and Single object tracking settings, continue reading for details on how to best utilize each section.
Remember, the label editor settings are set by you and not the project. Therefore, each user can:
- control their own settings
- have settings shared across all projects
- login from any device
- persist settings across logout / login sessions
Editor settings components
Data details
The Data details section displays information about the asset currently open for annotation, or review. This information is drawn from the data itself, and isn't available for direct manipulation. We use this section to provide you with valuable information about the data you're working on, including if we may have detected any possible issues with the data encoding.

- A. Data title: Title or name of the asset.
- B. Data type: Data format of the asset such as image, video or DICOM.
- C. Frames per second: frequently abbreviated FPS, this is the number of frames, or images, per second in a video. Higher FPS means smoother playback. This value is only valid for videos.
- D. Browser compatibility: Some FPS and video encodings may have issues synchronizing drawn labels with frames in modern browsers. Encord is developing compatibility tests to help detect when issues may arise. Read below for more.
Browser compatibility

Modern browsers don't allow deterministic control over video rendering -- which can lead to frame synchronization issues with some FPS values or video encodings. In order to help you ensure your labels are associated with the correct frames, Encord has developed browser compatibility tests to detect problematic videos. Click Run test to start the compatibility test process.
You can read more about supported videos here, and learn more about frame synchronization issues here and in our documentation here. We've identified common issues that can cause problems with frame synchronization, we can't guarantee all issues will be identified. Please reach out to support@encord.com if you have any questions or concerns about your data.
General settings

- A. Auto-save interval
- B. Invert mouse wheel zoom direction
- C. Display timestamps
- D. Turbo mode
- E. Frame skip interval
- F. Enable skip to next annotation buttons
Auto-save interval
To prevent accidentally losing work, the label editor will automatically persist labels to the server at regular intervals. Use this setting to control how often the labels are automatically saved. The minimum time interval for auto-saving is 15 seconds and maximum is 600 seconds. By default, the annotations are saved every 120 seconds.
Invert mouse wheel zoom direction
By default scrolling up will zoom out and scrolling down will zoom in. Toggle this switch to invert the scroll-zoom mapping.
Display timestamps
Toggle on if you want to display timestamps instead of frame numbers for object and classification instances.
Turbo mode
Turbo mode switches from the standard annotation workflow in which labelers can both create instances and modify them in detail to a separate "turbo attribute mode", which allows labelers to quickly iterate through created instances to assign or confirm nested classifications.
Toggle turbo mode on, and then select an instance to work with from the dropdown menu in the top left. This will hide all other instances except the single instance being viewed and corresponding nested classifications, if applicable.
Turbo mode has an additional autozoom feature, which will automatically zoom the camera on the focused instance as you
scroll through the list of instances. You can use the normal zoom control tools to zoom out, center
(![]() ) or even zoom in
after autozoom has centered the selected instance. This can help contextualize the object in its surroundings while
ensuring you know exactly which instance is under consideration. It will auto-zoom again when you navigate to the
next/previous instance.
) or even zoom in
after autozoom has centered the selected instance. This can help contextualize the object in its surroundings while
ensuring you know exactly which instance is under consideration. It will auto-zoom again when you navigate to the
next/previous instance.
Frame skip interval
The frame skip interval controls how many frames are skipped at once when navigating using the frame-skip forward and backward buttons. We define a set of default frame skip intervals to start, but you can also define customized frame skip intervals here, or from the drop-down in the video playback controls section. Select the desired interval from the video playback controls section to navigate appropriately throughout your data. See all player controls
Enable skip to next annotation buttons
For long videos with sparsely labeled frames, sometimes it helps to quickly jump between frames with labels. Toggle on the skip to next annotation buttons to add an extra set of playback controls which enable navigation straight to the next frame, either forward or backward, with labels. This will apply for objects and classifications. The screenshot below shows the video playback controls with the toggle off and on, respectively.

Drawing settings

- A. Polygon vertex size
- B. Object opacity
- C. Selected object opacity
- D. Object names & font size
- E. Object classifications
- F. Skeleton keypoint sensitivity
- G. Drawing line aides
- H. Freehand drawing & Polygon coarseness
- I. Permanent drawing (new instances)
- J. Permanent drawing (existing instances
- K. Skeleton points
Polygon vertex size
Adjust polygon vertex size. Larger vertices are easier to spot but may disrupt visibility of the surrounding areas. The possible range is from 1 pixel to 10 pixels, but they cannot be disabled entirely.
Object opacity
Adjust the opacity level of object labels. Raising the opacity will make it easier to spot the labels themselves, but will make it harder to see what is being labeled. Or, in the case of overlaps, may make it hard to see overlapping labels as well. Transparent labels may be hard to spot in a quick scan. Raise and lower the opacity levels to suit your workflow at different times of the labeling process.
Note that the setting can range from 1% to 100%. 1% is essentially transparent, and 100% is completely opaque.
Selected object opacity
Adjust the opacity for the selected instance, calculated as a multiplier of the value defined in Object opacity. The opacity multiplier can be set from 1x (same as all other instances) to 10x.
Object names and font size
Toggle the display of the ontology class of an object and the object identifier, as well as control the font size when displayed. The text will appear directly above their respective labels. Possible font sizes range from 4pt to 18pt. Choose a size which is legible, but doesn't hinder your annotation work.

Object classifications
If there are nested classifications on object instances (otherwise known as object attributes), enabling this option will display them over their respective labels. The classifications display can be toggled independently of the names display. When they're both enabled, classifications are displayed between the name and object itself.
Skeleton keypoint sensitivity
Adjust this setting to control the necessary precision when adjusting skeleton keypoint positions. Low values require high precision -- you must click exactly over the keypoint in question in order to adjust it. High values give the opposite behavior -- you can select and move skeleton keypoints even while the cursor is a good distance from the point in question.
Possible values range from a minimum of 1.00 and maximum of 10.00.
Drawing line aides
Show crosshairs on the canvas to indicate where the label will be drawn. Useful to know both when you've entered draw mode, and to see from exactly where the label will be created.

Freehand drawing & Polygon coarseness
Use freehand drawing to draw a polygon or polyline as you move the mouse, without explicitly having to click to place each vertex. The coarseness controls the spacing between two vertices. A low Polygon coarseness allows for high resolution polygons, but creates high vertex counts.
To avoid possible performance issues with large or complicated polygons, set the coarseness only as fine as necessary to accurately define the desired segmentation.
Permanent drawing (new instances)
Continue drawing new instances without having to press the drawing hotkey for a given ontology category. After drawing an instance of a given category, the editor will stay on the same frame and immediately prompt you to create another instance of the same category. It’s normally used to create many instances of a certain class in a given frame.
Useful in semi-automated workflows where the annotator labels many instances in certain keyframes and then uses tracking or interpolation features to fill in the remainder. The video below shows the difference between creating many objects with Permanent drawing (new instances) toggled off and then on.
Permanent drawing (existing instances)
Continue drawing labels of the same instance without pressing the drawing hotkey every time for the given object instance. After creating a label of an existing instance, the label editor will automatically advance forward the currently specified frame skip interval and prompt for the creation of a new label of that instance on the new frame. Accelerate workflows which create many labels for specific instances throughout a data asset and also makes it easy to apply dynamic classifications through the Preserve chosen state functionality. The below video showcases the difference in creating multiple labels of the same instance with the Permanent drawing (existing instances) on and off.
Skeleton points
Analogous to how we toggle the display of object names and attributes, use this to toggle the display of the individual skeleton keypoint names, as defined in the object primitives editor. Since object primitives may have many points in complex shapes, displaying the names can help ensure each point is placed appropriately and that the entire annotation is oriented correctly.
Single object tracking settings
Number of frames to predict
Single object tracking always starts from the frame it's initiated on, and will predict labels on the number of frames specified in these settings. For example, if you start on frame 50, and set Number of frames to predict to 50, the tracker will attempt to predict labels on frames up to and including frame 100. If the tracker isn't able to find an appropriate section of a frame to label however, it may not label the entire designated range. Use smaller ranges with less radical changes across frames to enhance tracking performance.
Tracking model
Choose between the Standard and Advanced tracking models. The Standard model runs faster, but may not be as accurate. The Advanced model has enhanced accuracy, but may take more time because it requires more computations.
Hotkeys
Use the following hotkeys to speed up common or useful operations.
Common editor operations
| Action | Hotkey |
|---|---|
| Save labels | Shift+S |
| Play / Pause | Space |
| Frame forward | Right |
| Frame backward | Left |
| Zoom in | Shift+Up |
| Zoom out | Shift+Down |
| Track selected object from frame | Shift+T |
| Delete selected object from range | Shift+D |
| Mark label row as not labeled | Shift+Y |
| Mark label row as in progress | Shift+U |
| Mark label row as labeled | Shift+I |
| Mark label row as review required | Shift+O |
| Mark label row as reviewed | Shift+P |
| Toggle turbo attribute mode | Ctrl+Shift+T / Cmd+Shift+T |
| Toggle turbo attribute mode auto-zoom | Ctrl+Shift+Y / Cmd+Shift+Y |
| Toggle permanent drawing | Ctrl+Shift+P / Cmd+Shift+P |
| Reject label | B |
| Approve label | N |
| Submit task | Shift+Enter |
| Render next review task (Turbo review mode only) | Up |
| Render previous review task (Turbo review mode only) | Down |
Drawing operations
| Action | Hotkey |
|---|---|
| Select additional drawing | Ctrl+ Click object / Cmd+ Click object |
| Select all drawings | Ctrl+A / Cmd+ A |
| Copy to clipboard | Ctrl+C / Cmd+ C |
| Paste from clipboard | Ctrl+V / Cmd+ V |
| Change class type | C |
| Save labels | Ctrl+S / Cmd+ S |
| Activate/deactivate add vertex | A |
| Activate/deactivate delete vertex | S |
| Enable free hand drawing | D |
| Enable edit mode for polygons and polylines | F |
| Delete drawing | Del / Backspace |
| Undo | Ctrl+Z / Cmd+ Z |
| Redo | Ctrl+Shift+Z / Cmd+Shift+Z |
| Drag image | Ctrl+ Click and Drag / Cmd+ Click and Drag |
DICOM specific operations
| Action | Hotkey |
|---|---|
| Windowing modification | Alt+W |
| Measurement tool | Alt+M |