Setting up an Automated Benchmark QA Project
Follow this walkthrough from beginning to end to learn how to set up a project which uses a set of ground-truth labels to perform automatic benchmarking of annotators while they process and label production data as well. Using automated QA projects with benchmarks are a great option when you have a reliable repository of ground-truth labels and a large volume of data to label, which may not scale with a manual review process.
The ingredients
A benchmark QA project is formed from the following "raw ingredients":
- A single shared ontology that is used in all of the benchmark source projects and the benchmark QA project itself. It is essential that all projects use the exact same ontology, otherwise benchmark calculations cannot be performed.
- Any number of benchmark source projects, which are composed as follows:
- the shared ontology from above
- any number of datasets which you can confidently label
- the labeled datasets, which form the set of ground-truth labels from the project
- A single benchmark QA project which is composed as follows:
- the shared ontology from above
- contains the production data you want labeled
- references the benchmark source projects
- a configurable benchmark function which controls how annotators are scored on benchmark tasks
Now that we know our ingredients, let's get to work assembling the benchmark QA project. For the purposes of this guide, we're going to walk through creating a coherent set of the ingredients above, but if you feel you already have the know-how for any given section, feel free to skip ahead to the areas of interest.
The creation recipe
Ontology
If you do not yet have any of the benchmark source projects, you'll first need to create an ontology. The steps are illustrated in general in our ontology creation documentation, but follow along below for the ontology we will use in this walkthrough.
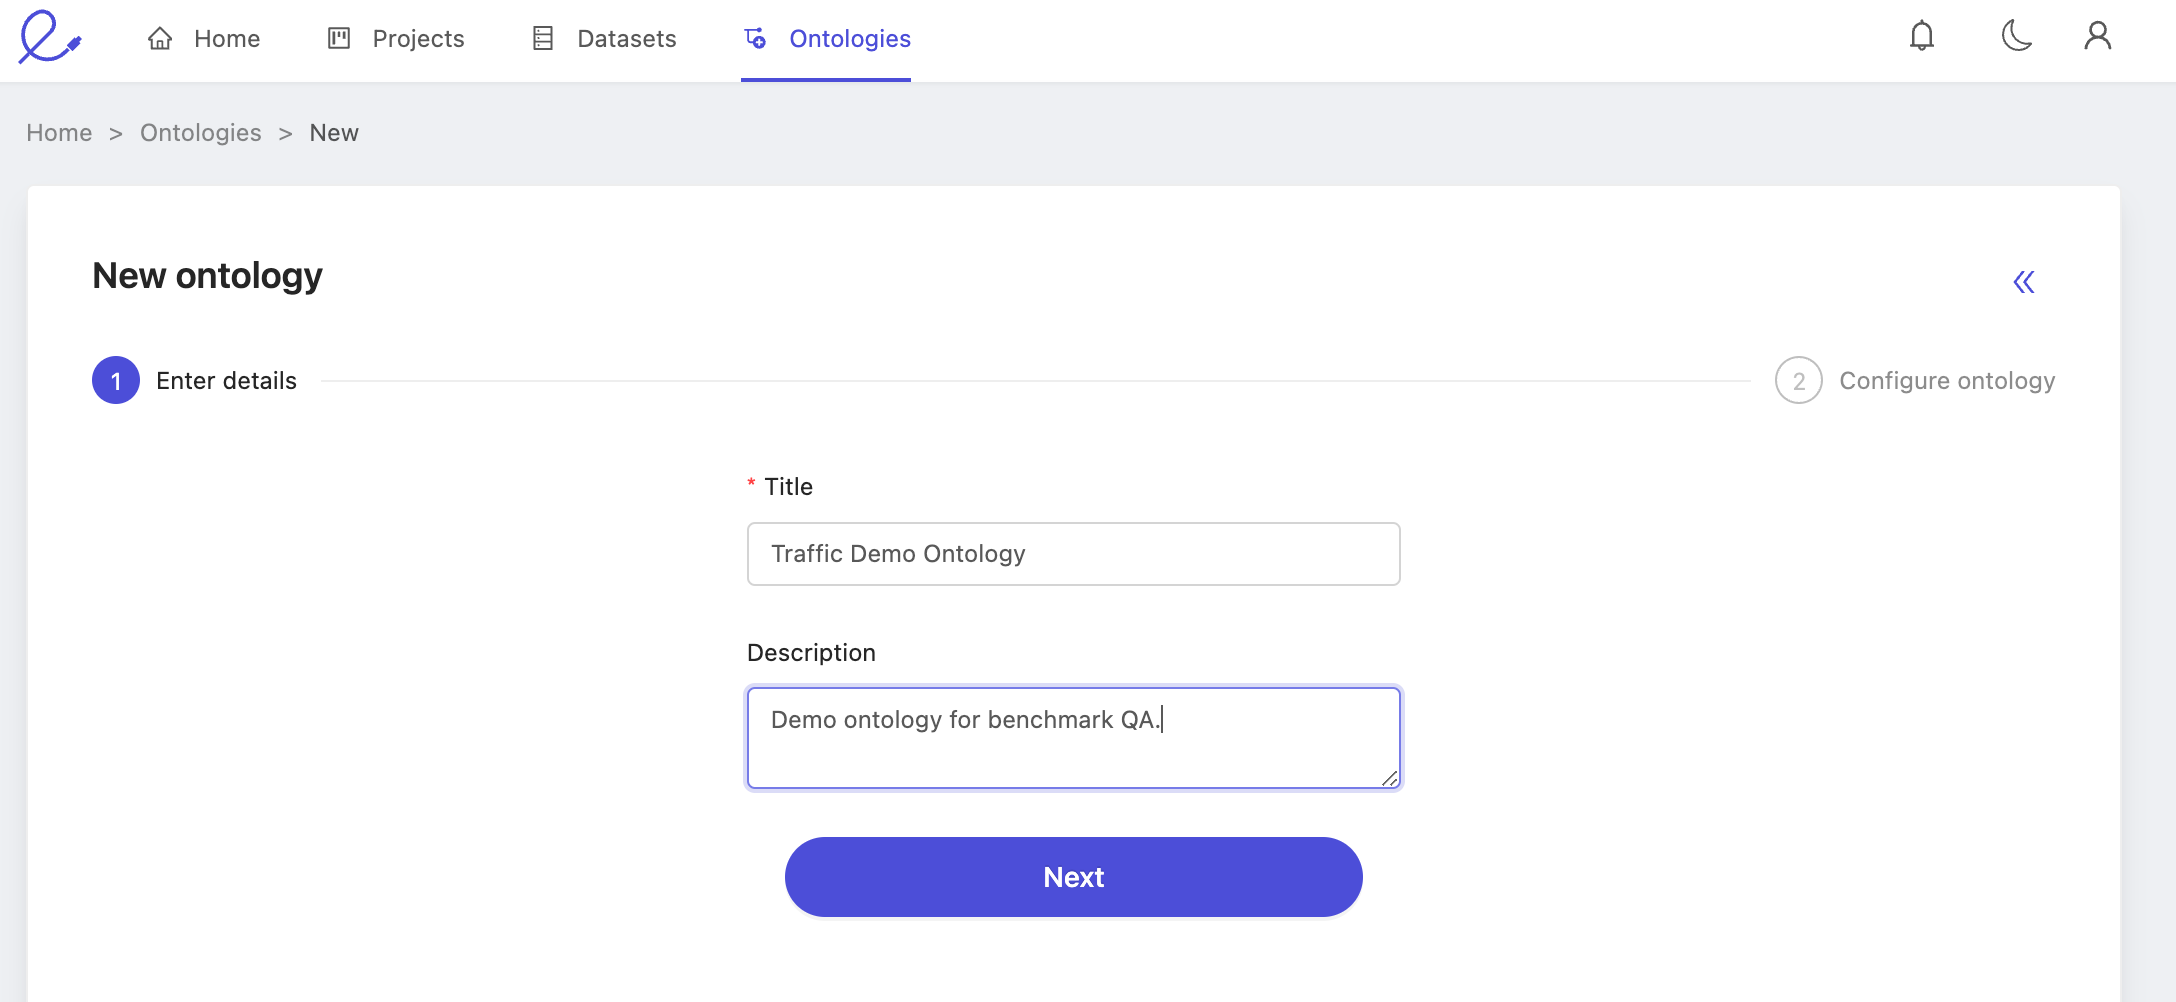
Follow the 'Create ontology' flow from the ontologies overview list, and enter easy to recognize name and description.
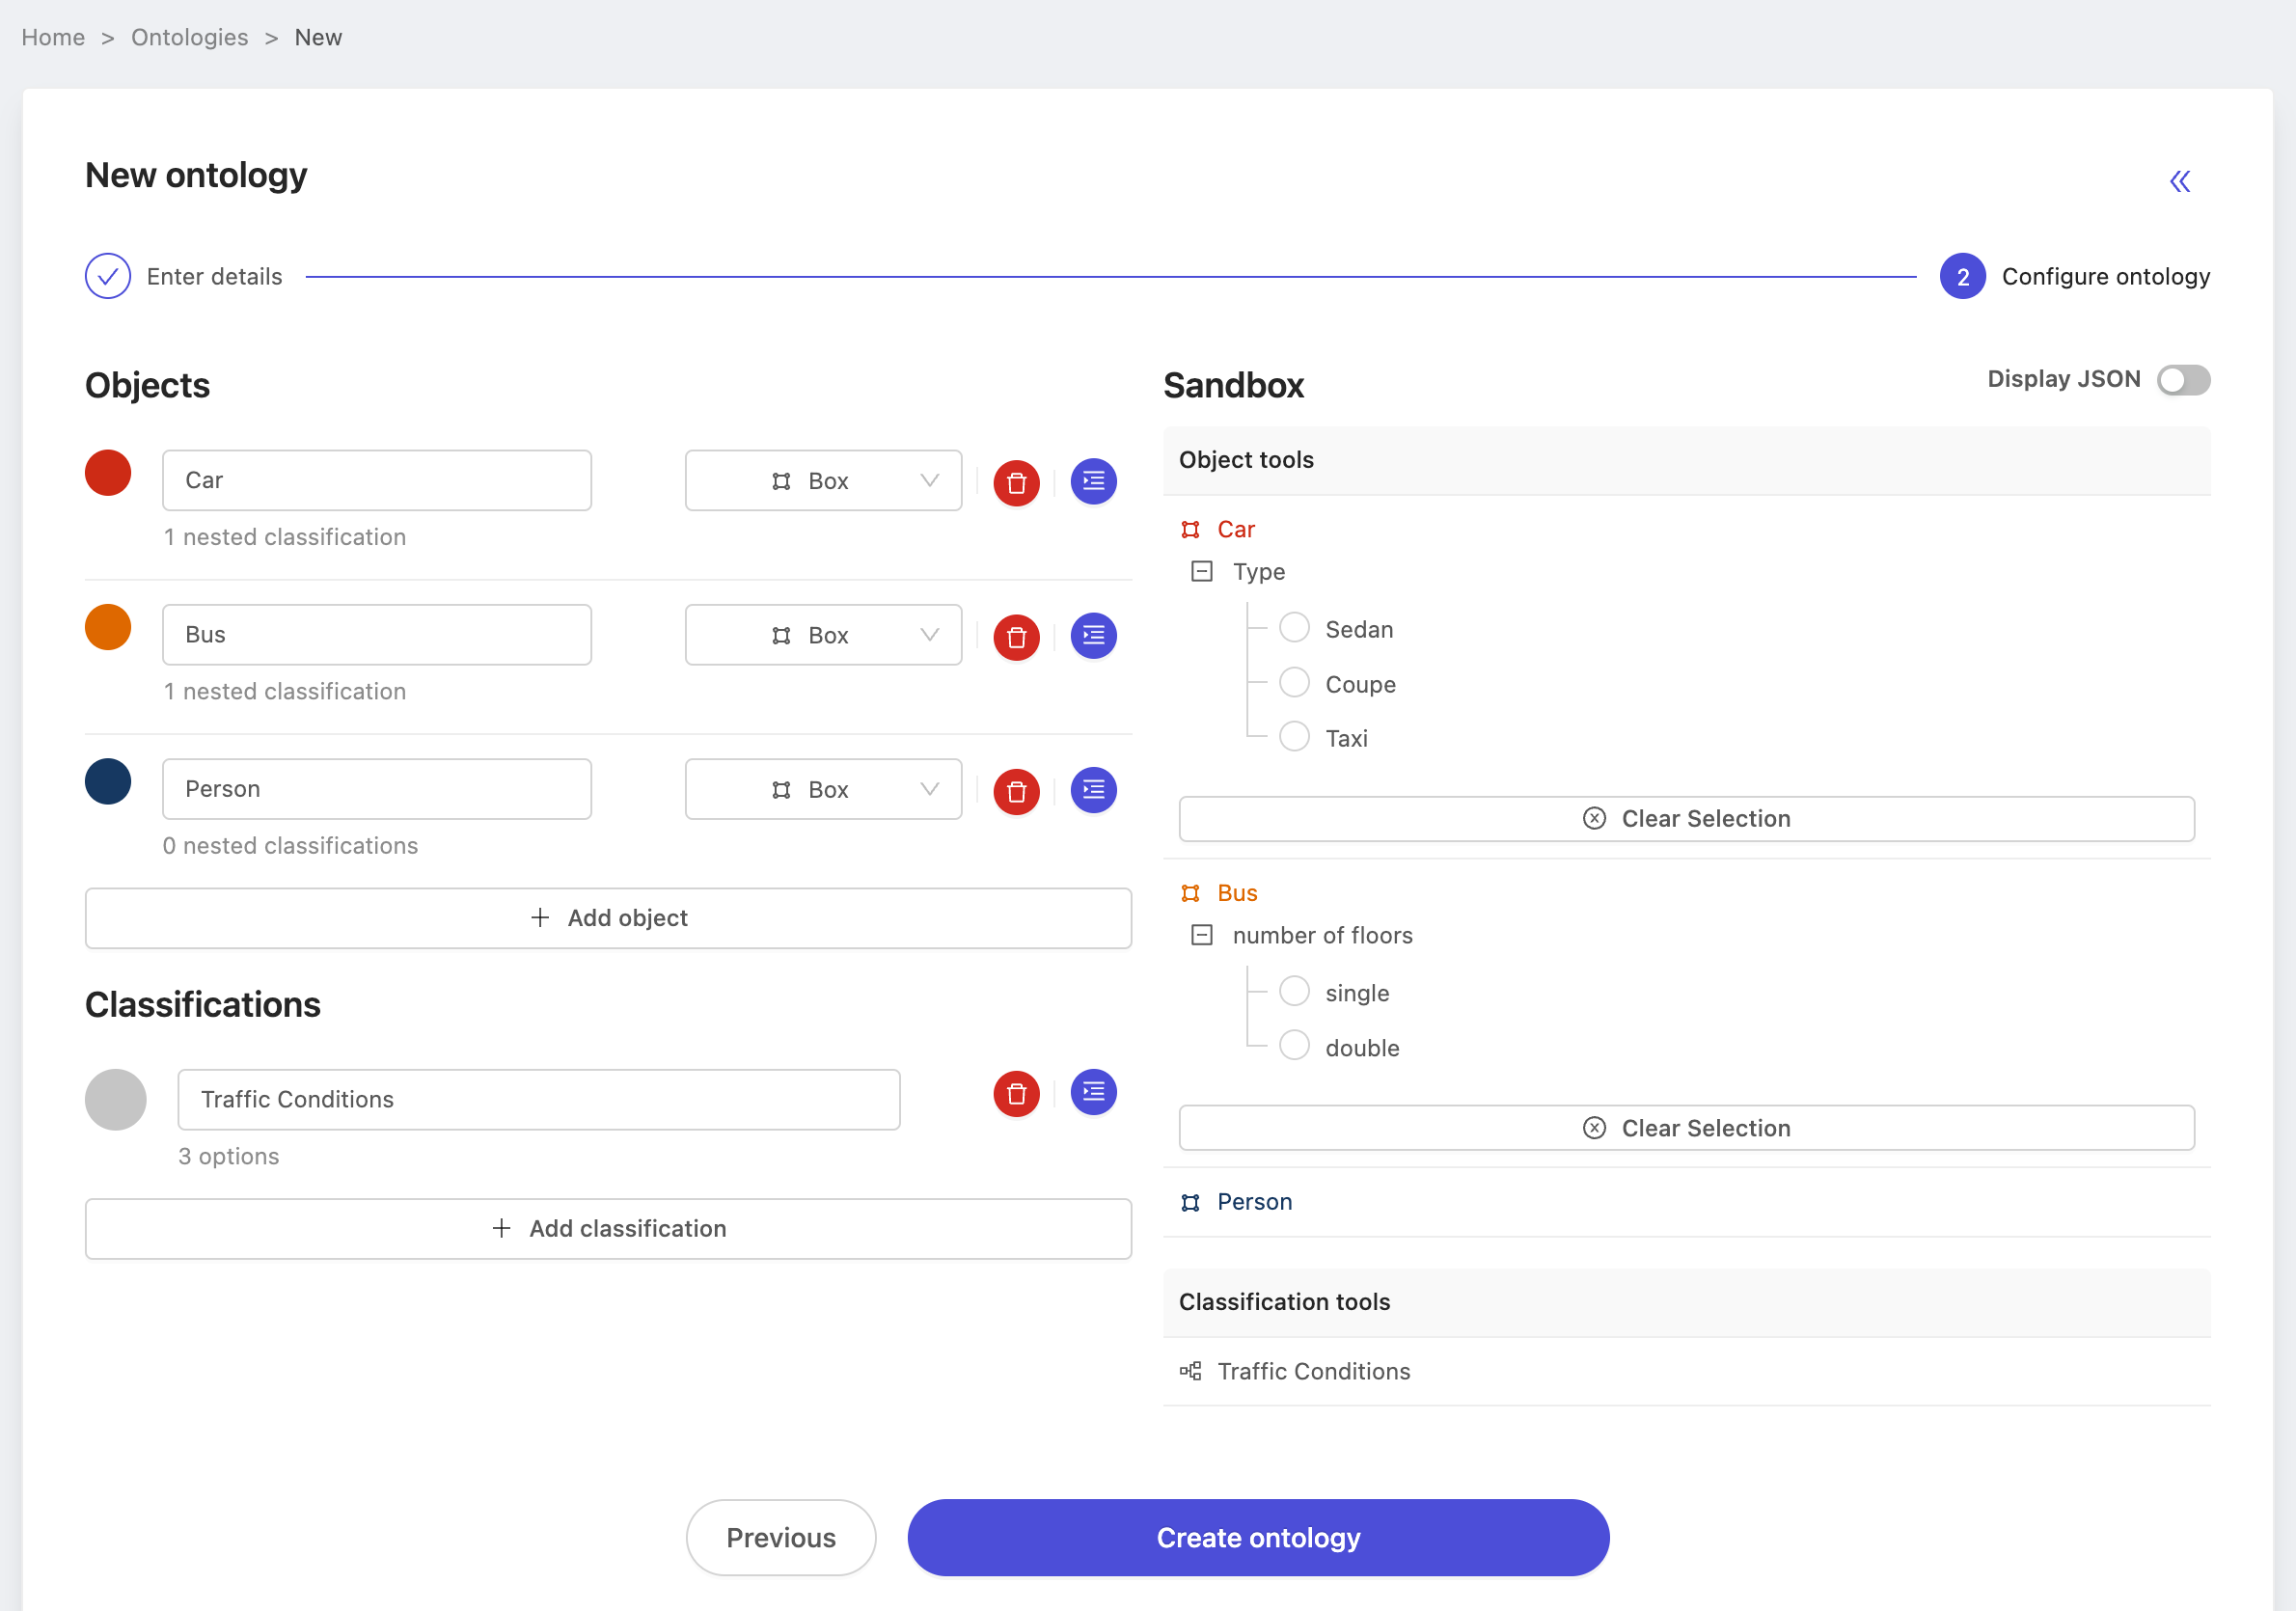
Of course, be sure you're satisfied with the structure as well.
Press 'Create ontology' and we'll move onto creating the benchmark source project. But first, make a note of the name of the ontology, we'll need it multiple times throughout this process. In this case, we've named our ontology: Traffic Demo Ontology.
Benchmark source project(s)
You will have to create at least one benchmark source project before you can create the benchmark QA project itself. A project must have at least one label task that has been submitted and is in the 'review' or 'completed' state for it to be selectable as a benchmark source project. While we only enforce "at least one", the more labels that have been the more labeling tasks can be used as benchmark tasks.
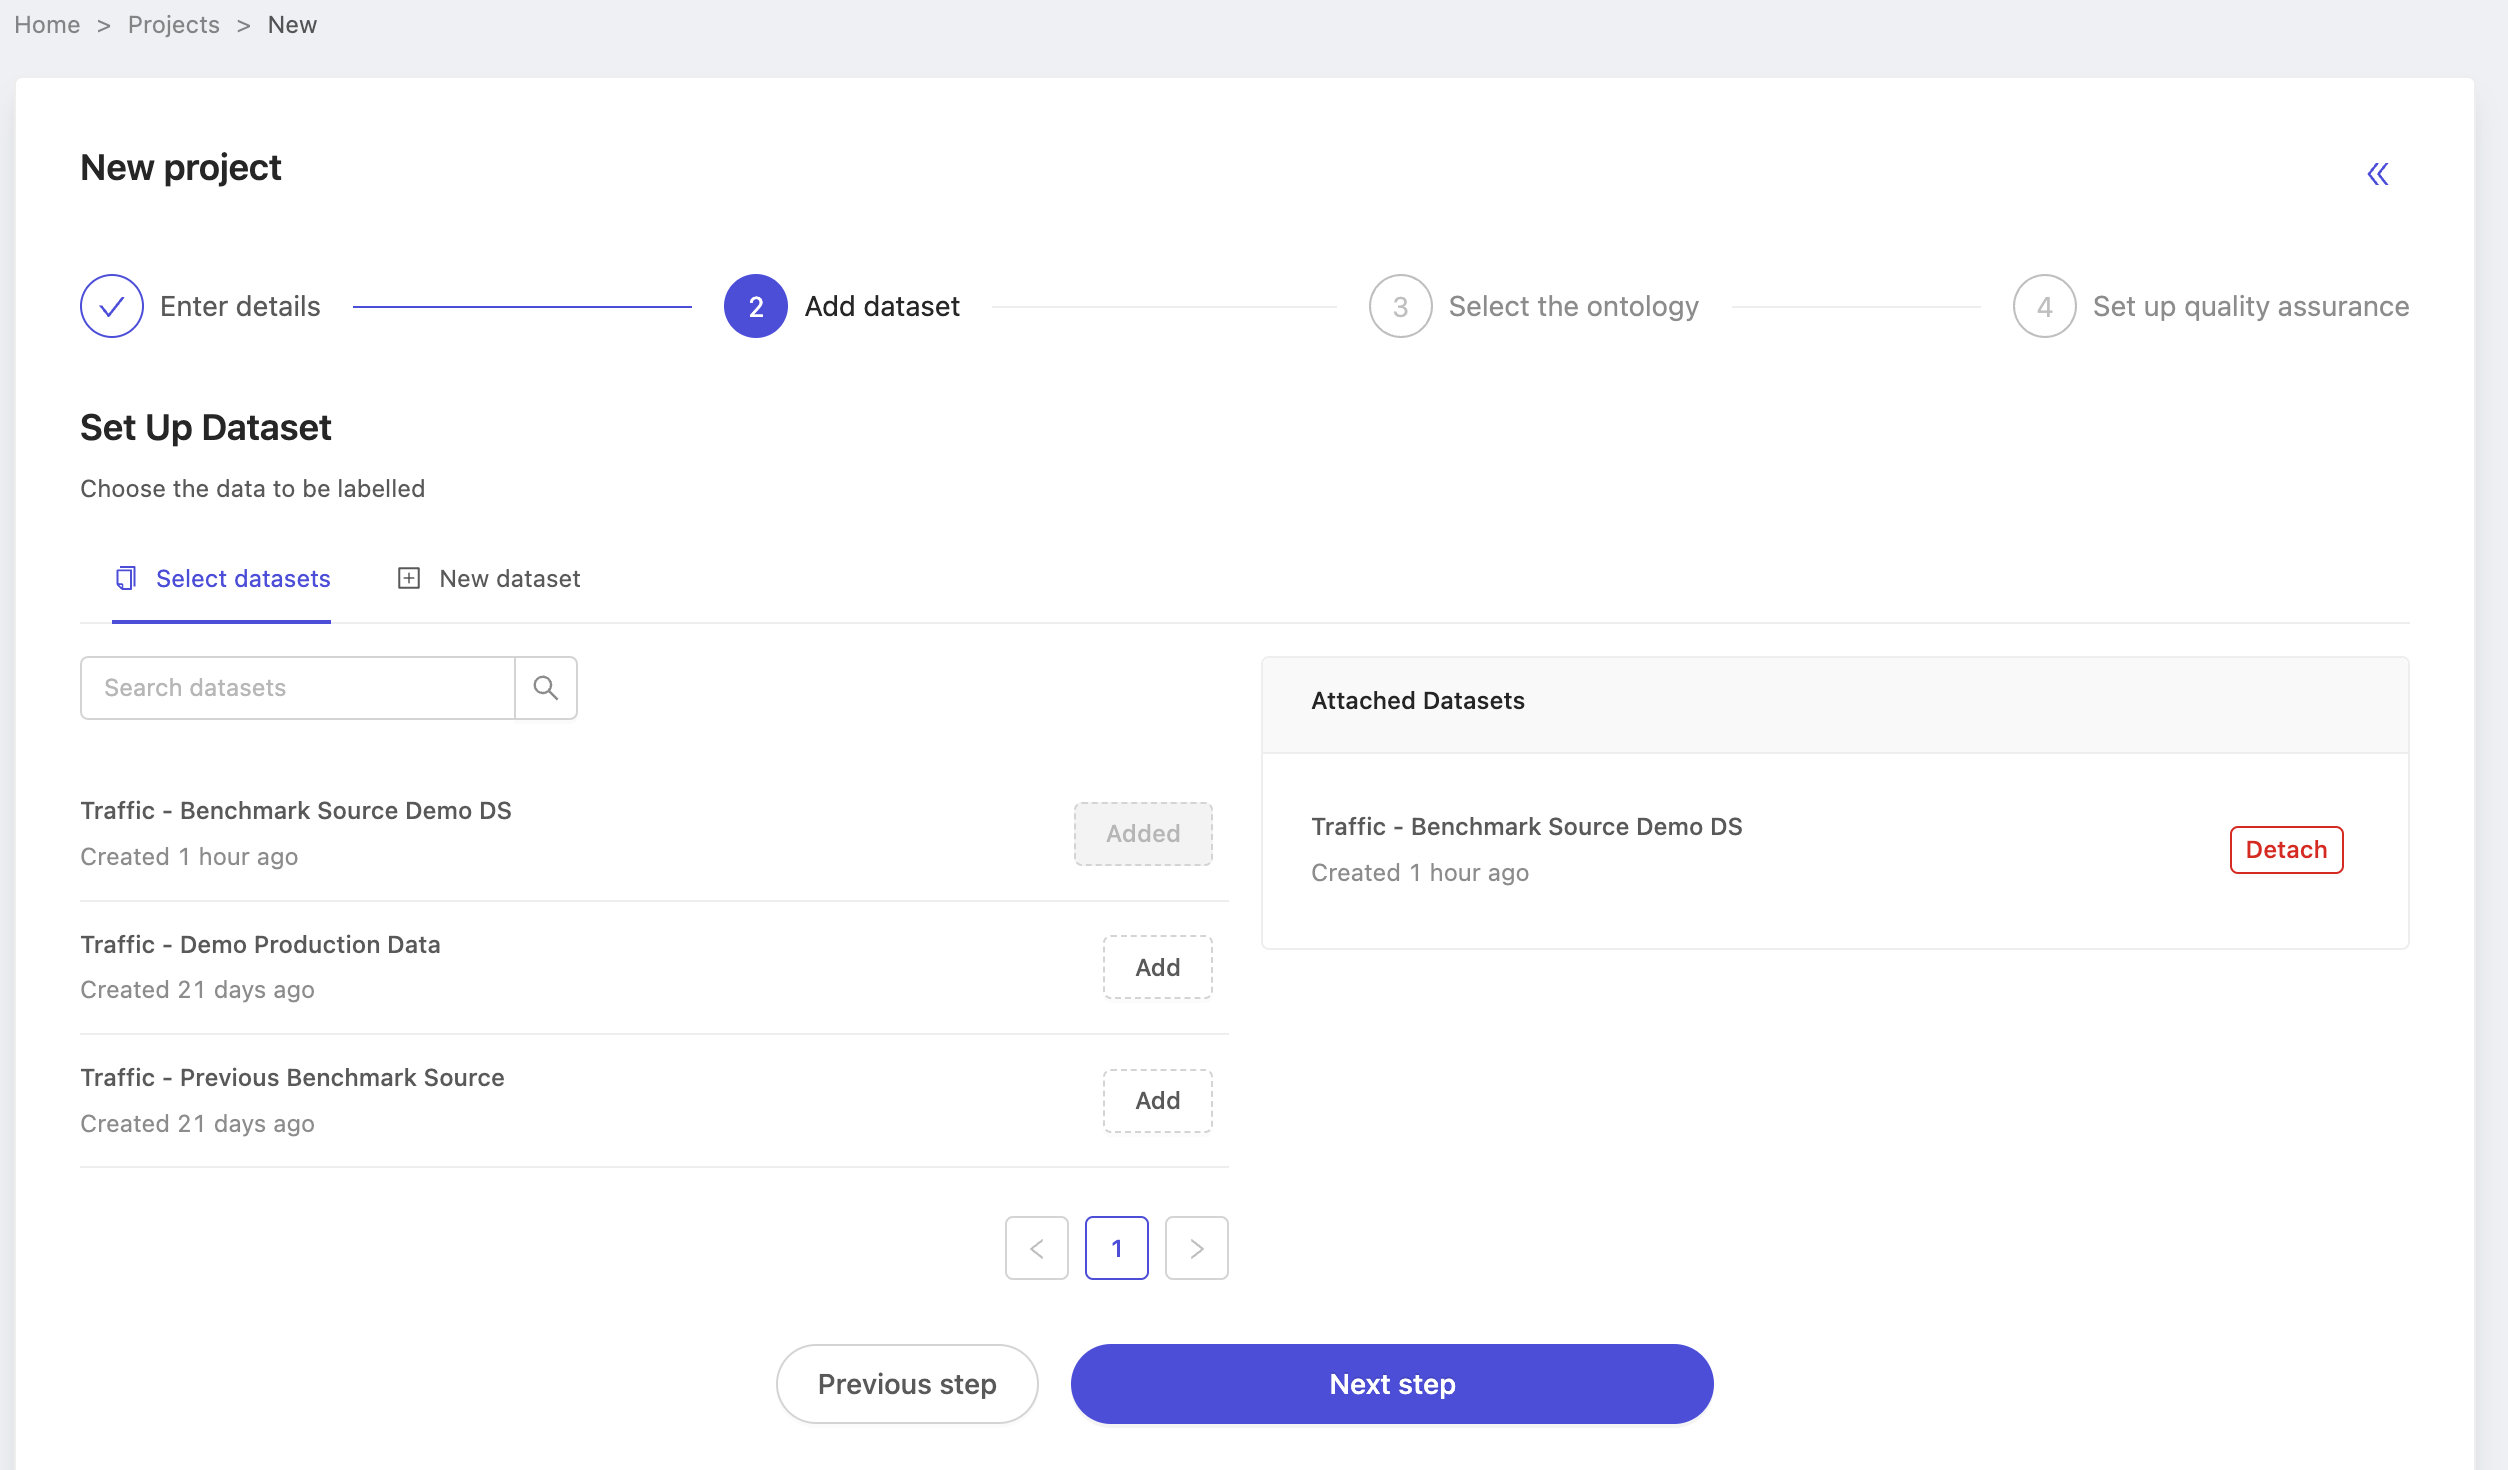
Benchmark source dataset(s)
The next step after preparing an ontology is preparing a dataset for annotation. In this case, choose a dataset you know can be labeled with confidence, as the labels in this project on this dataset will serve as the ground-truth labels.
Consult our dataset creation documentation for a reminder on how to create datasets. Here we show our dataset with data uploaded and initialized and ready to be used in the benchmark project.
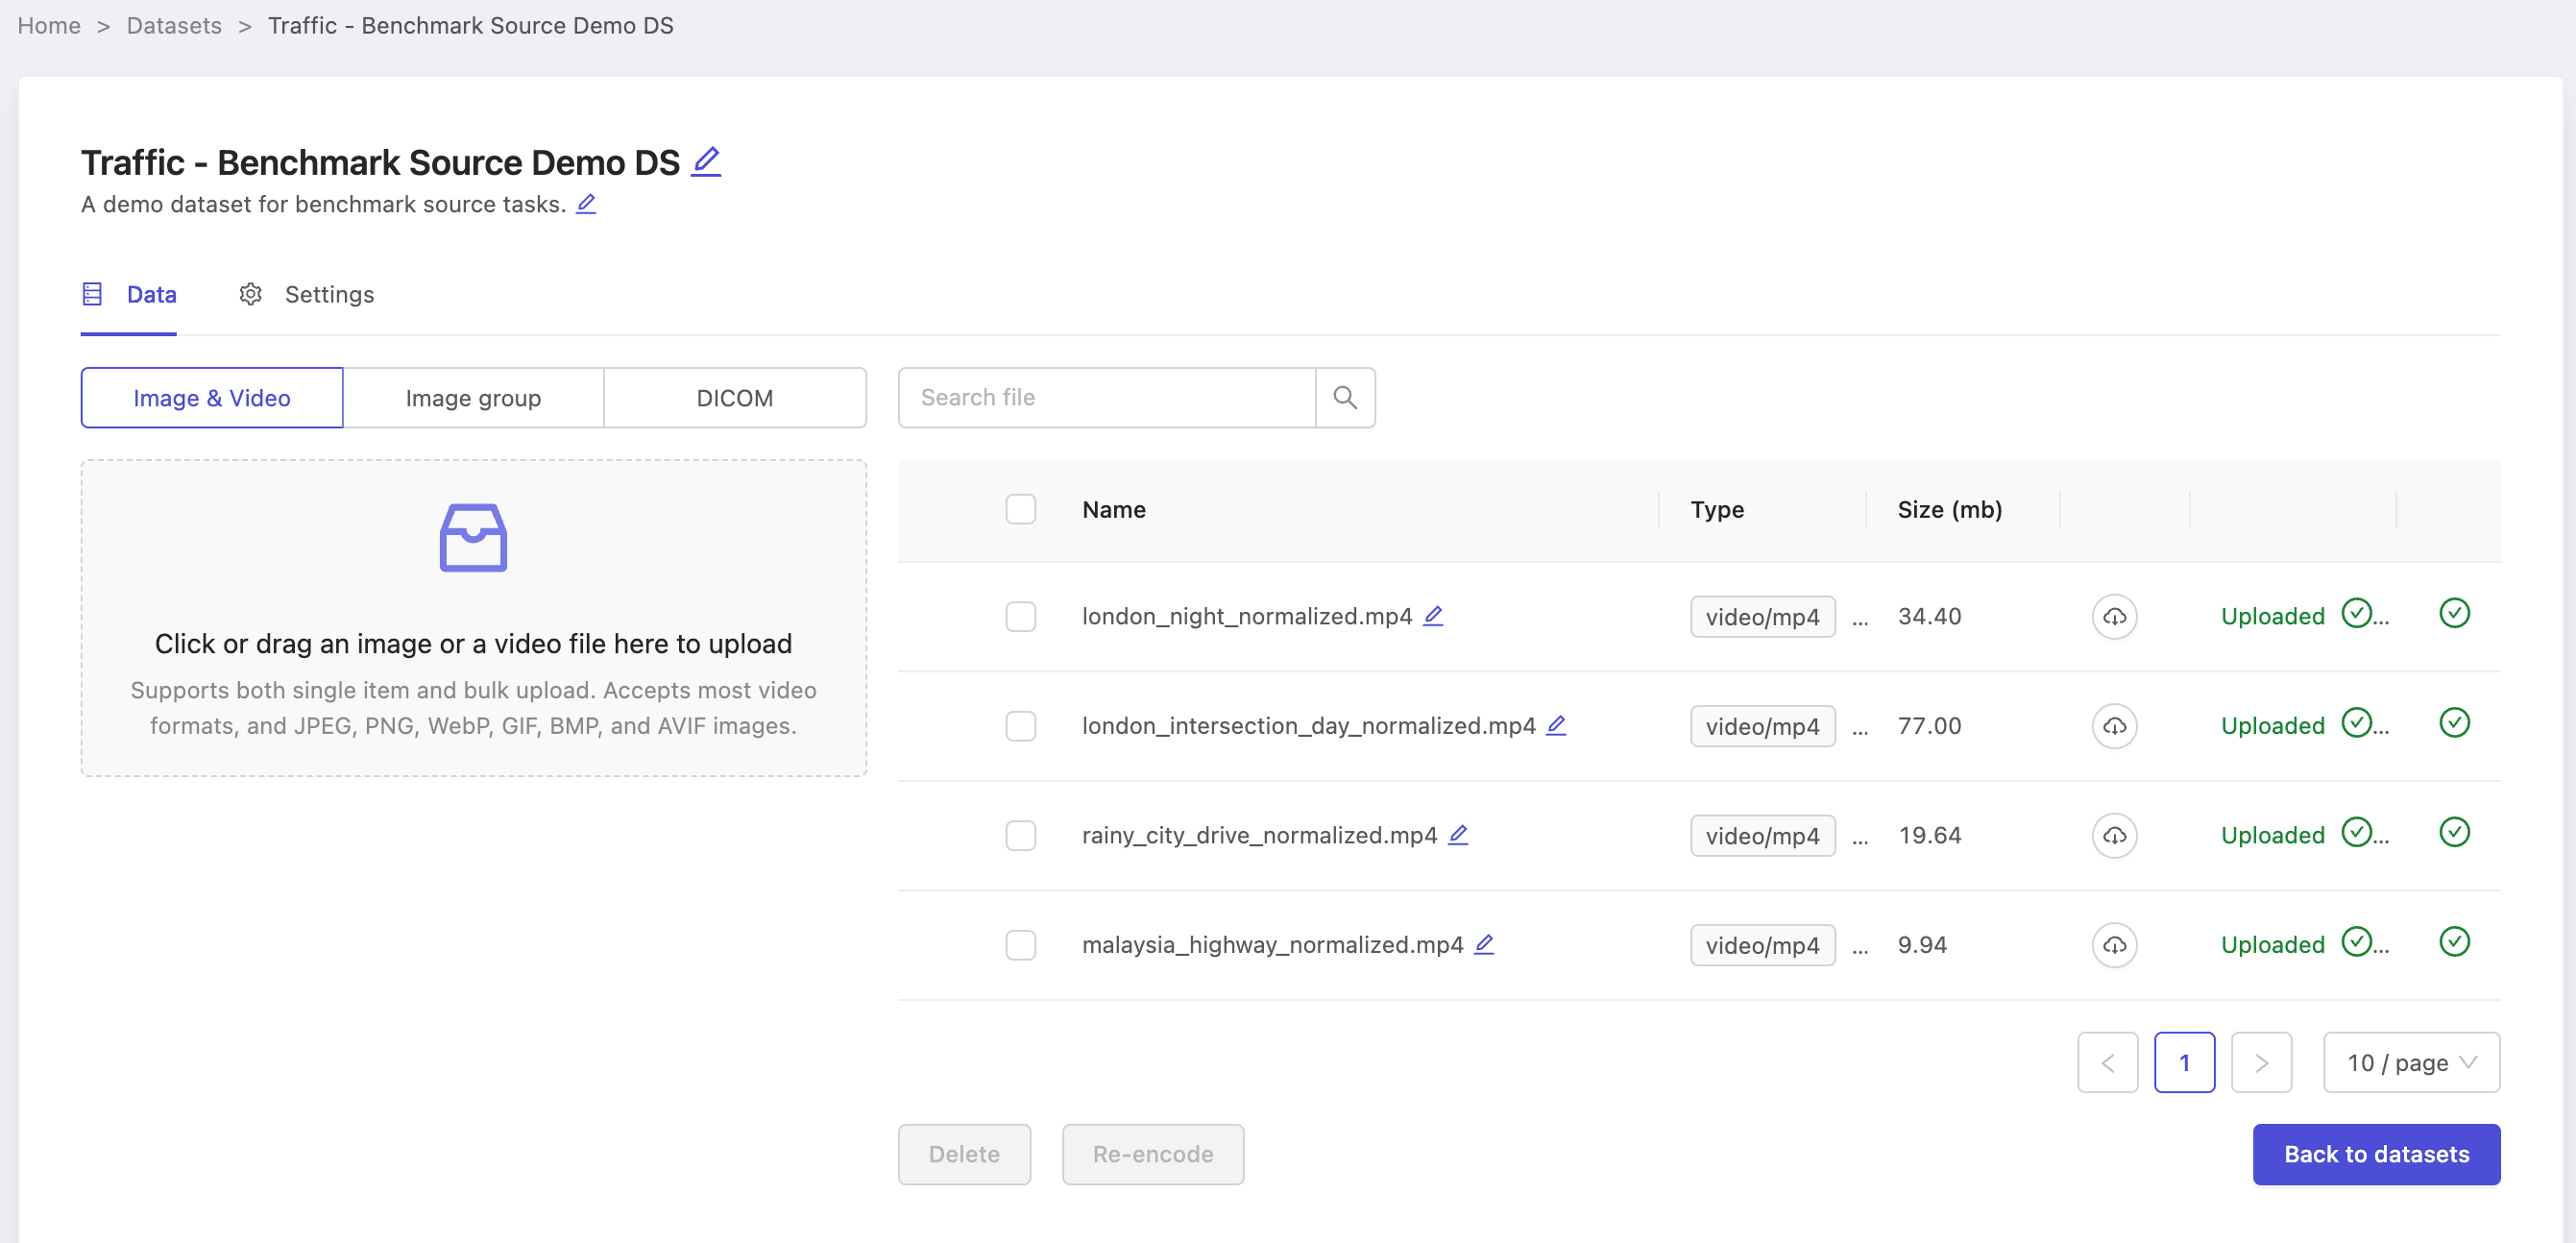
Note the name of our dataset Traffic - Benchmark Source Demo DS, as we will need it when creating the source project.
Creating the source project(s)
Follow the Starter Guide if you're completely new to the platform, or just use the create project documentation if you need a quick reminder. Follow along below we create a benchmark source project from the ontology and dataset we just prepared.
On the dataset selection step, be sure to choose the same dataset you prepared above. In this case, we choose the dataset named Traffic - Benchmark Source Demo DS.
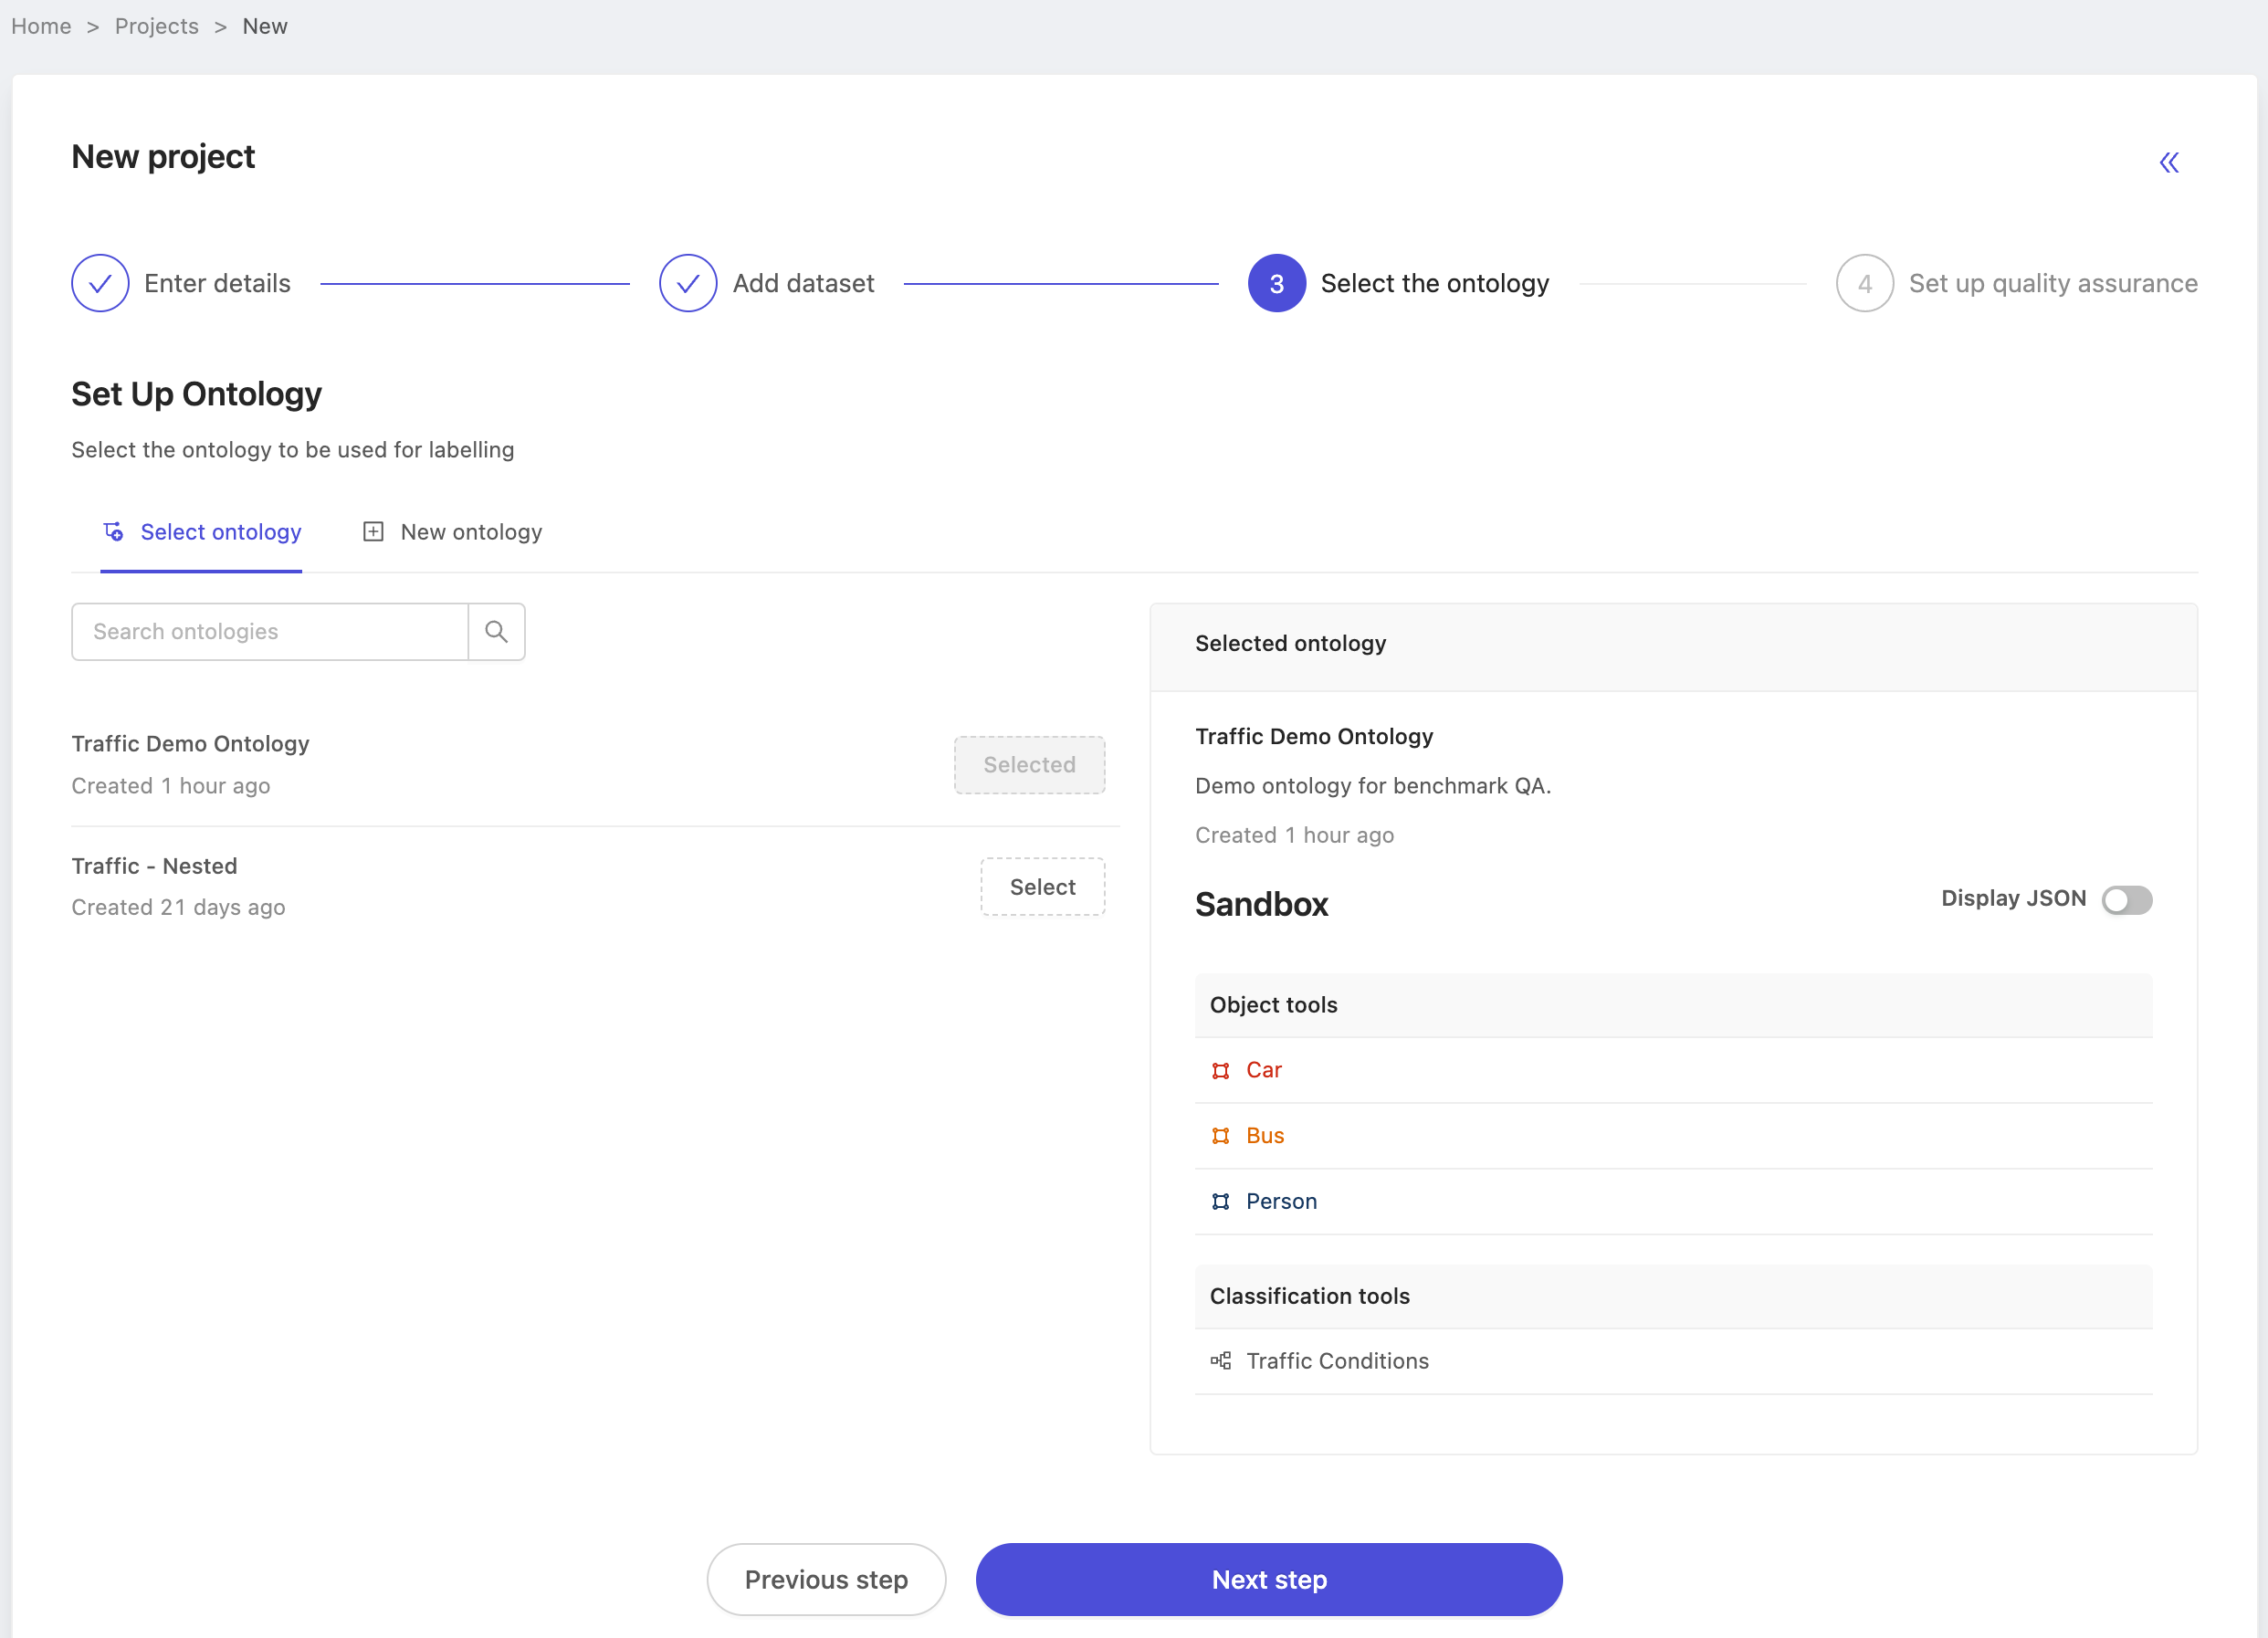
When configuring the ontology, choose the ontology you created earlier. In this case, we select Traffic Demo Ontology.
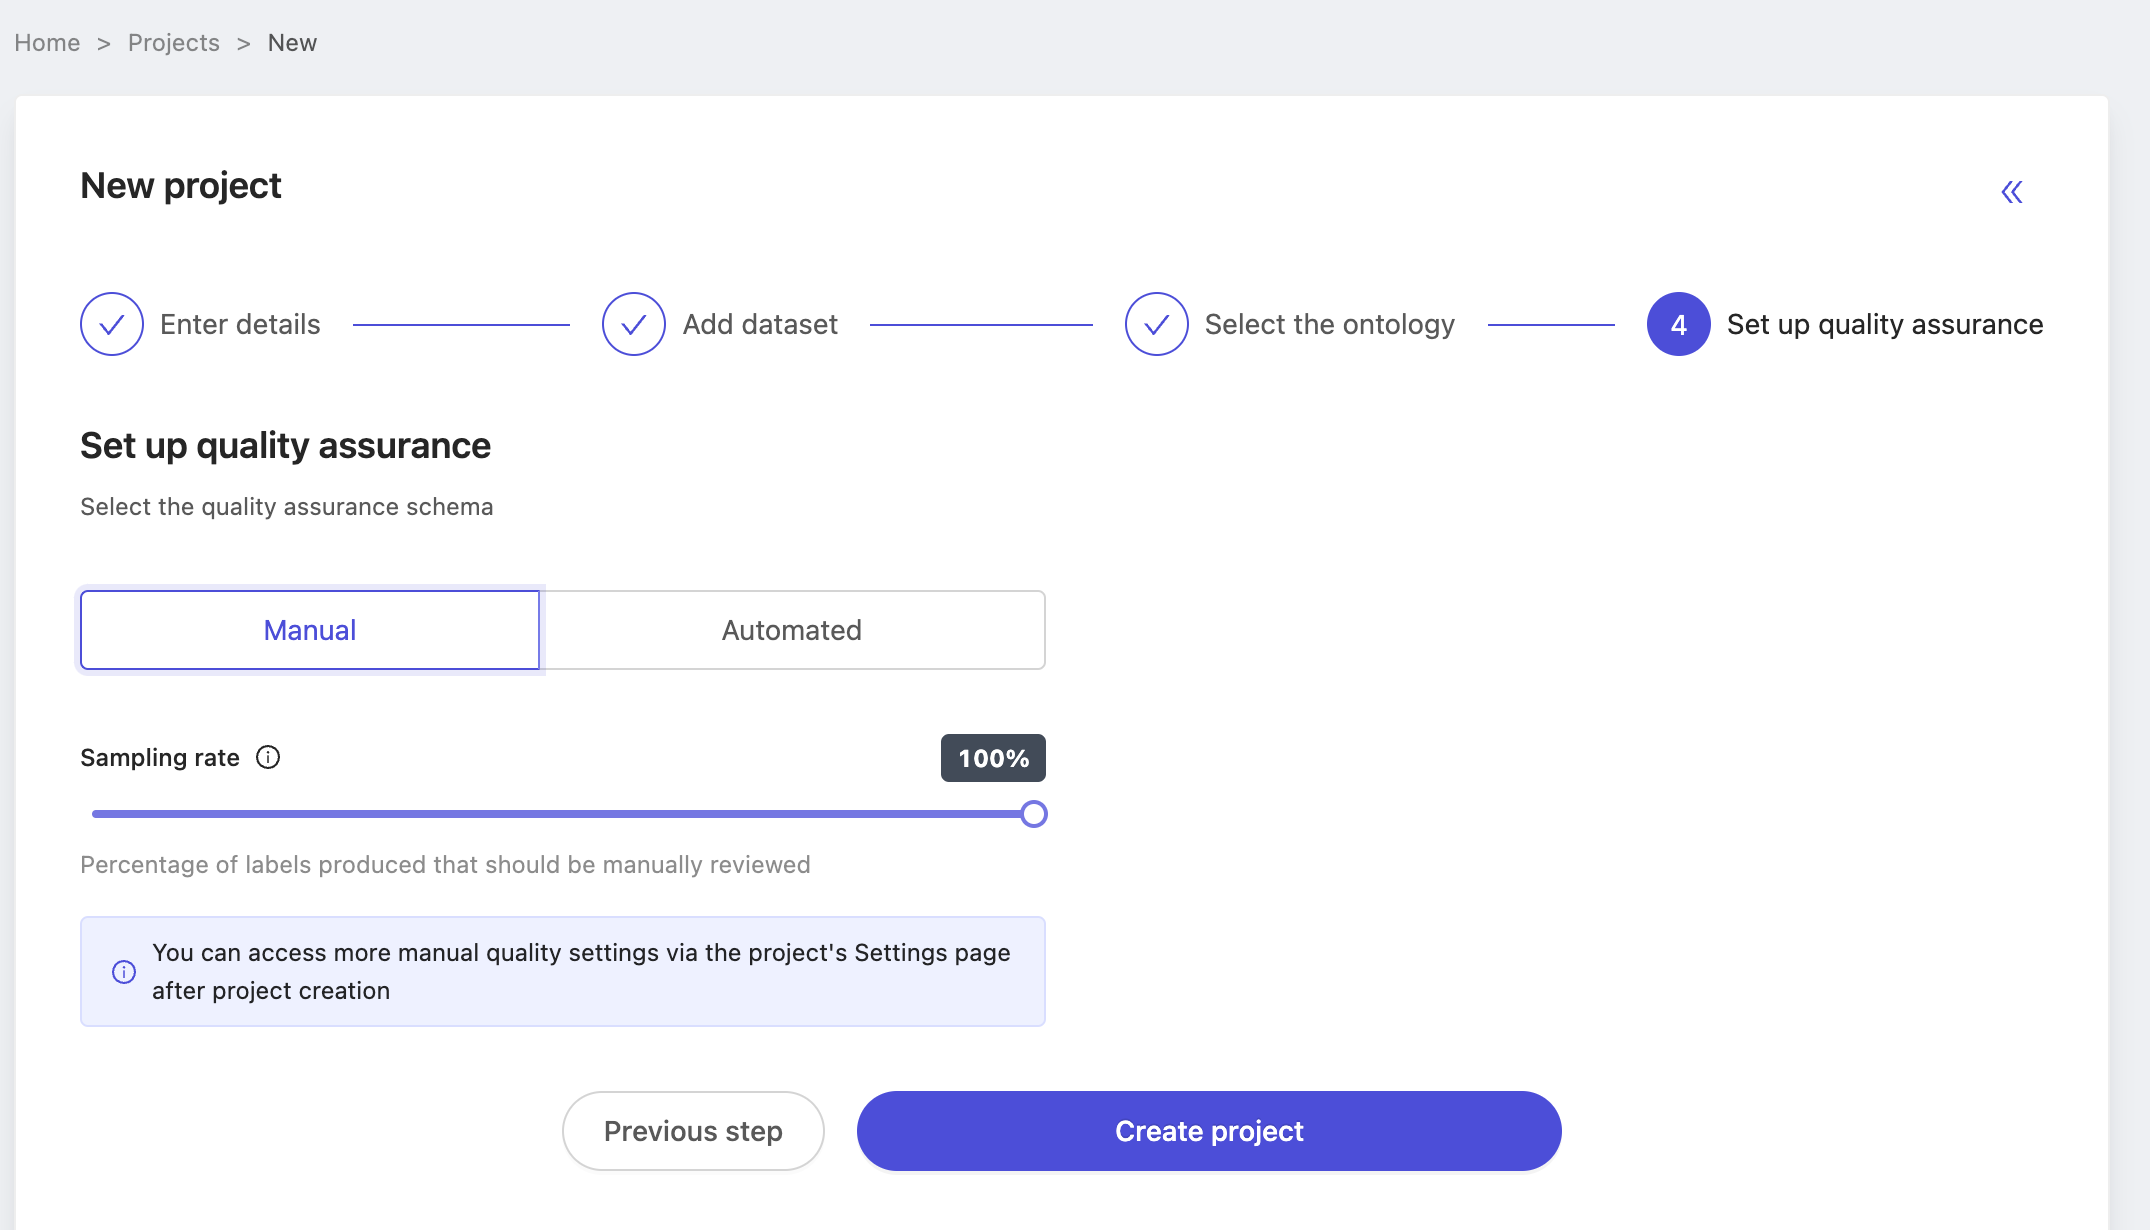
Finally, benchmark source projects are done using the manual QA method that Encord has supported up until now. Choose manual QA, configure the sampling rate and create your project! In this case we've left the sampling rate at 100%, but in practice the sampling rate does not matter for source projects. Labels must simply be in either the 'In review' and 'Completed' state to be used as a benchmark label. Therefore, choose the sampling rate that works for you. You can always adjust it later.
Create ground-truth labels
Projects which don't have any labels in the 'In Review' or 'Completed' state can't be used as source projects. In your real applications, you may determine ground-truth labels through a process of review and alteration labeling in the app, or use our SDK to upload labels from outside of Encord.
Ensure that at least several labels are either 'In Review' or 'Completed' as below, before moving on to benchmark QA project.
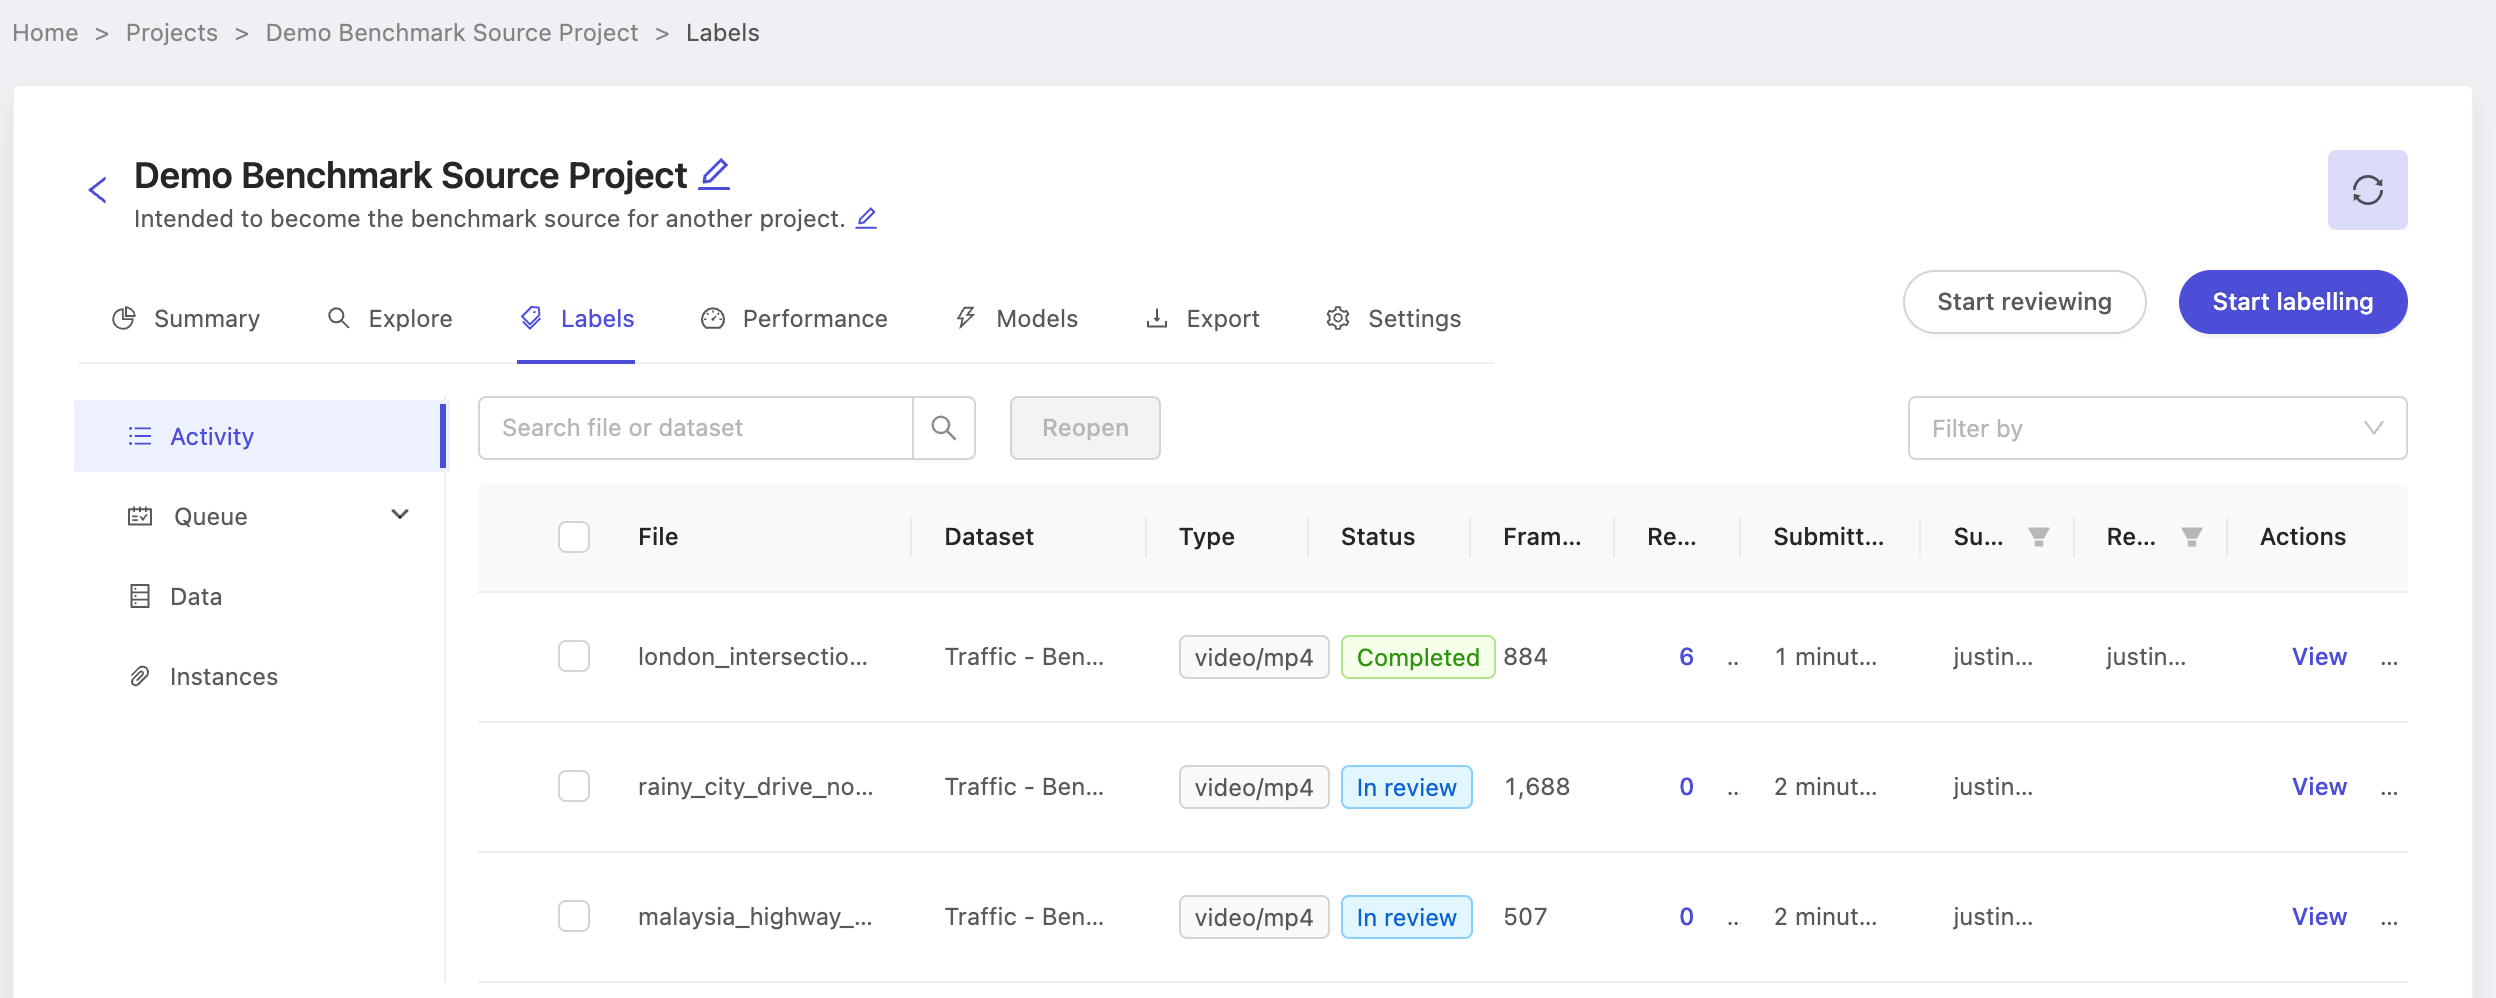
With the benchmark project created and ground-truth labels ready, it's time to create the benchmark QA project. Again, note the name of the project Demo Benchmark Source Project as we'll use it while configuring the benchmark QA project.
Benchmark QA project
Creating a benchmark QA process is much like creating a normal project, except for configuring the QA mechanism at the end of the creation process. Follow along below as we walk through creating a benchmark QA project.
Start by clicking the new project button from the projects list, and enter the title, description and any organisation tags you need as normal.
For the dataset, choose the dataset of the unlabeled production data you want annotators to label. In this case, our dataset is named Traffic - Demo Production Data. Take particular care to not select the source dataset! You may of course select more than one dataset if you wish.
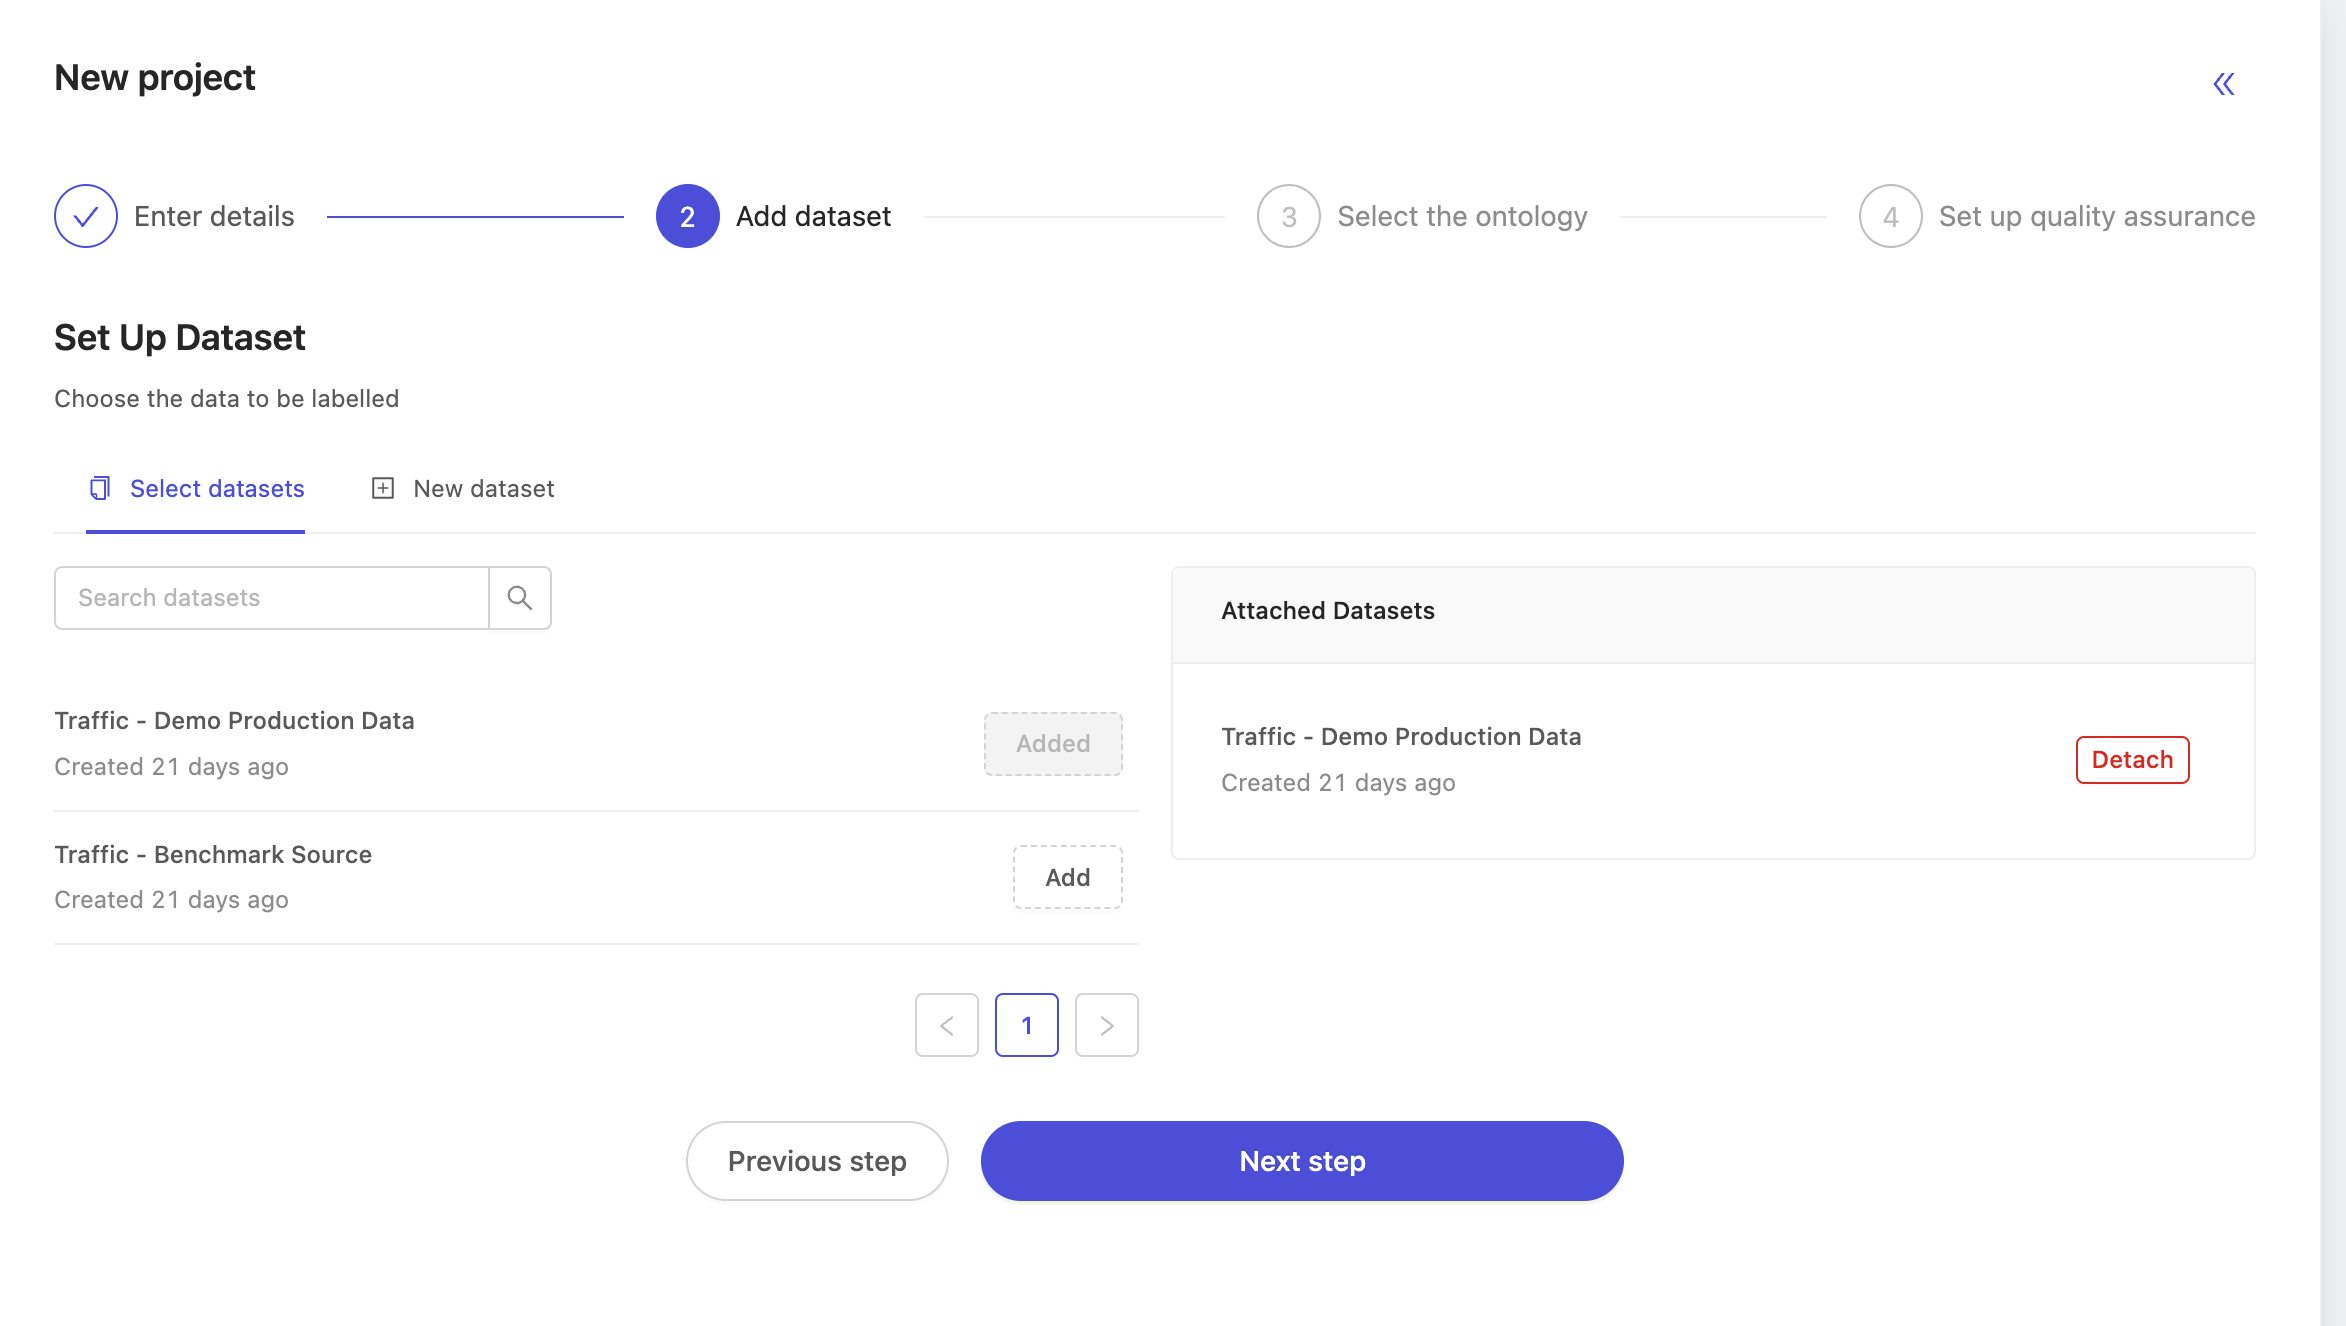
Next, select the ontology. At this stage you may select any ontology, but to have a working benchmark function, it's important to choose the same ontology that we set up earlier. In this case, we choose the ontology named Traffic Demo Ontology.

At the final "setup quality assurance" step, select "Automated" to make the project a benchmark QA project. The choice of QA methodology for a project is final at creation time. Projects created as benchmark QA projects can't be set to manual QA projects at a later time, and vice versa. By choosing to make a project a benchmark QA project, the list of possible source projects is automatically populated with projects meeting the following criteria:
- use the same ontology as was selected to create this benchmark QA project
- have at least one label with status 'In review' or 'completed'
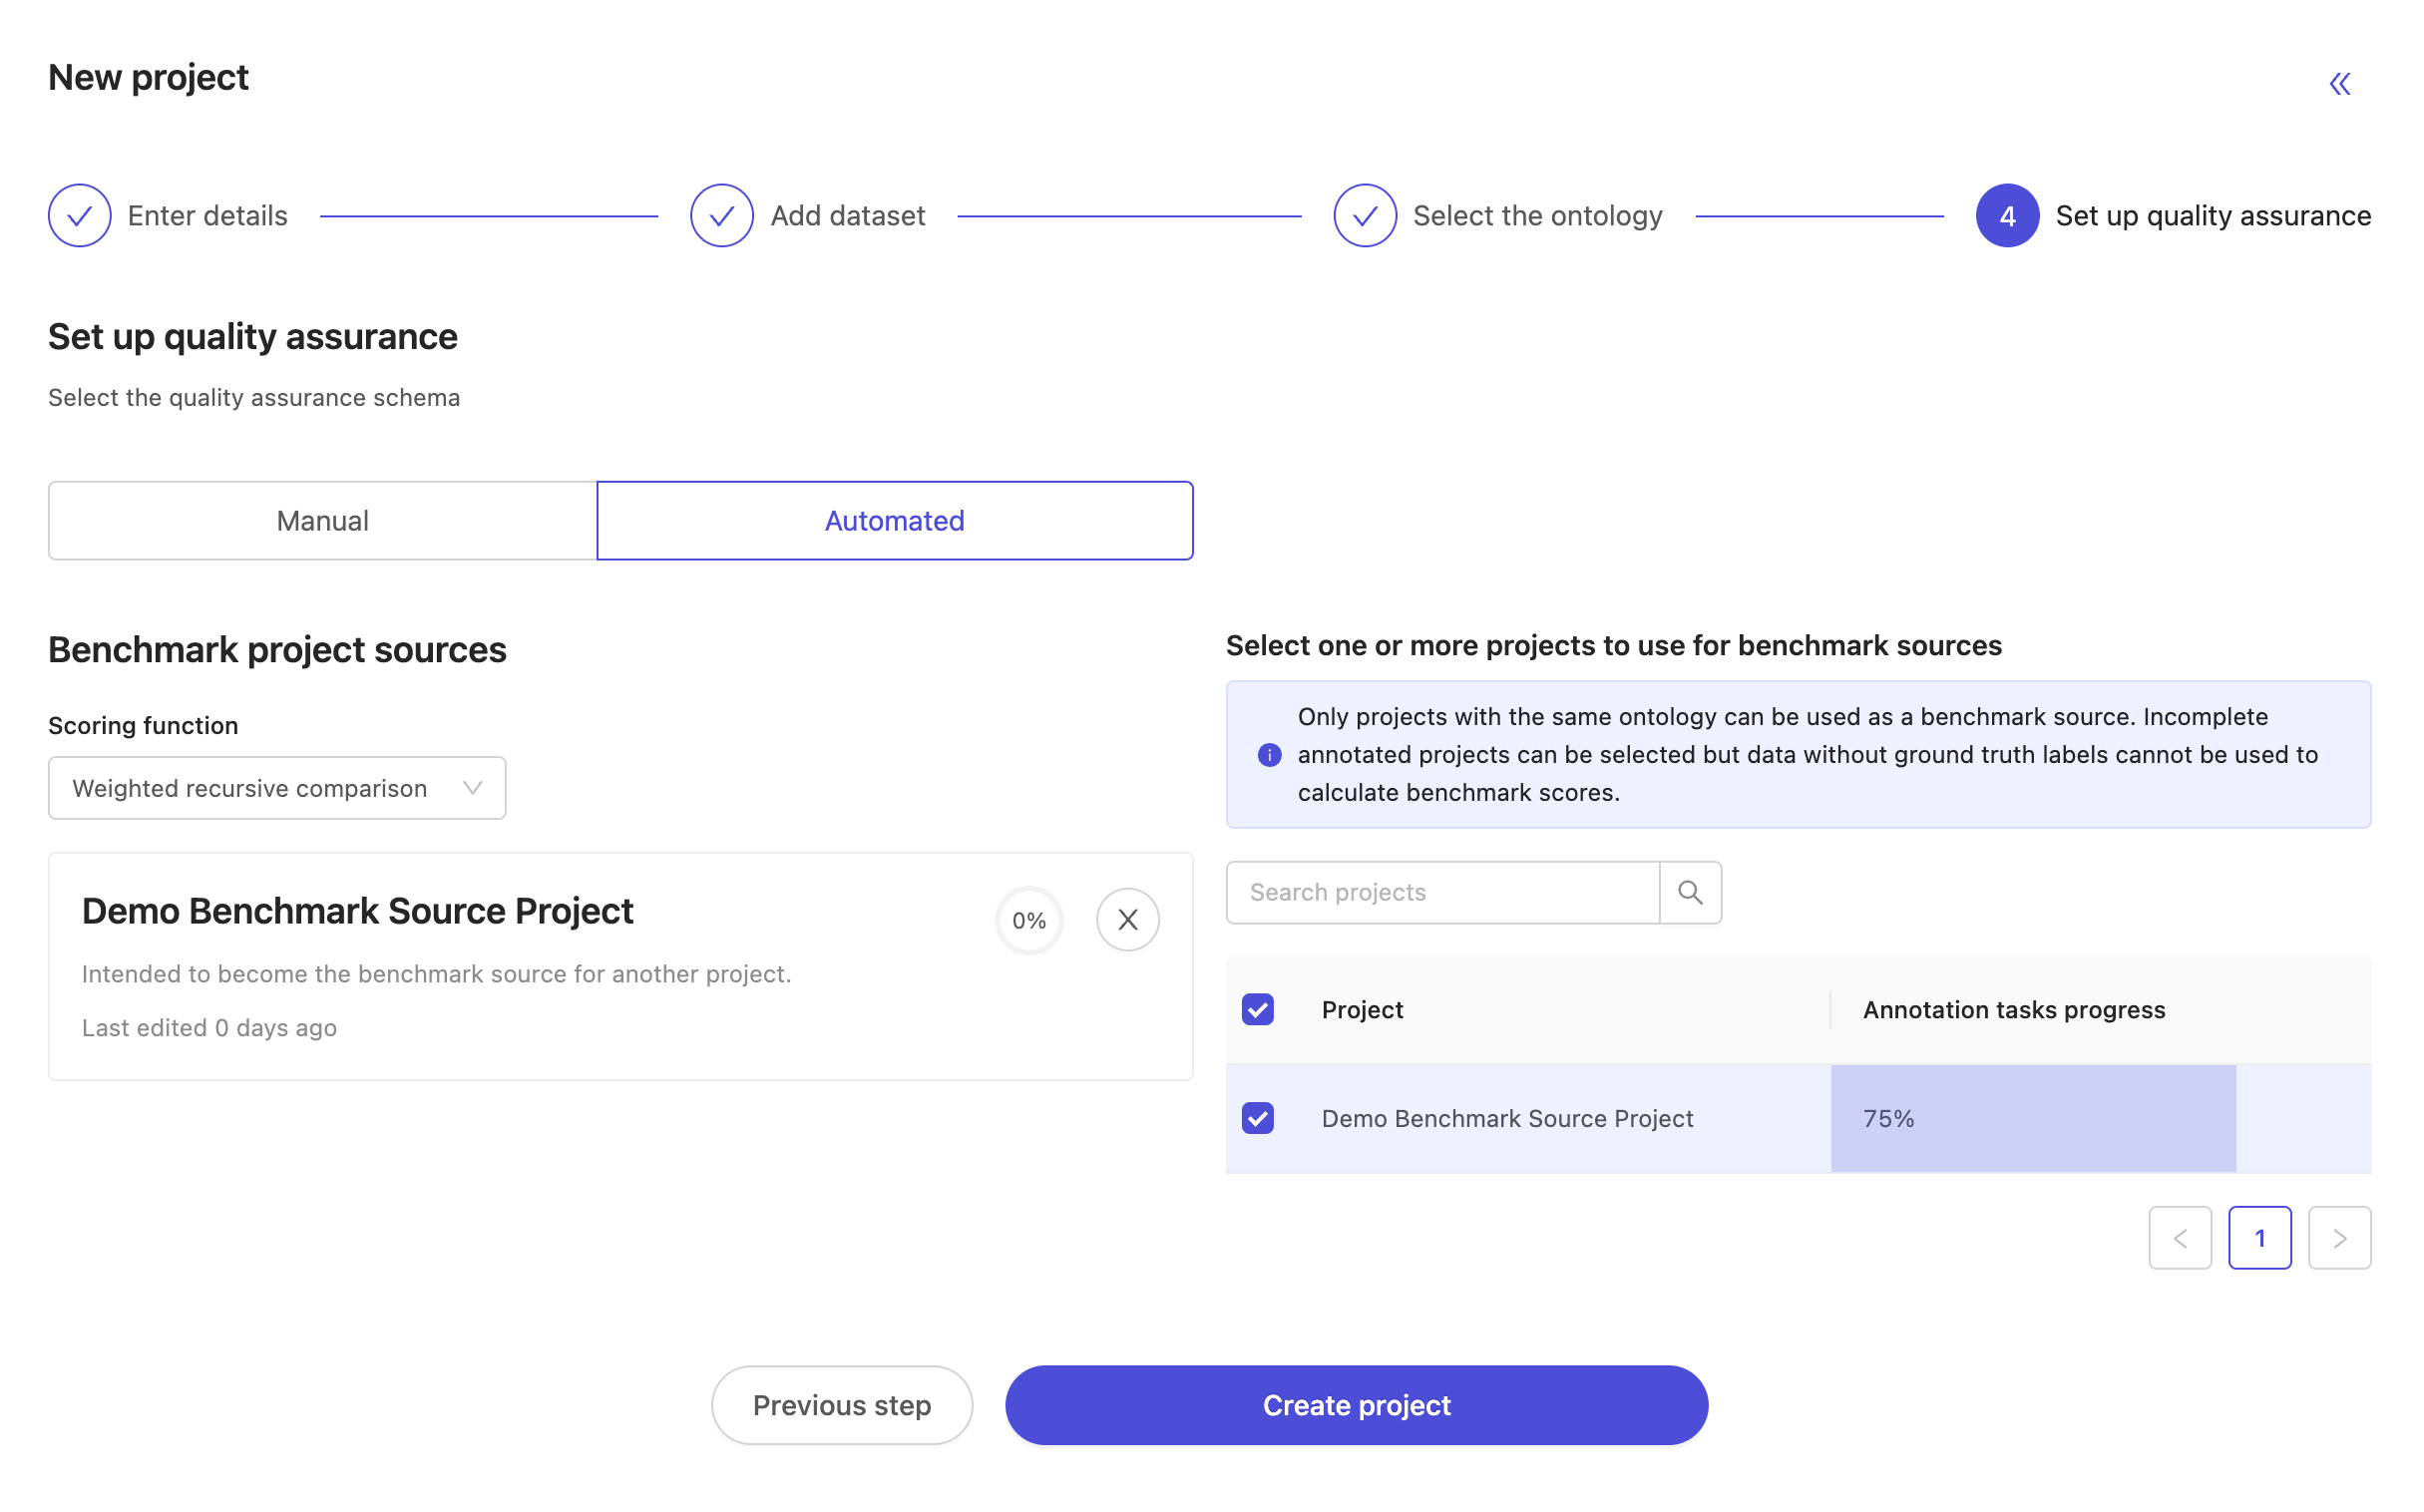
Finally, choose the benchmark scoring function. The current options for benchmark scoring functions are:
- First value of classification: a benchmark function for simple annotation tasks which only involve a single frame-level classification. For each annotation task, the annotators first created classification instance will be taken as their answer, and compared to the ground-truth labels.
- Weighted recursive comparison: a benchmark function for arbitrarily complex annotation tasks, useful when annotating many objects and classifications, as well as their nested attributes. By default, all ontology categories and attributes contribute equally to the benchmark score, but it will soon be possible to alter the weight of each attribute in the configuration screen.
Once you've selected your source project(s) and the scoring function, please 'Create project' to finish up! The new benchmark QA project is created and on your project's list.
Getting started using the benchmark QA project
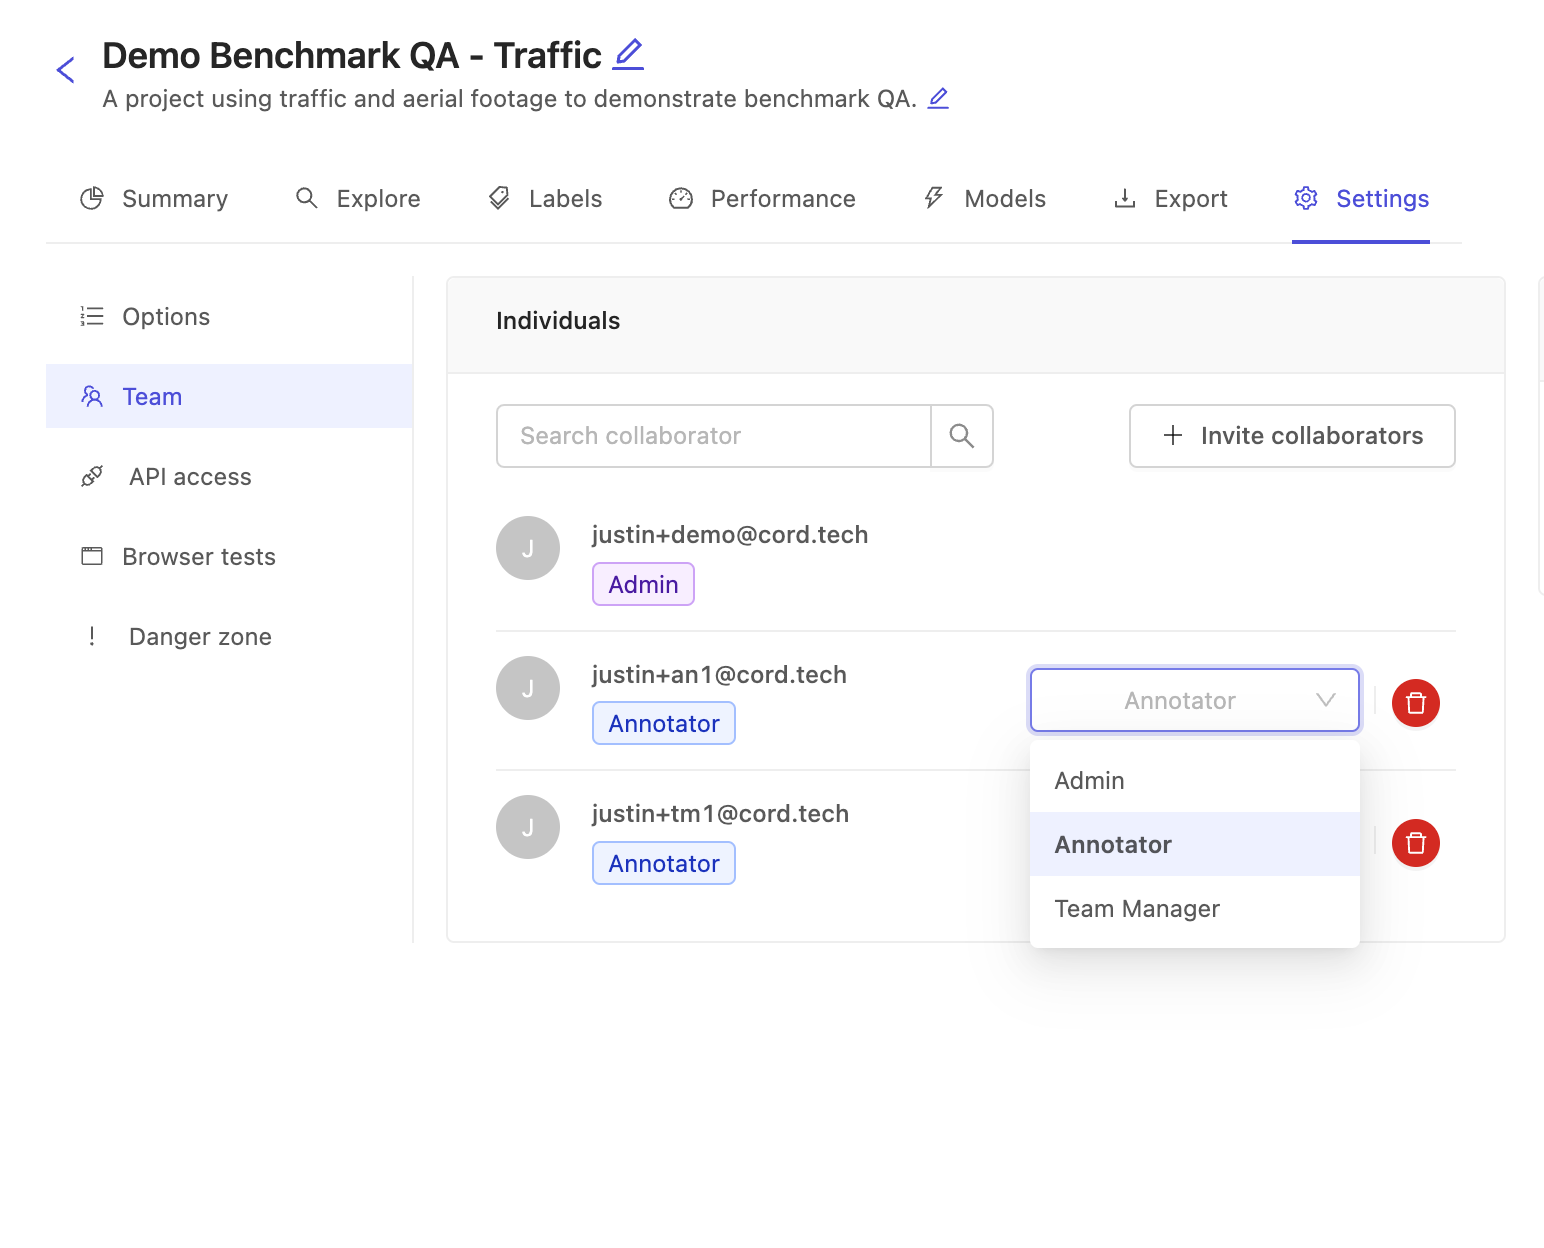
Before any data can be annotated, annotators must first be added to the project. Go the settings tab and add collaborators as your normally do. However, unlike in manual QA projects there is no 'Reviewer' or 'Annotator and Reviewer' role, as there is no manual review work to do!
For each annotator added to the project a copy of the benchmark data will be added to the project. This will result in the total number of tasks increasing. For example, a benchmark project with 8 units of production data tasks, 4 units of benchmark data tasks and 2 annotators will have 16 tasks overall.
As they annotate, they will be shown production data and benchmark data in an alternating fashion, and without notifying the annotator which type of task is which. They are presented at a ratio such that production and benchmark tasks will be finished being annotated at approximately the same time. In the above example with 8 production data units and 4 benchmark data units, annotators are expected to see benchmark data roughly every two production annotation tasks. Keep in mind this ratio may change for individual annotators as they proceed faster or slower through the labeling tasks.